
Table of contents
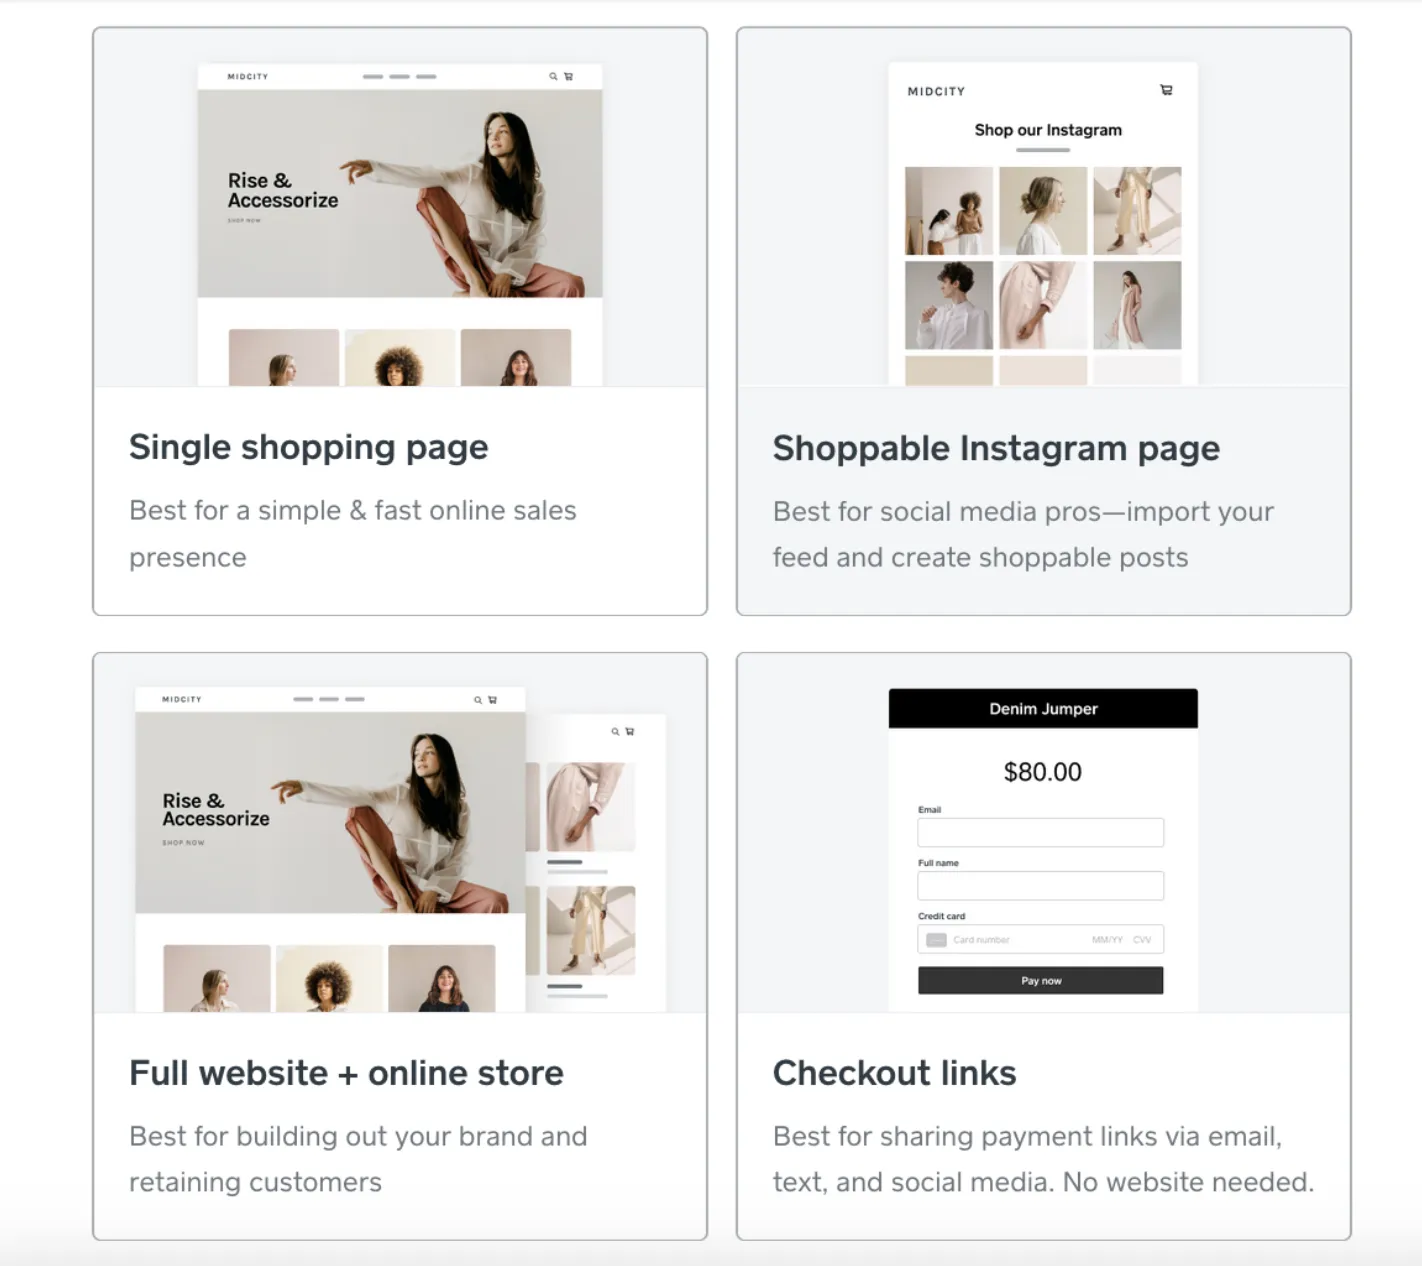
Whether you’re already using Square to manage your business or are just getting started, Square makes it easy to reach more customers and increase sales with a free eCommerce website.
Setting up an eCommerce store using your Square account allows you to keep your online and in-person orders, items, and inventory in sync. You also save time and work more efficiently by continuing to have all the tools you need to run and grow your online business in one place.

We’ll walk you through creating your digital storefront so you can easily showcase your business and start selling online fast.
- Choose a page type
- Choose features
- Add your logo
- Add your style
- Edit your header
- Edit your main banner
- Add a featured products section
- Add pages and navigation
- Build your item library
- Add item details
- Organize your items
- Set up checkout
- Set up shipping
- Set up pickup
- Set up delivery
- Set up taxes
- Preview your website
- Set up your domain
- Publish your online store
Customize your design: Choose page type, features, and style
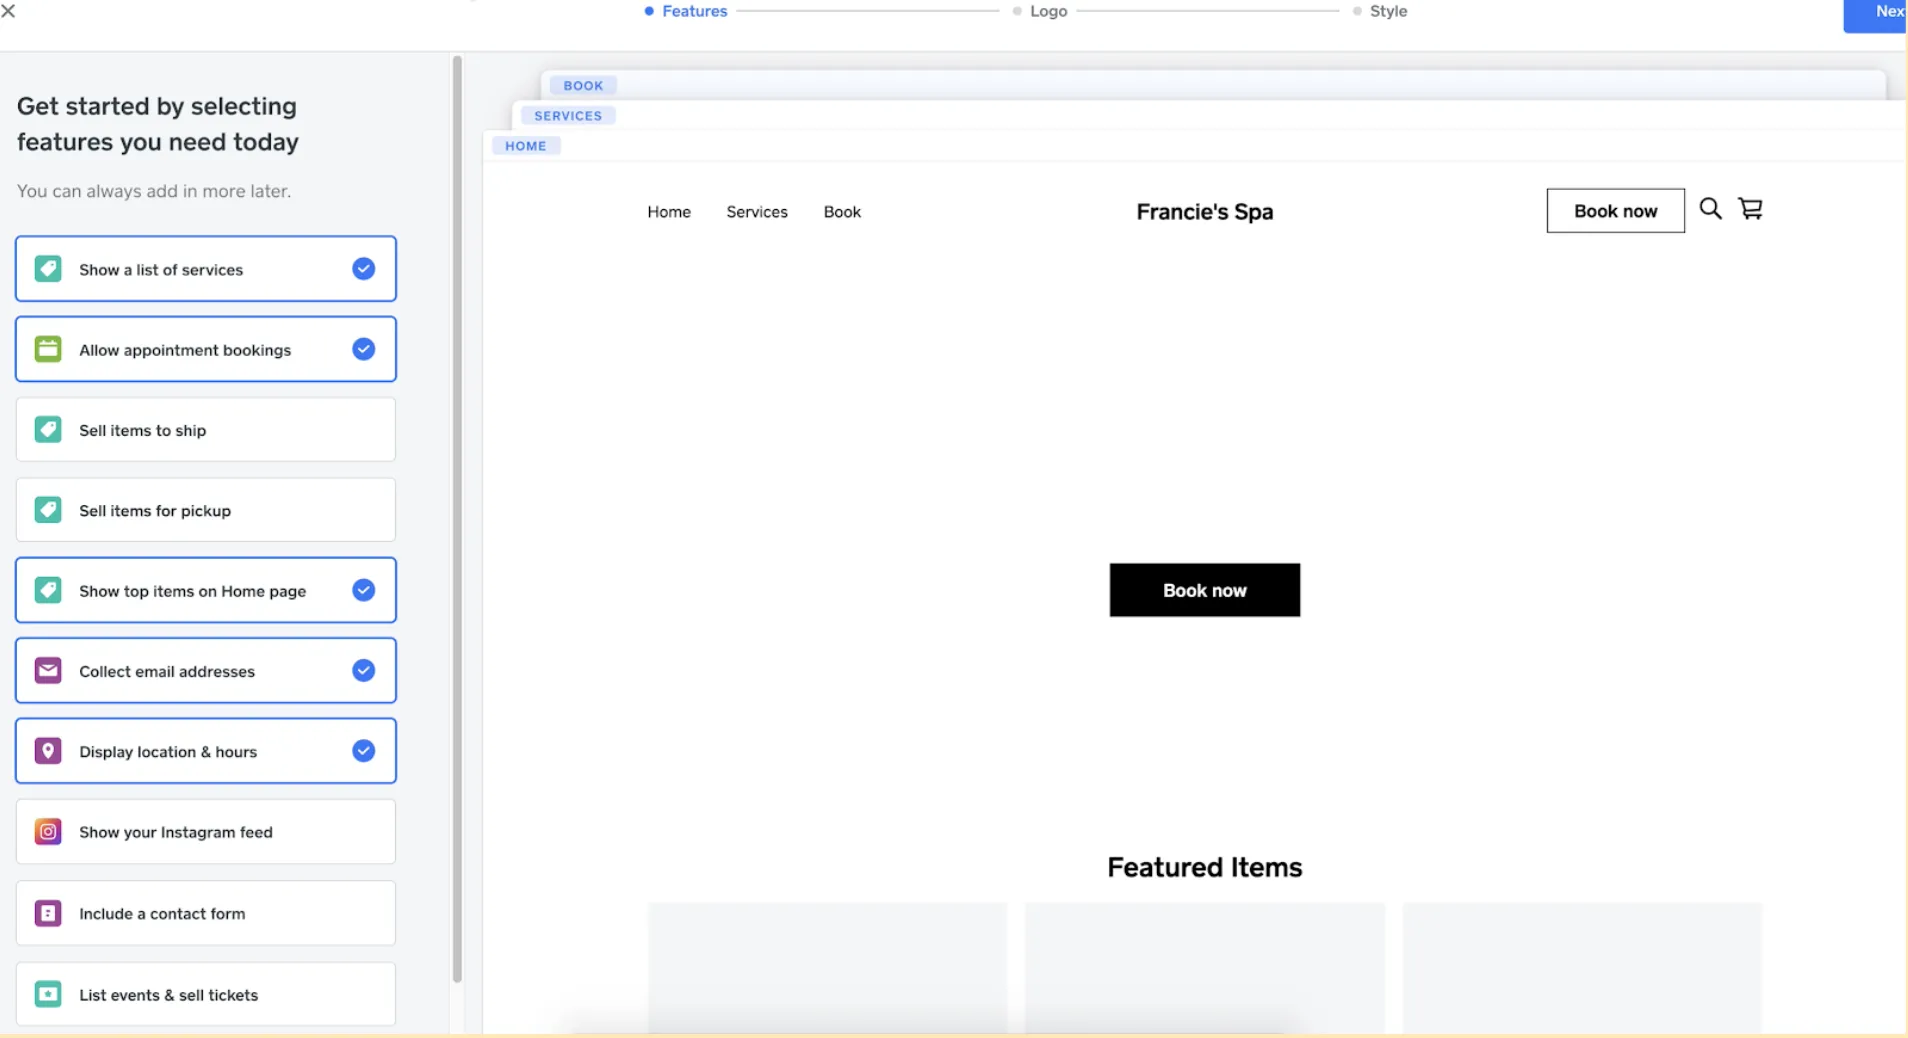
1. Choose your page type
When you first get started with Square, you’ll be prompted to select the page type that best suits your needs based on the information you’ve shared about your business.
These page types are modular and flexible. You can easily add or remove sections to fit your content needs or change the section’s layout to ensure all elements on a page look great together. Select the page type that best suits your needs, but don’t worry, no matter which you choose, you can always modify it later.
2. Choose features
Select the website features your business needs in an ecommerce website, from reservations, event tickets, a live Instagram feed, and much more. You can always add or remove features later.
3. Add your logo
Upload an image of your logo to represent your brand across your website. Use a PNG, GIF, or JPG that’s smaller than 10 MB and has a minimum width of 600 pixels. If you don’t currently have an image file of your logo on hand, you may skip this step and can always add it later.
4. Add your style
Select a font style and color palette for use across your website.
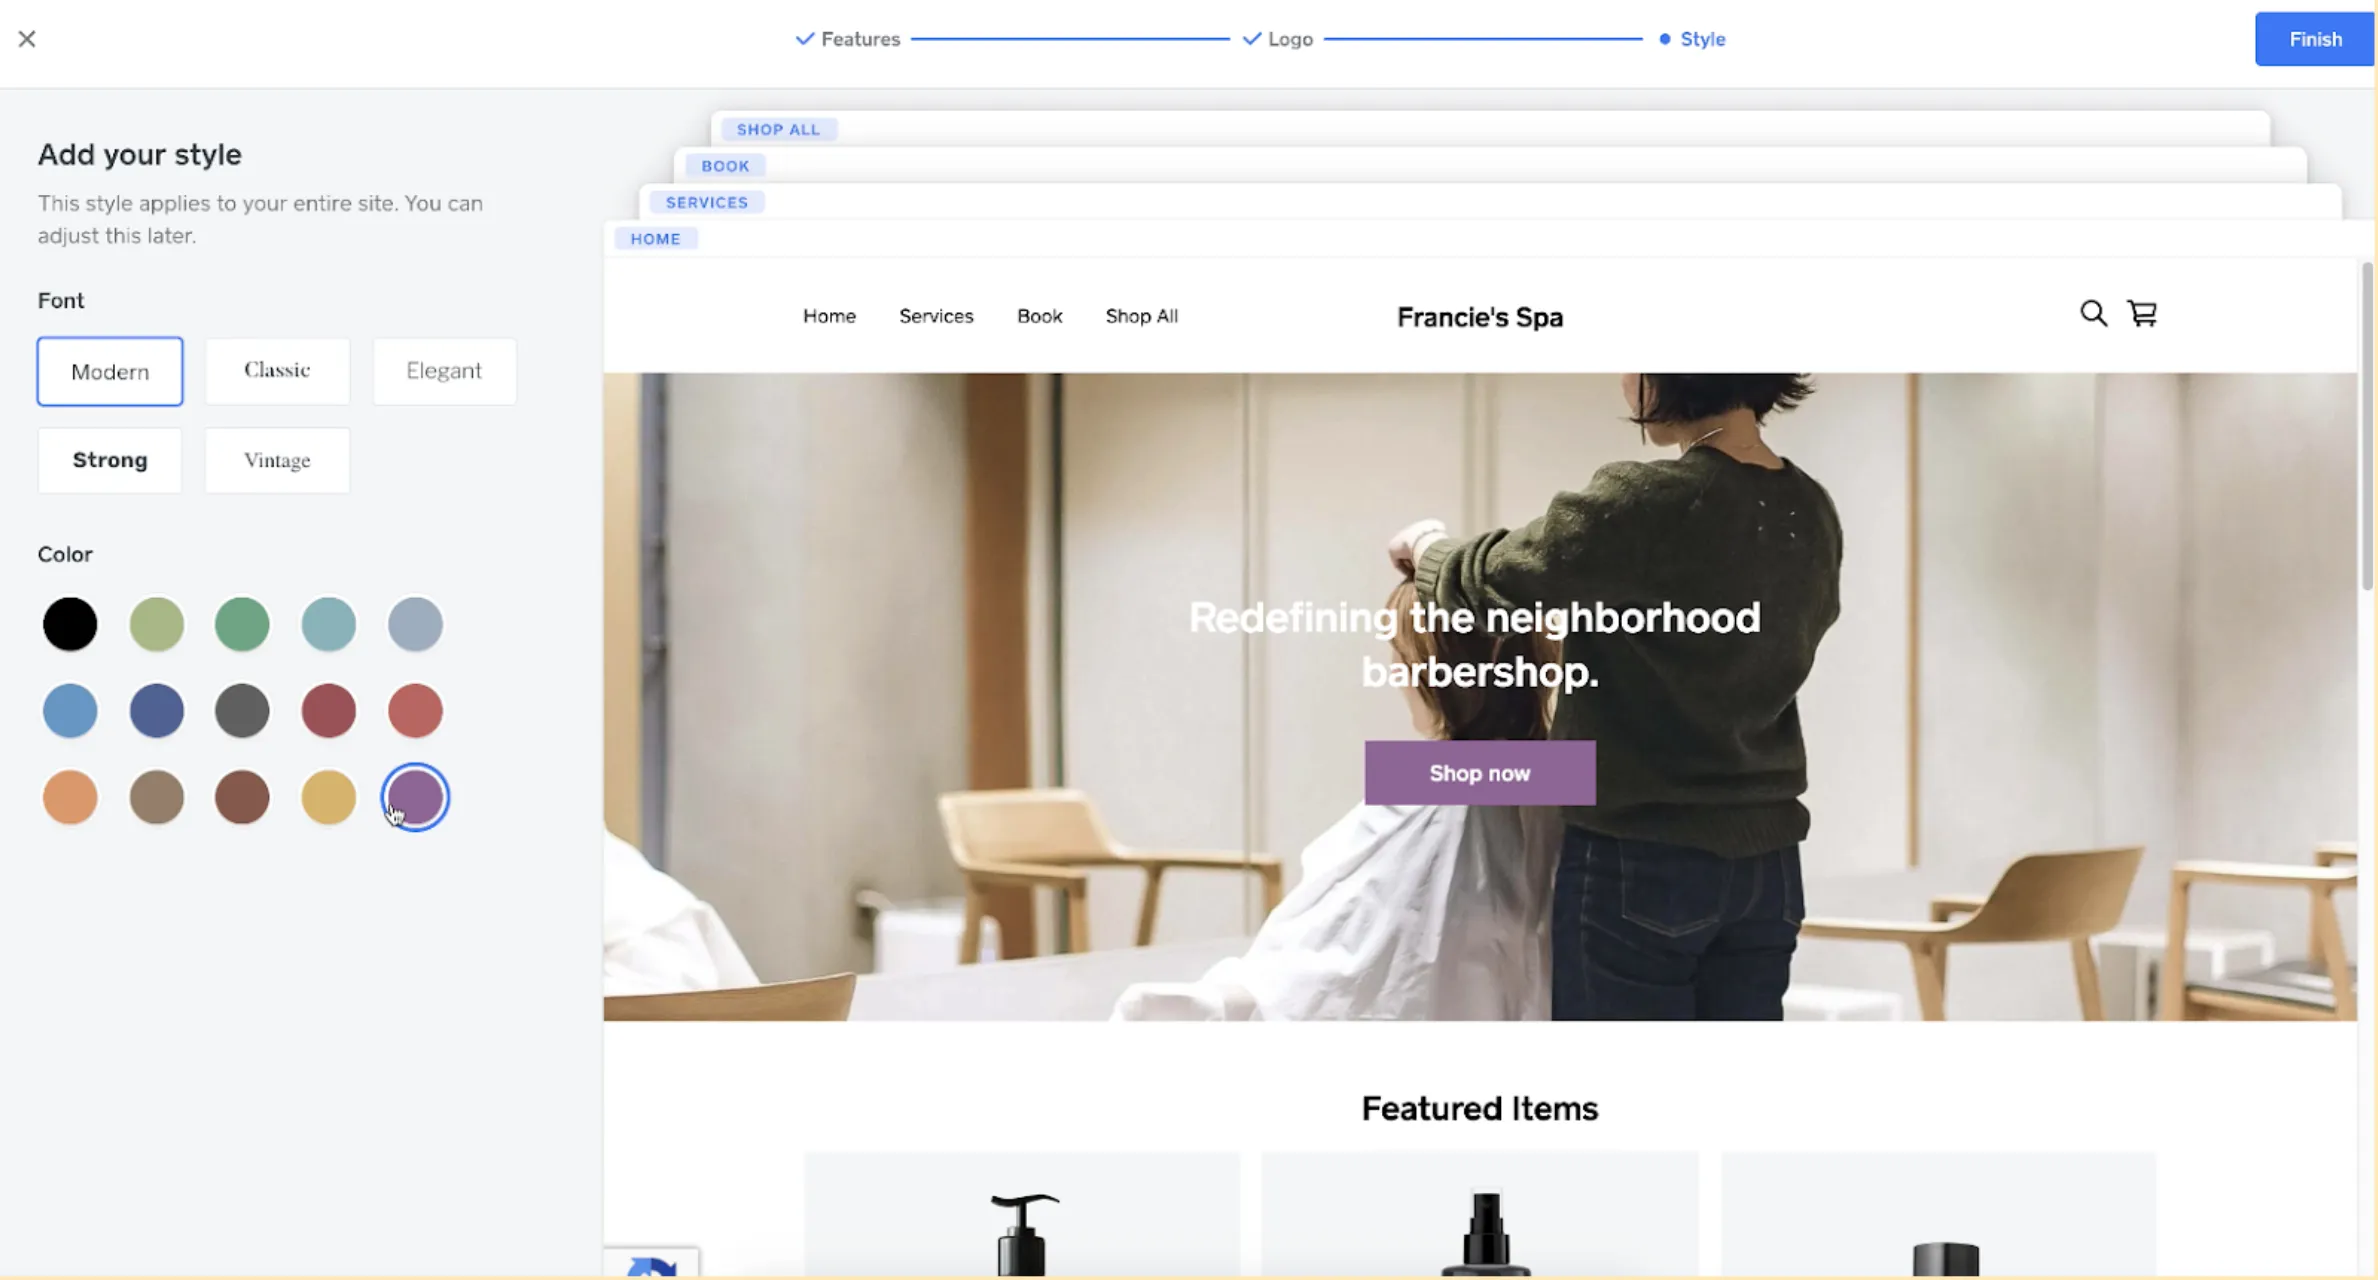
You can revisit any of these options at any time in the Site Design section of the site builder, where you can customize colors to match your brand and even upload your own fonts (paid plan required).
Pro tip: The font you choose can set the tone for your brand online. Sans serif fonts are among the most widely used because of their modern, crisp style, while serif fonts are considered more formal.
Configure your homepage: Edit page sections, images, and text
5. Edit your header
The header houses a few key elements for your eCommerce website:
- Logo
- Navigation
- Cart and search icons
Adding/editing your logo: Add an image if you have a word mark or logo file on hand. Use the logo size slider to adjust as needed. An alternative to using an image is to add your business name as text.
Adding/editing navigation menu items: Edit the navigation menu items that appear in the header and link to pages on your website. Many eCommerce websites include Shop All, About, or Contact pages, but you can also keep things simple with a one-page shop. No matter how many pages you have, use clear and succinct page names to make it easy for customers to find what they’re looking for.
Using cart and search icons: In addition to changing the color, if you aren’t ready to sell yet, you can hide the cart icon altogether. And for businesses with a lot of products, you might consider allowing customers to search your website from the header by adding a search icon.
Pro tip: You can change the header layout to align your logo and navigation menu links left, center, or right. You can also change the header background color, selecting from your color palette. Adjust these settings to maximize the readability of your logo and navigation.
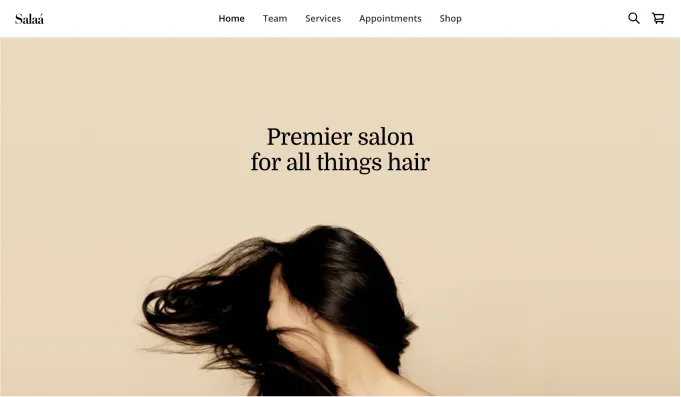
6. Edit your main banner
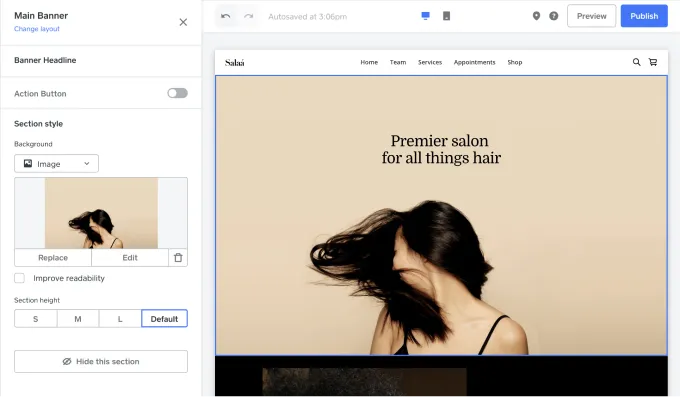
The main banner section sits just below the header on your website and can include images, text, and an action button. Use this section to make a statement about your business or invite customers to browse your products.
Once you’ve decided how you want to use your main banner section, edit each element to suit your needs:
- Layout
- Background
- Headline
- Action button
Pro tip: You can toggle the action button on and off. You can also completely hide the main banner section if you don’t need it.
Choosing a main banner layout: There are several layout styles, some which feature a full-width background and some that also include a separate image. If you don’t have an eye-catching image on hand, don’t worry — you can search for and use free, professional stock photography powered by Unsplash.
Pro tip: You can change the main banner height to make this section more or less prominent (choose from small, medium, and large). If your image is detailed, turn on the option to improve readability with a filter that makes overlaid text more legible.
Editing the banner headline: To edit the headline, click and type directly. Your headline should be descriptive and tell customers what you do or describe what you sell. Depending on the type of business you have, consider using your value proposition, highlighting your location, or being very clear about your product or service. For example:
- The best burgers and craft brews in Toronto
- 100% organic hand-crafted soaps and candles
- High-quality wedding photography to capture your special day
- Dog-grooming services: Pets pampered from their heads to their paws

Editing the action button: As with the headline (and all other section text), you can click and type directly in the action button to edit the text. Make this a strong, concise instruction that provokes an immediate response, such as:
- Shop All
- Order Now
- Book Appointment
- Learn More
Pro tip: You can easily see what your design looks like on a mobile device with the mobile preview (the default is desktop). To make it easier for customers to interact with the action button on mobile devices, enable the option for this to appear full width on mobile.
7. Add a featured items section
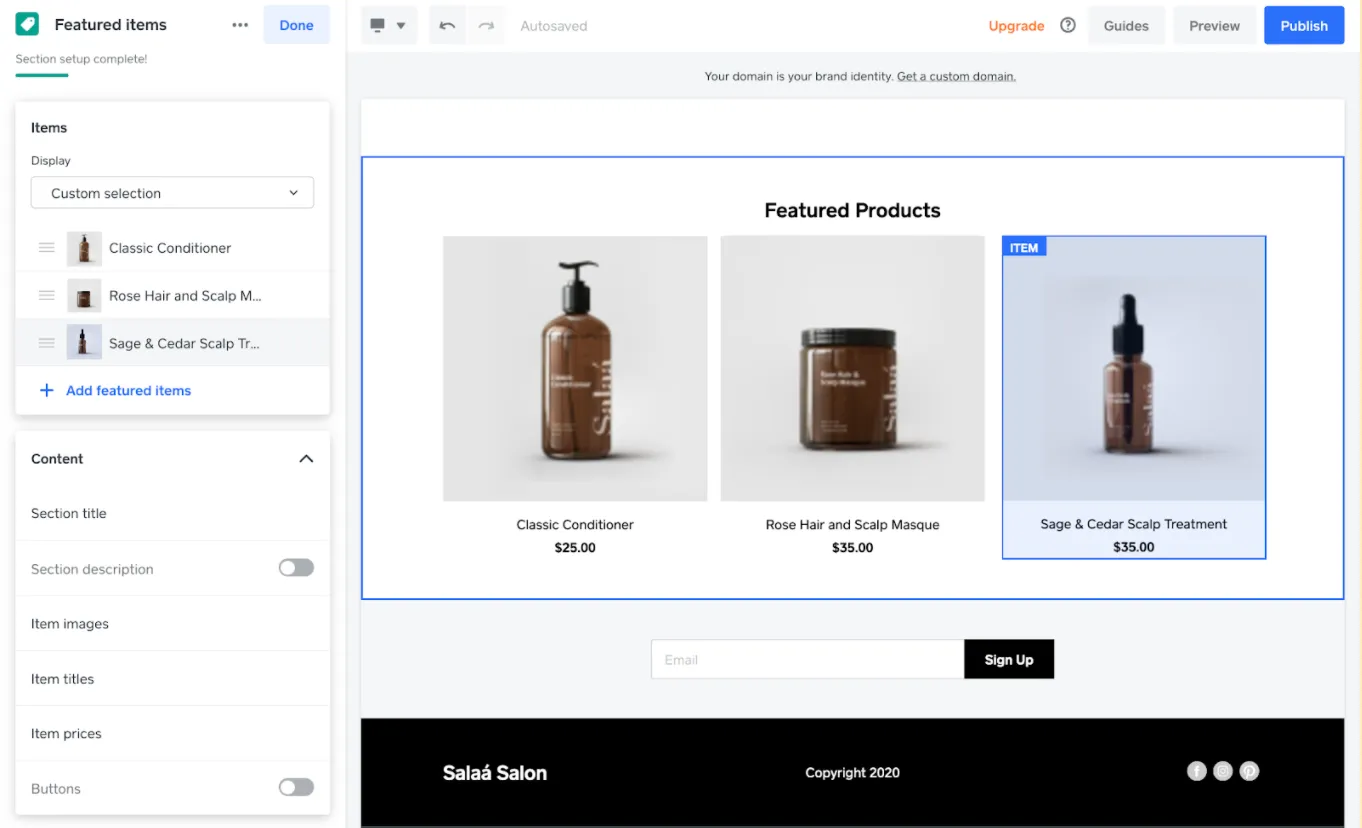
Displaying featured items on your home page is a great way to get customers to start shopping right away. You can also use this section to highlight a sale or showcase a new or special release. Item images can have hover effects, and you can edit the style for titles, pricing, and action buttons.
Pro tip: You can change the layout to highlight a single item, or showcase multiple items in either a multicolumn gallery or scrollable carousel.
If you don’t see a Featured Items section already displayed on your page, select the + Add button to the right of the page dropdown on the upper left of the site editor menu, and choose Section. There are a ton of section options for you to explore and further customize your site, but for now let’s focus on Featured Items.
If there’s already a Featured Items section on your page, click on it to adjust its settings. On the left you’ll see layout options, sliders for choosing which details to display with each item, and a button to pick the items you’d like to feature.
Choose and arrange the items you want to feature, dragging them up and down within the menu on the left to sort them. If you haven’t yet created your item catalog, the section will populate with generic items. For now you can get a sense of the layout options and determine what you’d like to display, and we’ll get to building out your item catalog a little later.
8. Add pages and navigation
You can further build out your site by adding more pages, such as an About page to tell your story, a Contact Us page, an image gallery or Instagram feed page, or whatever you desire to express your brand identity. Select the + Add button to the right of the site page navigation drop-down menu (where you can navigate between pages to edit them), and choose Page.
Start with a blank slate or choose from the list of templates, all of which are fully customizable. You’ll be given an option to add the new page to your site navigation located in the header section.
Edit sections on your new page by either clicking on the section name in the left-hand menu or by clicking directly on the section in the page preview on the right. The left-hand side will change to display all the available customization options for that section.
Select + Add Section at the bottom to choose from an extensive selection of additional sections you can add to any page.
Add, describe, and organize your items
9. Build your item library
If your existing item library synced over from Square when you got started with Square, you may skip to Step 11: Organize your items.
If you haven’t yet created items for your store, let’s take a look at how to do it from within the site editor. You can also create items from Items > Item Library on the main Online dashboard.
Click + Add in the upper left of the site editor, next to the page dropdown, and choose Item. A window will appear with basic item details to fill out. Select More options at the bottom to access the full item details.
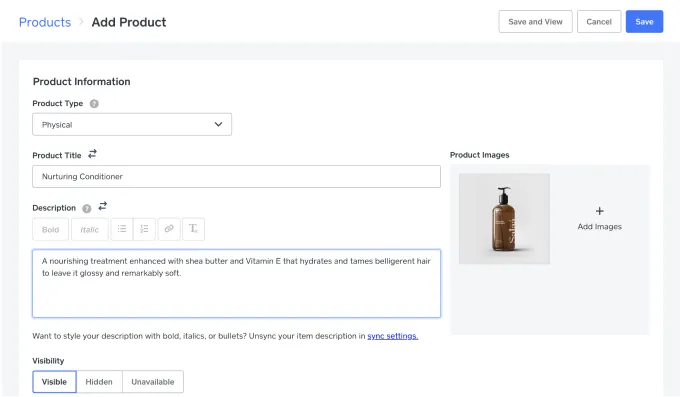
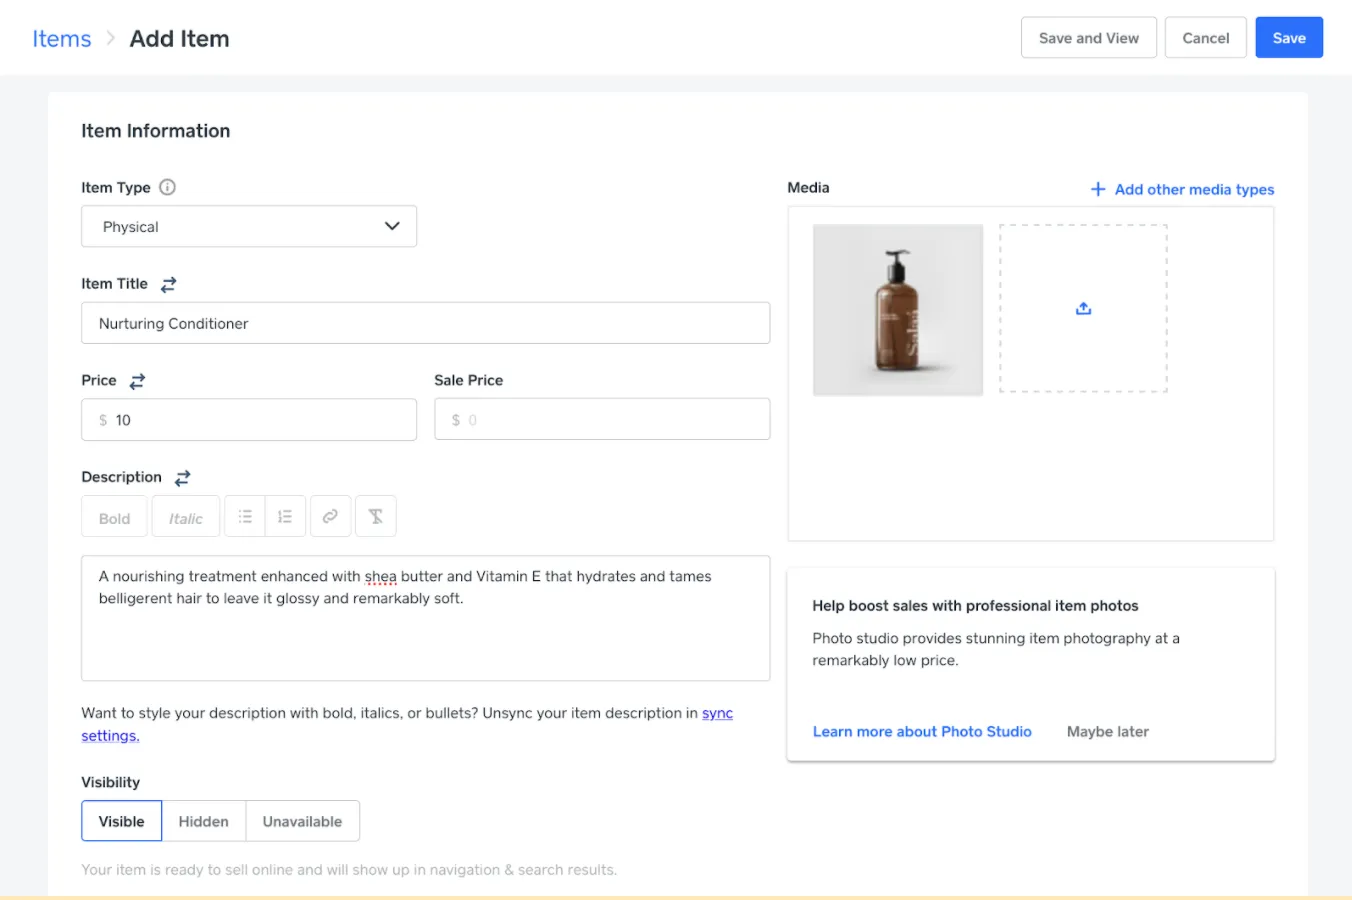
10. Add item details
Your website’s most valuable traffic is on item pages that convert online shoppers. People who are viewing your items are thinking about buying from you, and things like not having an item image, not descriptively labeling items, or not clearly describing item details such as size/dimensions/color/care are likely to deter potential customers from making a purchase.

Editing item titles: Names for items in your Square inventory might not work as well for selling them online. In other words, they may need to be more descriptive and customer-friendly. Keep in mind how people might search for your item, while balancing the length with specificity and clarity. For example:
Okay: BBQ Sauce
Better: Whiskey BBQ Sauce
Great: 18 oz. Tennessee Whiskey BBQ Sauce
Editing item prices: Set prices directly by editing the item details. You can also set a price by item option or variant, as well as set a sale price at any time by editing the item details — shoppers will see a sale badge and the markdown price.
Editing item descriptions: Your item descriptions should pique a shopper’s interest and share details that a photo can’t convey. A few eCommerce best practices:
- Highlight item features with accurate adjectives
- Don’t overlook the benefits
- Use sensory adjectives to help the customer experience
Pro tip: If you have special instructions, or guidance on things like sizing/fit, batteries, cleaning/care, etc., include that in the item description to give shoppers confidence in their purchase.
Uploading item images: Clear item photos help establish trust with potential buyers — blurry, discolored, or tiny images make shoppers feel uneasy about making a purchase, especially with shops they’ve never bought from before. Upload multiple images to automatically populate an item’s image gallery, and choose to display thumbnails on the left, bottom, or right.
Pro tip: Now that you’re selling online, you might need help putting your items in their best light (literally) to give shoppers a clear view of what they’re buying. Professional item photos from Square Photo Studio are cost effective and showcase your items the right way.
Adding item options: Add selectable item options if you have variants (color, size, weight, etc.) for shoppers to choose from. These are tied to your inventory levels.
Adding item modifiers: If you sell items that are customizable or offer additional choices, item modifiers allow customers to select choices from a list. Once created, modifiers can be applied to any item.
Pro tip: You can use item variations together with modifiers to create items with a range of options for customers to choose from.
Once you’ve built out your item library, select Website > Edit Site from the left-hand menu to head back into the editor.
11. Organize your items
Depending on which Page Type you chose during initial setup, your item catalog will be automatically arranged in either a Shop All page or an Order Online page. Shop All is a retail-oriented storefront layout, where you can click through to individual item detail pages. Order Online is a menu-style layout, with item detail pop-ups for quickly selecting items for an order without leaving the main menu page.
Navigate to your Shop All or Order Online page from the page drop-down menu. You can easily switch between either layout by clicking the 3 dots next to the page in the dropdown and choosing “Switch template”. Click the Item list page section to customize its layout.
How you further organize your items depends on how many items you have, as well as the types and variations. As you get up and running, keep your site structure streamlined with some basic organizational tools:
- Item categories
- Category pages
- Item pages
Pro tip: You can find these and all your other pages by opening the page list; every item and category you add to your store has its own page that’s automatically generated.
Using item categories: If you have a large number of items, clearly-labeled categories are a crucial component for a smooth buying experience — shoppers can quickly click into items they’re looking for.
If you have more than one item category, they’re automatically displayed as a linked list on your Shop All page, and clicking them will take your site visitors to the corresponding category page. When using the Order Online layout, categories are treated more like menu categories and will each have its own section right on the page. There’s not an option to create separate category pages when using the Order Online layout, as they’re all embedded in a single page.
Editing category pages: Click into the item list of a category to edit. Style changes, such as colors and fonts, are applied to all your category pages to ensure a consistent user experience. From here, you can style the page as well as adjust how much item information is displayed (images, titles, prices, etc.), and how many items show at a time.
Editing item pages: Click into the item details of an item to edit. As with category pages, style changes on item pages are applied to all of them. From here, you can style the title, price, buy button, description, and more to customize the look of your item pages.
Pro tip: Follow SEO best practices for eCommerce websites by optimizing your category and item pages. Add titles and descriptions that include relevant item category and item keywords by editing your category and item details.
Store settings: Set up checkout, shipping, pickup, delivery, and taxes
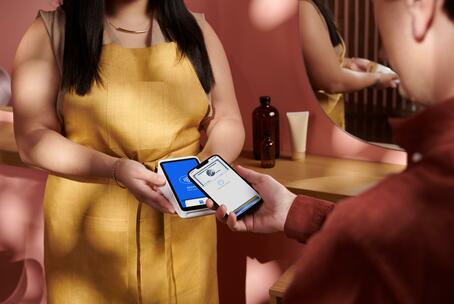
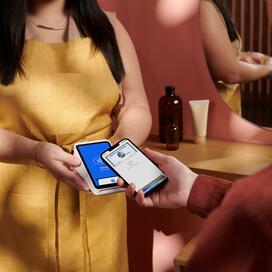
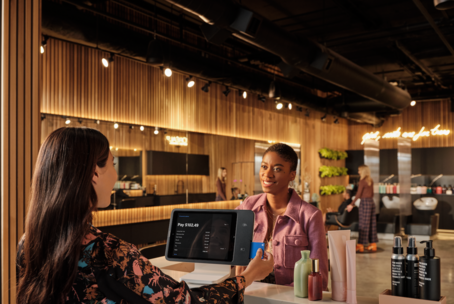
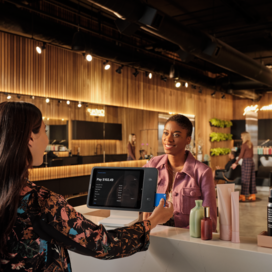
12. Set up checkout
Your online store is automatically set up to accept online payments through Square, including methods such as credit cards and Apple Pay. With our free plan, you only pay 2.9% + 30¢ per transaction.
Pro tip: Using advanced settings for checkout, you can choose options to collect additional information from customers to help with other aspects of the buyer experience, including a phone number, note to seller, or address for item types that aren’t physical goods.
13. Set up shipping
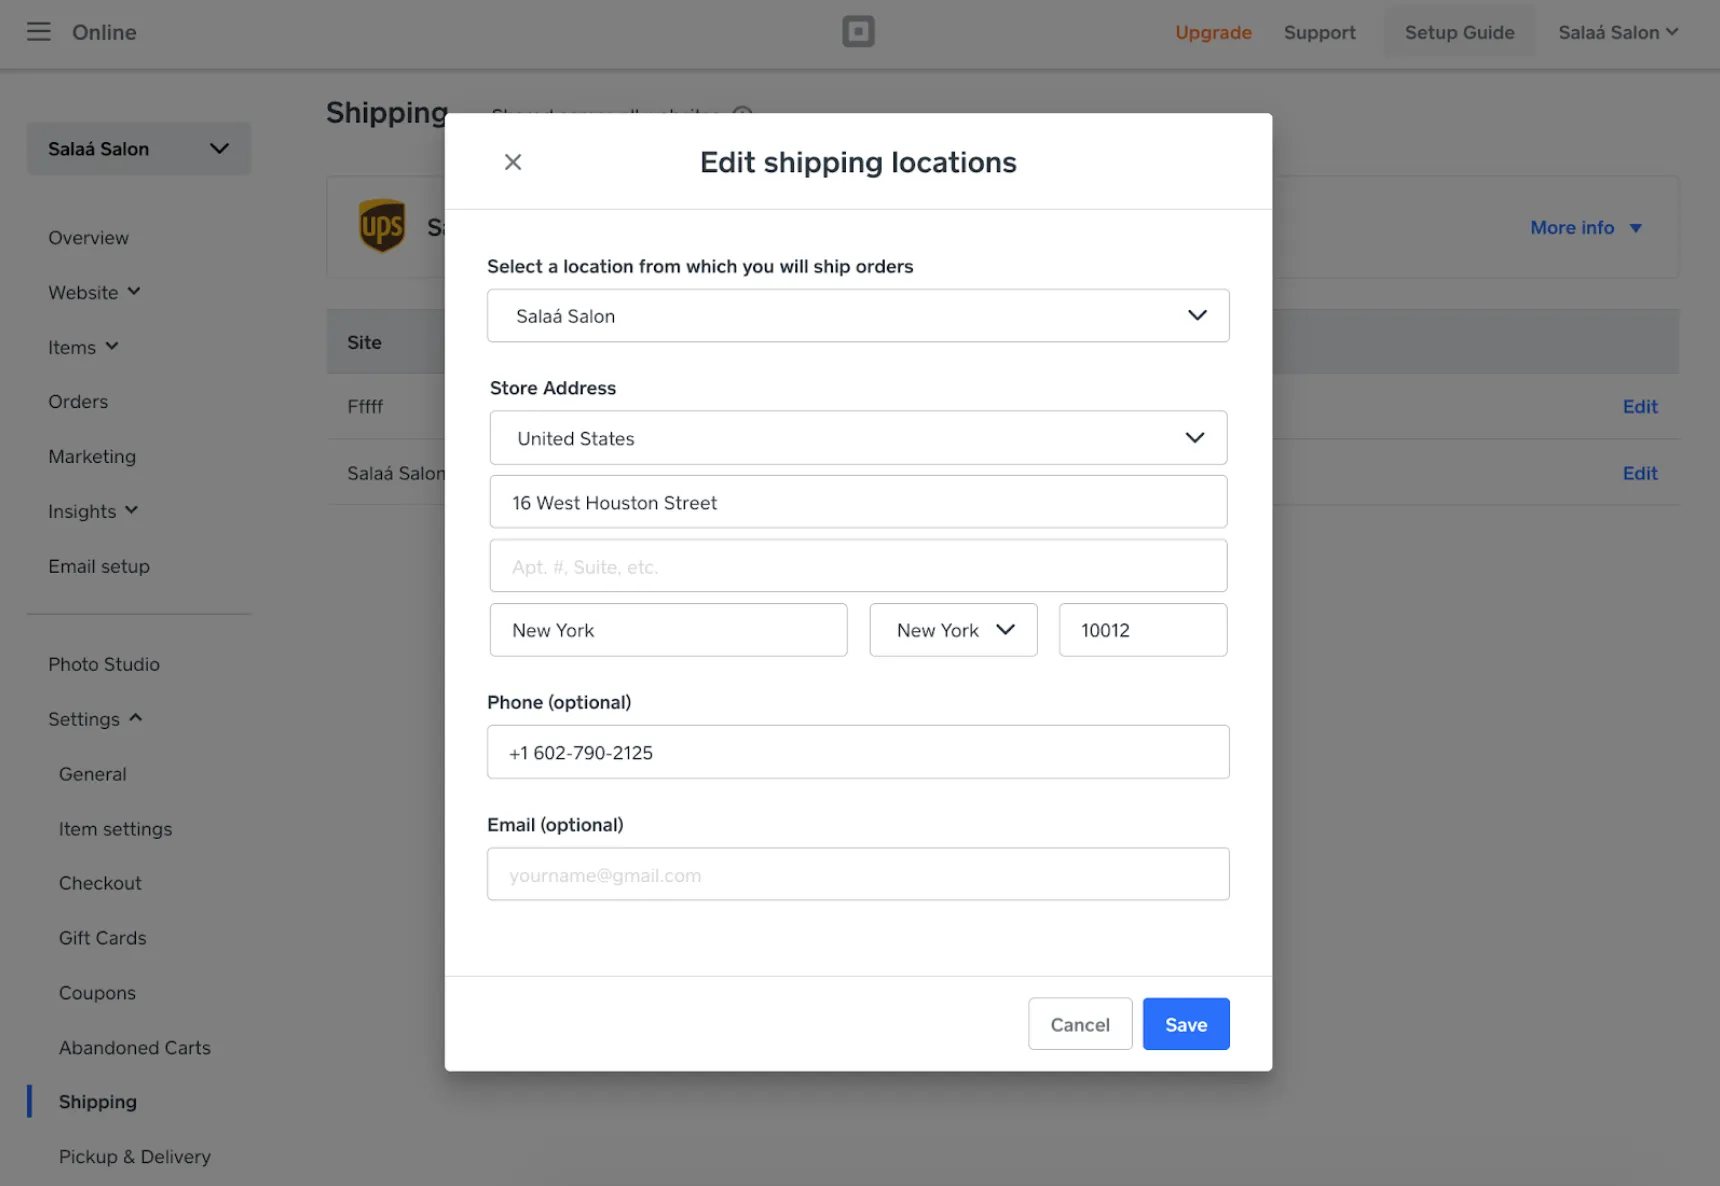
Before you can ship products, you need to set up a few basics:
- Shipping address
- Destination regions
- Shipping rates
Updating your shipping address: Your “Shipping From” address is prefilled using your business address, but it can be updated if your shipping address is another location or needs to be changed later on.
Selecting destination regions: Add regions you ship to, and deselect any cities/provinces you might want to exclude if they don’t fit within your business strategy.
Setting shipping rates: These are variable depending on the type, and this might change as you evolve your pricing strategy. To quickly get started, keep things simple by using a flat rate. Using this type of shipping rate only requires you to enter a name (e.g., Standard, 2-Day Shipping, etc.), set a price, and select how the rate is charged (either per order or per item). You can set multiple flat rates for each region to cover all the ways you fulfill orders.
Pro tip: Make sure to set flat rates that don’t eat into your profits, but don’t under- or overcharge your customers.

14. Set up pickup
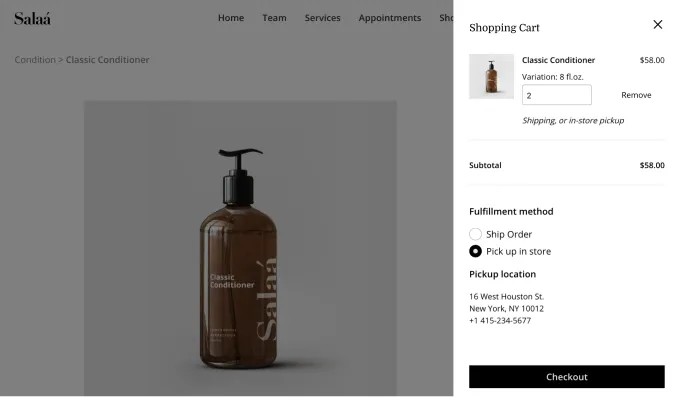
Whether you have one or dozens of locations, you can give customers the ability to pick up orders placed through your online store. Pickup settings help with logistics between a physical location and your online store by adding two important aspects of pickup to the ordering and checkout experience:
- When customers can pick up
- How customers can pick up
Setting up when customers pick up their orders: Confirm your location’s time zone, and select the days and times customers can pick up their orders (add multiple ranges for specific pickup windows, or if you open and close throughout the day). Then choose an order prep time — this is how customers are shown the right time for pickup at checkout automatically. If you’d like customers to schedule their pickup within the days and times you’ve set, select the “allow customers to schedule pickups” option.
Pro tip: Keep operations running smoothly by specifying an order prep time that works for your business type. For restaurants, give your kitchen team enough time to prepare, box, check, and bag food. For retail, allow enough time to neatly package up items for customers to carry home safely and conveniently, whether that’s hours or days.
Setting up how customers pick up their orders: Pickup instructions are a simple and effective way to ensure a smooth pickup experience. Specify where to go, if they need to provide information for their order (e.g., name, order number, etc.), and anything else that makes it easy for customers to quickly pick up their order.
Pro tip: Keeping customers up to date on their order status builds trust in your business. If you’d like to automatically notify customers when an order is ready, select the “mark orders as ready” option.
15. Set up delivery
In addition to shipping and pickup, you can also offer delivery to customers in your area, fulfilled either by your own courier or using our growing list of third-party on-demand delivery service providers.
From the same Settings page where you set up pickup, you’ll see a slider to enable delivery from each of your locations. Select Edit next to Hours in the slide-out blade that appears to the right when you edit your locations. You can set your pickup and delivery hours to be the same as one another, or use different hours for each.
Next choose Edit next to Delivery settings, where you’ll find the options for using your own courier or an on-demand delivery service. Our growing list of third-party on-demand delivery partners is directly integrated with Square to be automatically dispatched when an order is placed, all while saving you the cost of commissions associated with using their proprietary marketplaces. Set your delivery area, fees, and estimated delivery times after choosing your desired fulfillment option.
16. Set up taxes
Disclaimer: Square is not a tax advisor, nor an accounting firm. Tax compliance is your responsibility. We do not guarantee the applicability or accuracy of our tax tools. This article should not be construed as tax or legal advice. If you have any questions about your tax obligations, you should consult a professional tax advisor.
Whether or not you need to charge sales tax to a specific customer is based on your nexus profile with the local, state, country, or economic zone. To ensure taxes are set up properly, you need to confirm settings related to how you’re fulfilling online orders:
- Store addresses
- Tax rates
Using store addresses for taxes: Physical store locations, shipping addresses, and pickup locations all have tax implications. An important thing to remember about U.S. taxes is that you need to collect them if you have a presence (i.e., nexus) in the locale and/or state that you’re shipping an order to. Same applies for pickup locations.
Setting tax rates: When you receive an order, the U.S. automatic tax calculator first checks to see if your store has turned on the tax setting for the location you’re shipping to. The calculator checks each location and if you don’t have a presence where you’re shipping to, no taxes are charged.
Start selling: Preview and publish
17. Preview your website
Now that we’ve covered the essentials for your online store, it’s time to give everything a final check before you hit publish. While in preview mode, review your design, content, and items (note that some features don’t function in preview mode, e.g., checkout, contact forms, etc.). A couple of things to check for:
- Missing item images, prices, options, or modifiers
Fix: Add by editing product details
- Misspelled item titles or descriptions
Fix: Update item information by editing item details
- Poor text size or readability
Fix: Change the text or section style to ensure readability
Pro tip: In addition to the online store builder preview, you have two more ways to preview your site. Use the Share feature to view preview in another tab, or to copy a shareable link to your preview site that you can email to a third party. Try sharing your website with a friend, colleague, or family member before you publish to make sure your site works on other people’s devices.
18. Set up your domain
Your domain is the website address that buyers will use to visit your store, so it’s an important piece of your brand identity. When you publish your site, you’ll see options to purchase a new domain name, connect an existing domain name that you own, or assign a free square.site subdomain.
Your site must be on a paid plan to use a custom domain. If you’re looking to assign a domain to your site that you’ve purchased elsewhere, you’ll be walked through the domain connection process, or you may refer to our Support article for detailed instructions. If you choose to go with a free square.site subdomain, you can always update it to a custom domain later.
Pro tip: Review your site address, along with other site settings, by navigating to Website > General Settings from the main Online dashboard.
19. Publish your online store
Congratulations on getting your free online store up and running — you’re officially ready to start selling online with Square! Log in to Square and activate your site today.
![]()