Configurar Square Kiosk

Acerca de Square Kiosk
El hardware de Square Kiosk (anteriormente conocido como Square Stand Mount) es una unidad versátil basada en iPad que puede fijarse fácilmente a una pared, a un mostrador o a un soporte de piso compatible con VESA en cualquier parte de tu negocio. Con los lectores integrados para tarjetas sin contacto y con chip, puedes procesar pagos con tarjeta acercando o insertando una tarjeta, además de aceptar pagos con dispositivos móviles, como Apple Pay y Google Pay.
Cuando el hardware de Square Kiosk se combina con su aplicación, crean una solución de punto de venta de autoservicio que permite a los clientes hacer pedidos y completar el flujo del proceso de pago por su cuenta.
Otra forma de usar el hardware de Square Kiosk es como dispositivo de punto de venta que ahorra espacio y puede ejecutar cualquier aplicación de punto de venta de Square, no solo la aplicación de Square Kiosk. Esta opción es ideal para los negocios que operan en espacios pequeños o limitados y necesitan montar su dispositivo de punto de venta en una pared.
Antes de comenzar
Para configurar Square Kiosk, instala el hardware, crea un código de dispositivo desde el Panel de Datos Square e inicia sesión en la aplicación Square Kiosk. Obtén más información sobre Square Kiosk como solución integral.
Para poder usar Square Kiosk como dispositivo de autoservicio para aceptar pedidos, imprimirlos y cobrar en efectivo, necesitas un iPad compatible con la aplicación Aplicación de Square Kiosk instalada. También necesitas al menos un dispositivo de punto de venta activo (teléfono, iPad o hardware de Square) que utilice la aplicación Punto de venta Square.
Square Kiosk tiene dos versiones:
Square Kiosk (USB-C, v2) cuenta con un conector USB-C para iPad.
Square Kiosk (Lightning, v1) cuenta con un conector Lightning para iPad. Square ya no fabrica ni vende esta versión, pero seguiremos proporcionando actualizaciones y asistencia técnica.
La compatibilidad con iPad varía según la versión de Square Kiosk que tengas. Para comprobar si tu iPad es compatible con Square Kiosk, consulta nuestra página de los dispositivos compatibles.
Paso 1: Instala el hardware de Square Kiosk
El hardware de Square Kiosk tiene cuatro opciones de instalación diferentes que se adaptan a tu negocio:
Soporte angular para pared
Soporte plano para pared
Soporte para el mostrador
Soporte VESA
Obtén más información sobre las Especificaciones técnicas de Square Kiosk, así como lo que hay en la caja, las dimensiones, la conectividad y más.
Para mayor seguridad y personalización, puedes comprar un Cable de extensión USB-C de 14 cm para Square Kiosk. Este cable se conecta directamente en Square Kiosk para que puedas desenchufar y guardar tu dispositivo sin quitar el soporte de montaje.
 Este soporte para pared coloca la pantalla inclinada hacia arriba, orientada hacia el personal y tus clientes. Descarga la guía visual.
- Elige en qué zona de la pared quieres instalar el soporte: Sujeta tu Square Kiosk contra la pared para decidir a qué altura quieres colocarlo. No lo instales delante de un montante.
- Coloca el soporte en ángulo: Nivela el soporte en la pared y luego marca la posición de los orificios para los tornillos con un lápiz.
- Haz los agujeros que acabas de marcar: Si vas a instalar el soporte en paneles de yeso, utiliza la broca de yeso que se incluye en la caja.
- Atornilla el soporte en ángulo en la pared: Introduce los anclajes de pared en los orificios. Coloca el soporte en ángulo. A continuación, introduce los tornillos de pared en la parte delantera y apriétalos del todo, asegurándote de que el soporte se mantenga nivelado.
- Conecta el hub a Square Kiosk: Desde la parte inferior del soporte, introduce el cable USB-C del hub por el orificio de paso hasta llegar al conector de la parte posterior de Square Kiosk.
- Coloca tu Square Kiosk en el soporte: Aprieta el tornillo de montaje central hasta que no se vea ninguno de los laterales rojos. Comprueba que esté firme y no se mueva.
- Enchufa tu Square Kiosk: Enchufa el cable USB-C del adaptador de corriente al hub y, a continuación, conecta un extremo del cable al adaptador de corriente y el otro a un enchufe.
- Coloca el iPad y sujétalo: Coloca el iPad en el conector y asegúrate de que el pestillo de seguridad haga clic. Opcional: Para fijar el iPad de forma aún más segura, utiliza un destornillador Phillips pequeño para apretar el tornillo de seguridad que encontrarás en el lateral de Square Kiosk.

Este soporte plano tiene un diseño fino y compacto que se ajusta perfectamente a la pared. Descarga la guía visual.
- Elige en qué zona de la pared quieres instalar el soporte: Sujeta tu Square Kiosk contra la pared para decidir a qué altura quieres colocarlo. No lo instales delante de un montante.
- Coloca el soporte plano: Nivela el soporte en la pared y luego marca la posición de los orificios para los tornillos con un lápiz.
- Haz los agujeros que acabas de marcar: Si vas a instalar el soporte en paneles de yeso, utiliza la broca de yeso que se incluye en la caja.
- Atornilla el soporte plano en la pared: Introduce los anclajes de pared en los orificios. Coloca el soporte plano. A continuación, introduce los tornillos de pared en la parte delantera y apriétalos del todo, asegurándote de que el soporte se mantenga nivelado.
- Conecta el hub a Square Kiosk: Coloca el cable USB-C del hub en el túnel para cables que encontrarás en la parte posterior de Square Kiosk. Comprueba que no haya interferencias entre el cable y el tornillo de montaje.
- Coloca tu Square Kiosk en el soporte: Aprieta el tornillo de montaje central hasta que no se vea ninguno de los laterales rojos. Comprueba que esté firme y no se mueva.
- Enchufa tu Square Kiosk: Enchufa el cable USB-C del adaptador de corriente al hub y, a continuación, conecta un extremo del cable al adaptador de corriente y el otro a un enchufe.
- Coloca el iPad y sujétalo: Coloca el iPad en el conector y asegúrate de que el pestillo de seguridad haga clic. Opcional: Para fijar el iPad de forma aún más segura, utiliza un destornillador Phillips pequeño para apretar el tornillo de seguridad que encontrarás en el lateral de Square Kiosk.

Este soporte permite colocar el dispositivo de forma discreta en el mostrador, con la pantalla inclinada hacia arribada. Descarga la guía visual.
- Elige en qué zona quieres instalar el soporte: Con el soporte en ángulo hacia ti, pasa el cable del adaptador de corriente por el orificio.
- Conecta el hub a Square Kiosk: Comprueba que el cable USB-C del hub esté bien conectado.
- Coloca tu Square Kiosk en el soporte: Aprieta el tornillo de montaje central hasta que no se vea ninguno de los laterales rojos. Comprueba que esté firme y no se mueva.
- Enchufa tu Square Kiosk: Enchufa el cable USB-C del adaptador de corriente al hub y, a continuación, conecta un extremo del cable al adaptador de corriente y el otro a un enchufe.
- Coloca el iPad: Coloca el iPad en el conector y asegúrate de que el pestillo de seguridad haga clic.
- Opcional: Sujeta bien tu iPad. Con un destornillador Phillips pequeño, coloca el tornillo de seguridad que encontrarás en el lateral de Square Kiosk para fijar el iPad de forma aún más segura.

Utiliza cualquier soporte VESA de 100 mm x 100 mm para fijar una base independiente, un brazo basculante u otro tipo de instalación. Descarga la guía visual.
- Conecta el hub a Square Kiosk: Decide de qué lado quieres que salga el cable USB-C del hub y colócalo en el canal del cable o, si se puede, pasa el cable por el soporte VESA.
- Atornilla tu Square Kiosk en la placa VESA: Alinea los orificios para tornillos de la placa VESA de 100 x 100 mm con las roscas de la parte posterior de Square Kiosk y aprieta los tornillos.
- Enchufa tu Square Kiosk: Enchufa el cable USB-C del adaptador de corriente al hub y, a continuación, conecta un extremo del cable al adaptador de corriente y el otro a un enchufe.
- Coloca el iPad y sujétalo: Coloca el iPad en el conector y asegúrate de que el pestillo de seguridad haga clic.
- Opcional: Con un destornillador Phillips pequeño, coloca el tornillo de seguridad que encontrarás en el lateral de Square Kiosk para fijar el iPad de forma aún más segura.
Paso 2: Configura la aplicación Square Kiosk
Para iniciar sesión en la aplicación Square Kiosk por primera vez, debes completar la configuración inicial y crear un código de dispositivo desde el Panel de Datos Square en un ordenador o iPad.
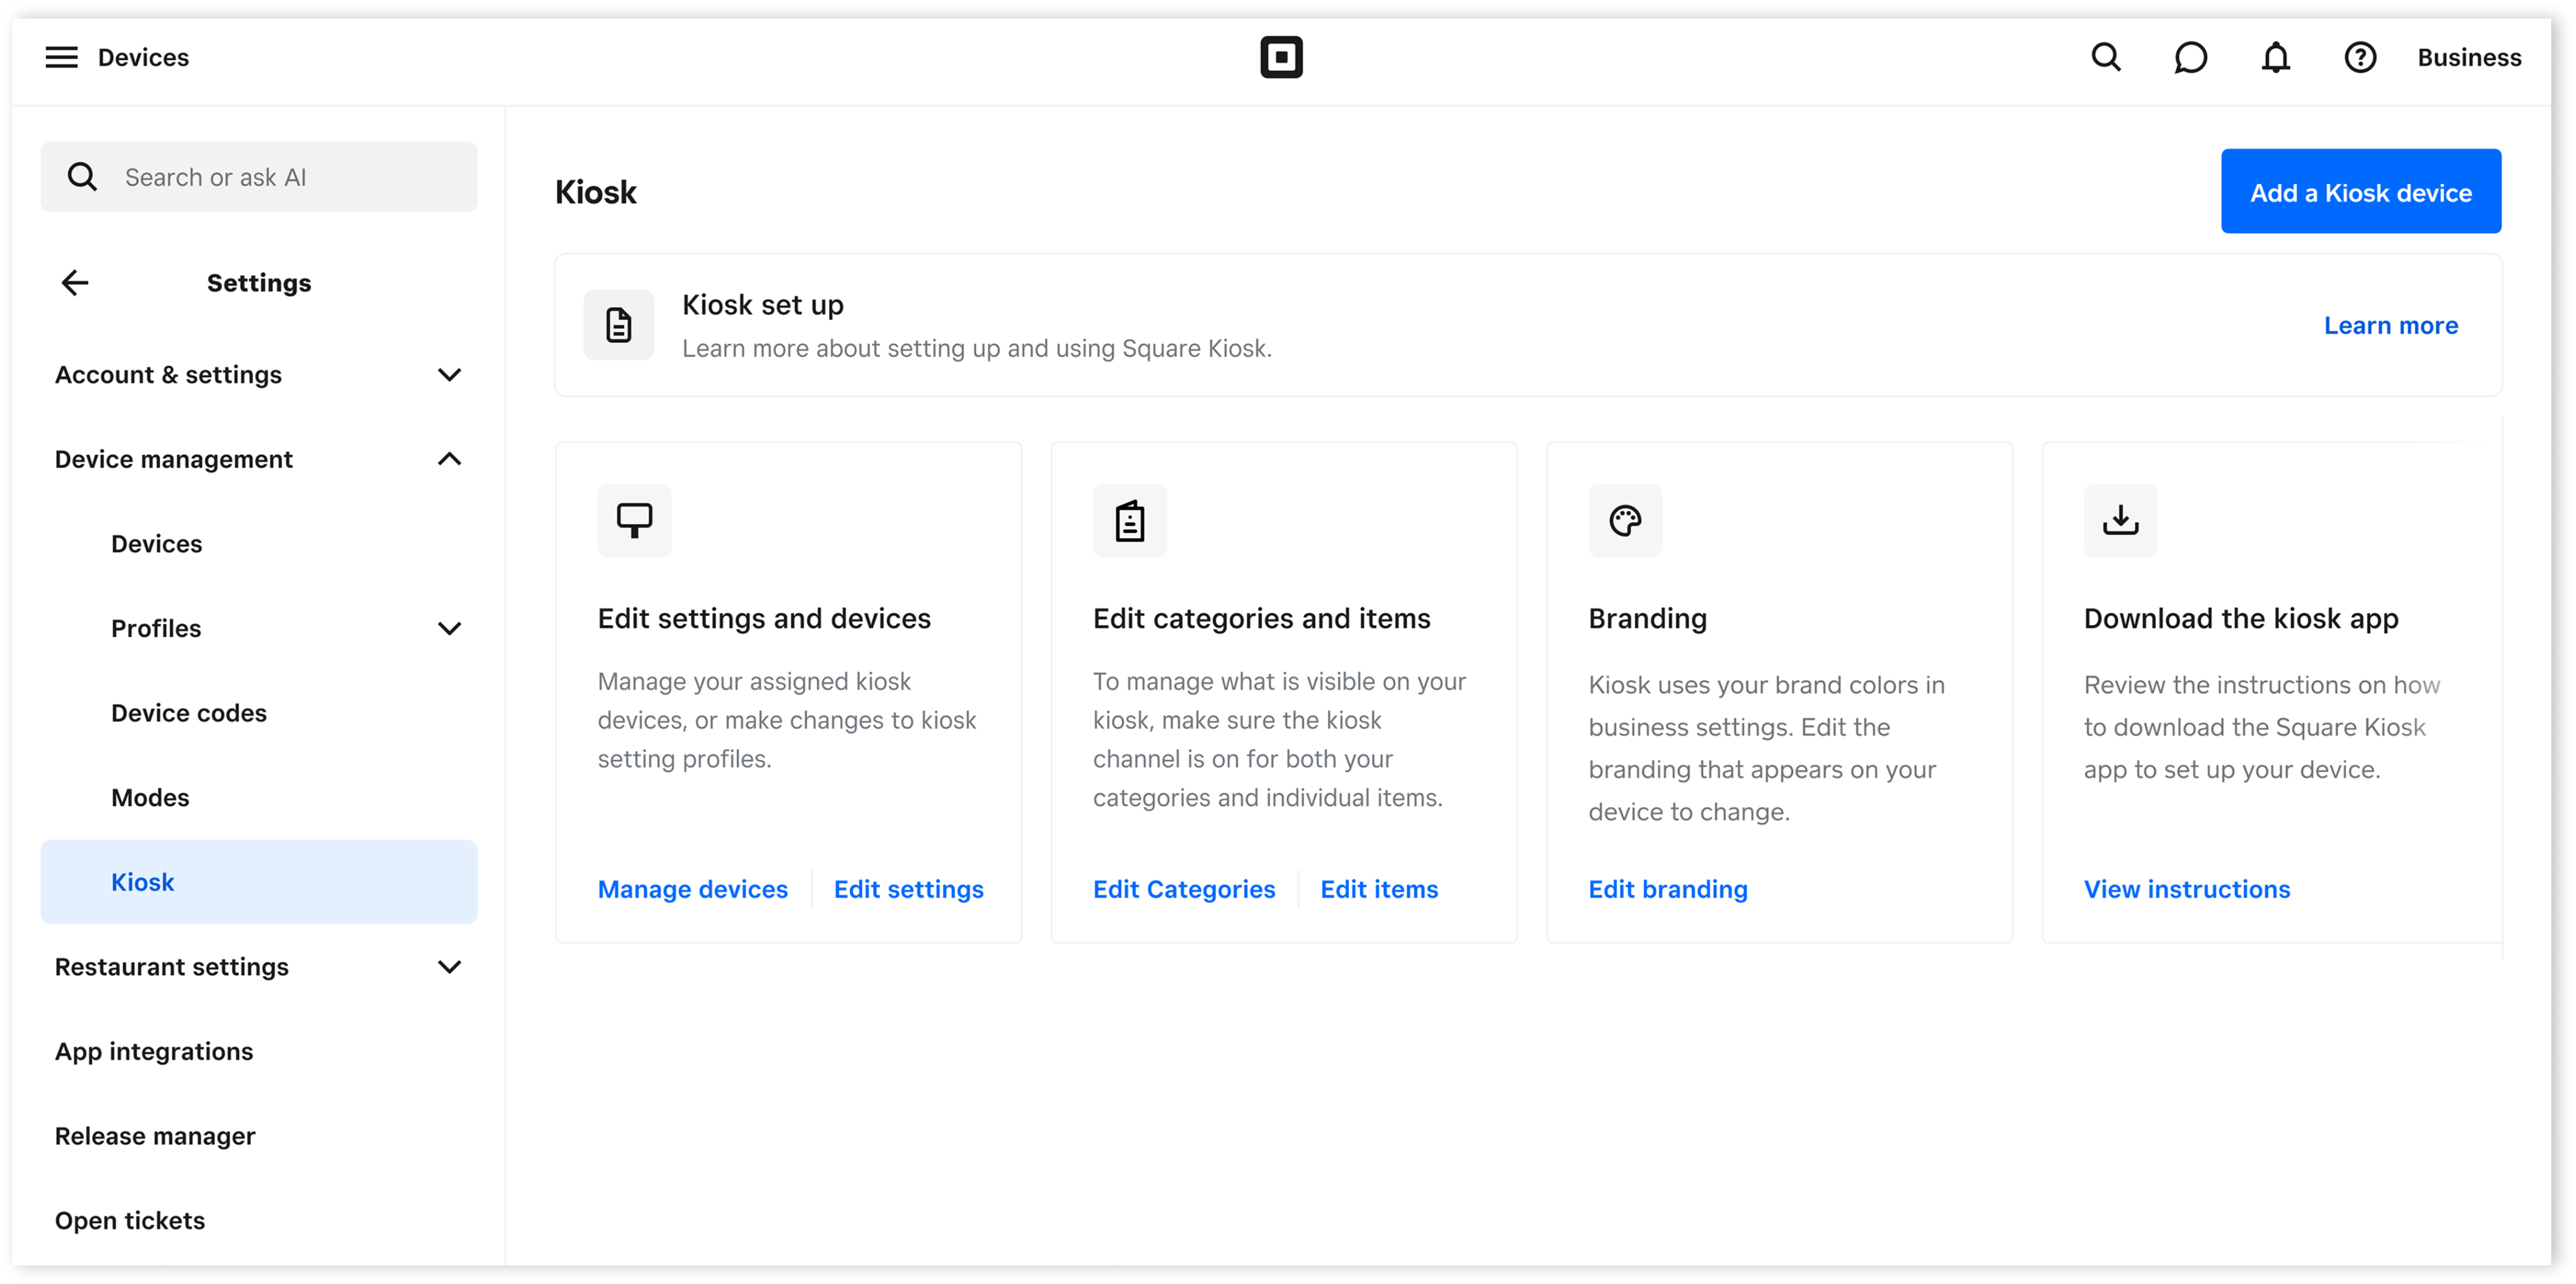
Inicia sesión en el Panel de Datos Square y ve a Ajustes > Administración de dispositivos > Kiosk.
Selecciona Obtener kiosco.
Si corresponde, confirma los costos del nuevo dispositivo asociados a tu plan.
Selecciona la sucursal donde usarás el kiosco.
Ponle un nombre y haz clic en Siguiente.
Selecciona las categorías de artículos que quieres que se muestren en el menú de Square Kiosk. Podrás editarlas más adelante. Obtén más información sobre cómo editar los artículos y categorías del menú de Square Kiosk.
-
Asocia imágenes con cada categoría que se mostrará en tu kiosco utilizando imágenes existentes de tu biblioteca de imágenes o cargando nuevas imágenes:
Haz clic en el icono de la imagen gris junto a la categoría y selecciona las imágenes, o bien haz clic en Cargar nuevas imágenes > Listo. Si no tienes imágenes de categoría, el kiosco usará automáticamente una imagen disponible de uno de los artículos de la categoría.
Haz clic en Siguiente.
Haz clic en Tengo el hardware si ya compraste Square Kiosk. De lo contrario, haz clic en Comprar hardware para adquirirlo ahora u Omitir para hacerlo más tarde.
Descarga la aplicación Square Kiosk en tu iPad y anota el código de dispositivo de 12 dígitos. También puedes hacer clic en Copiar para copiarlo o en Enviar código de dispositivo para enviarlo por correo electrónico o mensaje de texto.
Haz clic en Listo.
Ahora estás en la página Ajustes de Square Kiosk, donde puedes administrar todos los aspectos de tu experiencia en el kiosco:
Administrar los dispositivos y los ajustes de Square Kiosk
Editar categorías y artículos
Editar la identidad de marca
Crear dispositivos de Square Kiosk nuevos
Paso 3: Inicia sesión en la aplicación Square Kiosk
Comprueba que haya un iPad compatible conectado al hardware de Square Kiosk. Si el iPad está desconectado del hardware de Square Kiosk, no podrás usar la aplicación Square Kiosk.
Abre la aplicación Square Kiosk en tu iPad compatible y pulsa Iniciar sesión.
Introduce el código de dispositivo que generaste en el Panel de Datos Square para iniciar sesión en la aplicación.
Si no utilizas el nuevo código de dispositivo en un plazo de 48 horas, este caducará y tendrás que restablecerlo para iniciar sesión en la aplicación Square Kiosk.
Una vez que hayas configurado tu primer kiosco, puedes configurar códigos de dispositivo para dispositivos de kiosco adicionales. Obtén más información sobre cómo Configurar códigos de dispositivo.
Paso 4: Imprime pedidos para cocina para los pedidos de Square Kiosk (opcional)
Si usas Square Kiosk como estación de pedidos de autoservicio con la aplicación, no podrás conectarlo a accesorios como lectores de códigos de barras o impresoras de recibos a través de USB, Wi-Fi, Ethernet o Bluetooth.
Puedes imprimir pedidos de kiosco desde tus dispositivos de punto de venta complementarios si están conectados a tus impresoras de cocina. Obtén más información sobre cómo configurar perfiles de impresora y conectar una impresora a tu punto de venta.
Para enviar tus pedidos de kiosco a tu impresora de cocina a través de un dispositivo de punto de venta complementario desde las aplicaciones PDV Square, sigue estos pasos:
En la aplicación de punto de venta de tu dispositivo complementario.
Pulsa ≡ Más > Ajustes > Hardware > Impresoras.
Pulsa Perfiles y selecciona uno.
Pulsa Editar junto a Detalles de perfil y activa la opción Pedidos impresos para Square Online y Square Kiosk.
Pulsa Guardar.
Si estás imprimiendo por categoría, asegúrate de que las categorías activadas para Square Kiosk también estén seleccionadas en el perfil de la impresora.
Estos pedidos para cocina se imprimirán a través de la configuración de la impresora a través del dispositivo de punto de venta, junto con cualquier otro pedido para cocina creado desde un punto de venta.
Obtén más información sobre cómo imprimir pedidos.
Paso 5: Bloquea la aplicación Square Kiosk (recomendado)
Puedes configurar el Acceso guiado para evitar que los clientes manipulen tu kiosco o cierren la aplicación Square Kiosk. El Acceso guiado limita tu iPad para que solo se pueda utilizar la aplicación Square Kiosk.
Abre la aplicación Ajustes de tu iPad y ve a Accesibilidad > Acceso guiado.
Activa el Acceso guiado.
Establece un código de acceso para el Acceso guiado.
Abre la aplicación Square Kiosk en tu iPad.
Haz clic tres veces en el botón lateral o en el botón de Inicio.
Pulsa Acceso guiado > Iniciar.
Obtén más información sobre el Acceso guiado en Artículo de ayuda sobre el acceso guiado de Apple.
Cerrar sesión en la aplicación de Square Kiosk
Pulsa las tres líneas (≡) situadas en la esquina superior derecha de la pantalla Comenzar para abrir los ajustes.
Ingresa tu código de acceso para ir a los ajustes del dispositivo.
Pulsa Cerrar sesión.
Crea letreros para tu kiosco
Square ofrece opciones de letreros descargables, incluido un PDF fácil de descargar y un proveedor para la impresión nacional:
Cartel retráctil
Letrero perfilado
Póster de pared
Puedes pedir un letrero retráctil para colocarlo detrás del hardware de Square Kiosk cuando lo montes en un pedestal. Puedes diseñar tu letrero con la plantilla anterior y pedir su versión retráctil a través de Vistaprint.
Descarga una plantilla de letrero retráctil para Square Kiosk.
Esta opción requiere que tu kiosco esté al lado o frente a una pared que vean los clientes cuando entren por la puerta. Los letreros perfilados requieren un soporte para instalarlos en la pared. Puedes usar la plantilla a continuación para diseñar un letrero perfilado y pedirlo aquí en Vistaprint.
También puedes diseñar un póster de pared con la plantilla anterior y luego pedirlo en Vistaprint.
Plantilla de letrero perfilado para Square Kiosk
Usar el hardware de Square Kiosk como punto de venta
Dado que Square Kiosk funciona con un iPad, también puedes acceder a la aplicación PDV Square a través del hardware de Square Kiosk. Cuando se usa como punto de venta, el hardware de Square Kiosk funciona igual que Square Stand (2.ª generación), pero sin el soporte giratorio integrado.
Obtén más información sobre cómo configura Square Stand (2.ª generación) y acepta pagos con Square Stand.
Artículos relacionados
Configurar los ajustes de notificación de pedidos y proceso de pago de Square Kiosk
Obtén una vista previa de la experiencia de pedidos de tus clientes en Square Kiosk