Get Started with Orders in Square POS
Order Manager is available in the Square Point of Sale app on Square Register, Square Terminal, or a compatible iPad, iPhone, or Android tablet/phone. You can view the Orders tab to manage all in-person, pickup and online orders. Follow this guide to navigate through your order set up and printer settings.
Before you get started, update to the latest version of the Square POS app and software on your devices.
To view Order Manager, tap ≡ More > Orders.
To add Order Manager in the bottom navigation panel, tap ≡ More > Customize and tap + next to Orders.
Note: Order search, filter, and sort features are available even if your device loses internet connectivity and goes offline.
Learn more about managing your shipments from your Square Dashboard.
Set Up Order Manager
You can create orders for in-store and curbside pickup. All Dining options must be turned off in your online Square Dashboard.
Open the Square POS app , then tap ≡ More > Settings.
Tap Orders > Order creation.
Toggle on Enable order creation in checkout.
If you're using Square Terminal, learn more about managing orders on Square Terminal.
Order Manager Features
You can view orders by order status and order type in Order Manager.
- Order types: All orders, In store/Dine-In, Self-serve, Pickup, Delivery, Shipment, and Other.
- Order status: Active, Scheduled, Open, Paid, To do, and Completed.
Tap ≡ More > Orders and select the magnifying glass to search orders from the past 30 days. You can search by:
- Order number
- Customer name, phone number, or email address
- Address, city, state, or zip code.
- Station ID (for self-serve order)
- Last 4 digits of the payment card
- Order notes
You can export your orders from the Orders page on your Square Dashboard.
To do so:
- In your Square Dashboard, go to Orders.
- Select Export and then Generate.
Note: Any filters applied to your orders will also be applied to your export CSV file.
You will receive a notification within Square Dashboard as soon as your export file is ready to download. You will also receive an email with a download link, which is sent to the email address associated with your Square account. If you don’t receive the download link within ten minutes, be sure you’re checking the right email address and/or its spam folder.
Find orders quickly by applying payment status, order status, fulfillment type, or order source filters. You can also sort orders by time created, fulfillment time, customer name, or order total.
To filter orders on a mobile device or Square Terminal:
- Tap Orders.
- Tap the filter icon in the top right corner and select Filter.
- Select an option under Filter. You may see additional options depending on which options you selected.
- If applicable, check the box next to each additional option.
- Tap Done to view filtered results.
To sort orders on a mobile device or Square Terminal:
- Tap Orders.
- Tap the filter icon in the top right corner and select Sort.
- Select an option under Sort and choose to arrange from Old to new or New to old.
- Tap Done to view sorted results.
To remove filters, tap the filter icon > Filter > Reset > Done.
Find orders quickly by applying payment status, order status, fulfillment type, or order source filters. You can also sort orders by time created, fulfillment time, customer name, or order total.
To filter orders on an iPad, Android tablet, or Square Register:
- Tap Orders.
- Tap the filter icon in the top right corner and select Filter.
- Select an option under Filter by. You may see additional options depending on which options you selected.
- If applicable, check the box next to each additional option.
- Tap Done to view filtered results.
To sort orders on an iPad, Android tablet, or Square Register:
- Tap Orders.
- Tap the sort icon in the top right corner and select Sort.
- Select an option under Sort and choose to arrange from Old to new or New to old.
- Tap Done and view sorted results.
To remove filters, tap Reset filter.
You can use bulk actions to update the status or print multiple orders at once.
From a mobile device or Square Terminal:
- Tap Orders > Actions.
- Tap Mark as in progress, Mark as ready, Mark as complete, or Print.
- Check the box next to each order you want to take action on.
- Tap Done or Print.
From an iPad, Android tablet, or Square Register:
- Tap Orders > Actions.
- Check the box next to each order you want to update or print.
- Tap Mark as in progress, Mark as ready, Mark as complete, or Print. Some order actions may not be available depending on the current status of the orders selected.
- Tap Done or Print.
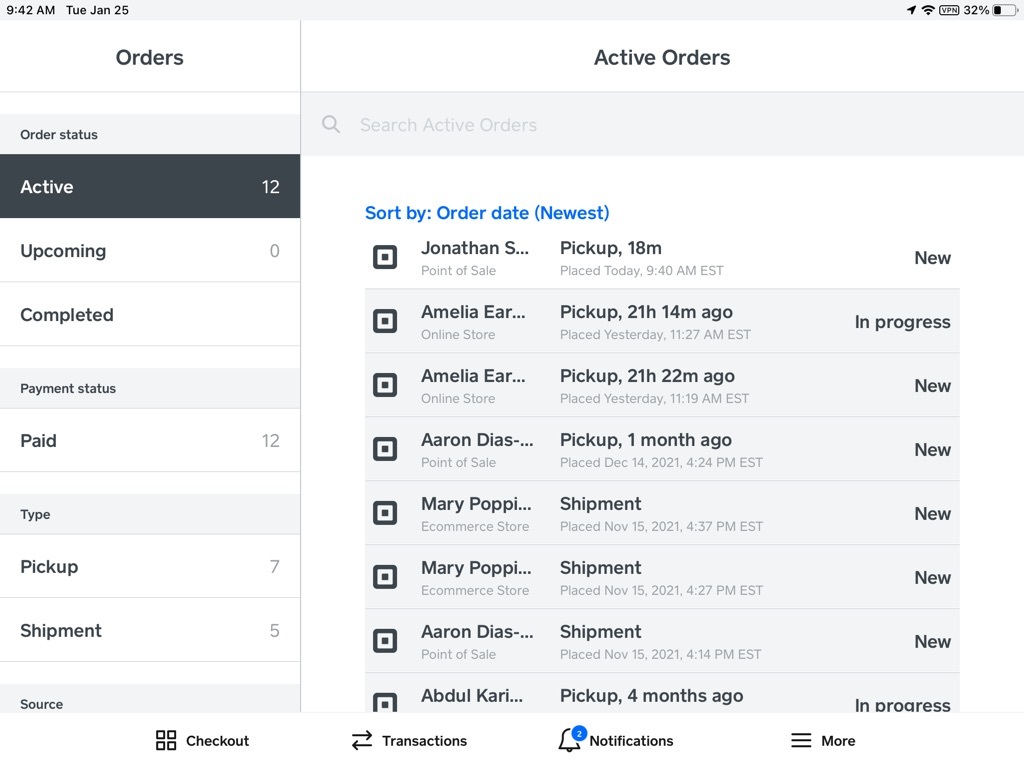
Each order has relevant fulfillment details in the Status Active order view, including recipient name, fulfillment type, placed at date, order number (if provided), and fulfillment status (New, In Progress, Ready, Completed).
If you’re viewing Order Manager on a mobile device or Square Terminal, your active orders list will look like this:
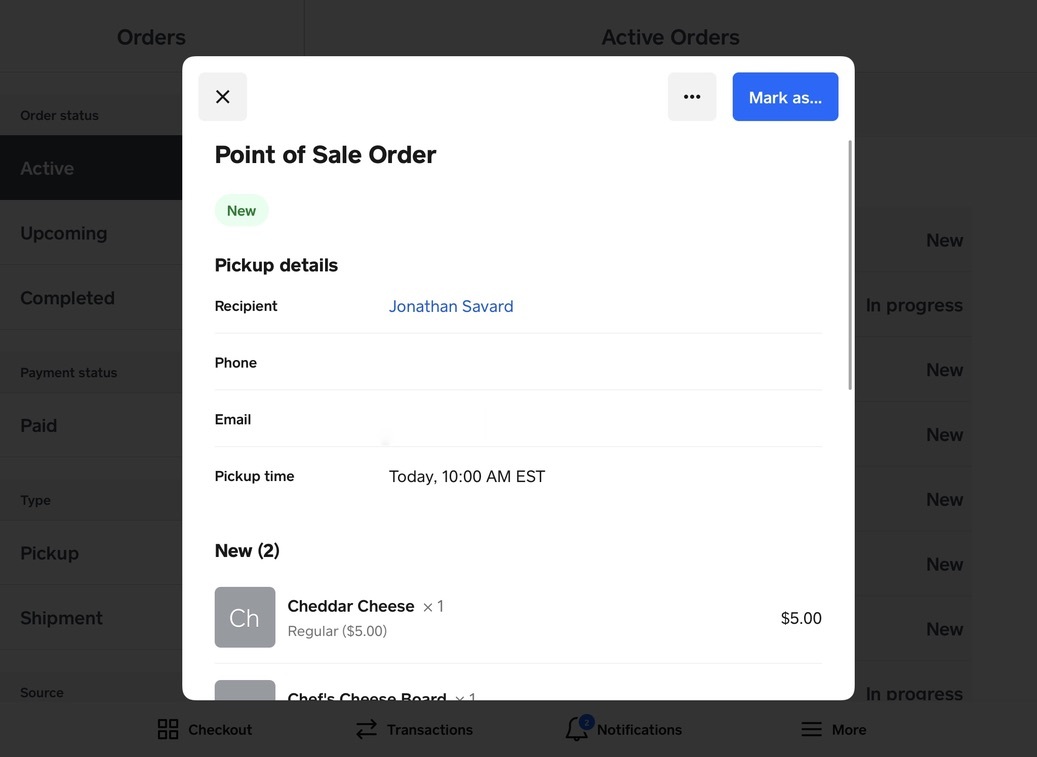
If you’re viewing Order Manager on an iPad, Android tablet, or Square Register, your active orders list will look like this:
Order Timing
You can temporarily add 15 minutes to a location’s prep time during busy periods to give yourself more time to complete your active and incoming orders. To do so:
- Tap Orders.
- Tap the clock icon to view your Order Timing settings.
- Toggle on Busy Mode.
- Selec tIncrease prep time by 15 minutes for the next: Busy mode: 15 minutes, 30 minutes, or 60 minutes. While Busy Mode is on, 15 minutes will be added to your current location’s prep time.
- Tap Save.
Once enabled, you’ll see the remaining time in busy mode on your Orders page. Select Exit Busy Mode to resume your regular prep times or select Extend to extend the duration of Busy mode.
Note: Busy mode can also be extended from the Order Timing page by selecting Extend > Save. Tap the clock icon and select Extend busy mode duration another: 15 minutes, 30 minutes, or 60 minutes > Save.
Prep time allows you to control when an order ticket prints, and also lets buyers know when an online order will be ready.
To set your prep time:
- Tap Orders and select the clock icon.
- Tap the How long does it take to prepare an order? dropdown.
- Select a time and tap Save.
Note: The Use location default option will use the prep time set for the location from your Square Online site.
Pause online orders to prepare your active and upcoming orders, then resume Square Online orders when you’re ready. To temporarily stop incoming online orders from the Square apps:
- Tap Orders.
- Tap the clock icon and scroll to Pause orders.
- Tap Pause next to Pickup or Delivery.
- Choose when you want to resume online orders and tap Done > Save.
You can see the remaining pause time and resume online orders instantly from Order Manager.
Message Customer
You can send an email or text message to your customer regarding their order from the Order Details page. Select an order and tap the phone number or email at the top of the Order Details page to start a conversation. Alternatively, select an order, open the action menu ( . . . ), and select Message Buyer.
Note: Reply to your customers via email or text after they send you an initial message with Square Messages or initiate new conversations with your customer via email or text with Square Messages Plus. Learn more about Square Messages.
This feature is ideal for gaining clarification on your customer’s order as well as any last minute changes, such as out of stock items or substitutions. Square Messages supports both text and email communication, as well as photo support.
You will receive an email notification when your customer responds. You can also enable push notifications by going to Messages > Settings icon on Dashboard. Learn more about Square Messages.
Note: Square Messages will only be accessible to your employees with the following permission enabled: Grant access to view and send messages to customers. This includes access to items and customer data for sending messages. Learn more about managing your employees’ Custom Permission Sets.
Order Settings
Enable order creation in checkout to create orders for in-store and pickup. All dining options must be turned off in your online Square Dashboard.
If you’re using an iOS device—such as an iPad or iPhone— you can receive device alerts for all new orders, even if your Square POS app is not open.
Note: You will also have to turn on push notifications on your iOS operating system. To do so:
- From your Apple device, go to Settings > Notifications.
- Scroll to the Square app.
- Toggle on “Allow Notifications.” You can go to the Alerts settings in your Square POS app to preview the notification.
Note: If you do not see Alerts in your Square POS app settings, force-close your app and re-open.
You can also turn on curbside notifications for orders when your customer arrives. From your Square POS app, go to ≡ More > Settings > Orders > Alerts, then toggle on “Allow curbside alerts.”
Group Items
To customize your item grouping settings:
On the Square Point of Sale app, go to Settings > Hardware > Printer Settings. Scroll down to In Person Orders. On Square KDS, go to your Square Dashboard and select Devices > Kitchen Settings.
Toggle on Combine identical items. Items with the same details will then be automatically combined into one line item.
If you toggle on Single item per ticket, this setting overrides grouping items and automatically prints each item, ungrouped, on its own ticket.
Note: Combine identical items is off by default for existing printer stations but will turn on by default for all new printer stations you create. Learn more about grouping items.
Split Order Fulfillment
You can split up items within orders as they become available and separately manage the fulfillment of each item by marking them as New, In Progress, Ready, Completed, Shipped, or Delivered.
| Status | Description |
|---|---|
| New | This status is for net new items or orders. |
| In Progress | You are preparing part of the order. Items and Orders are In Progress before Ready or Completed. |
| Ready | Mark an item as Ready when part of the order is available for pickup. |
| Completed | Used for pickup orders. Mark an item as Completed once the customer picks up the item. |
| Shipped | Used for shipments. Mark an item as Shipped once you ship the items to the customer. |
| Delivered | Used for delivery orders. Mark an item as Delivered once the customer receives the items. |
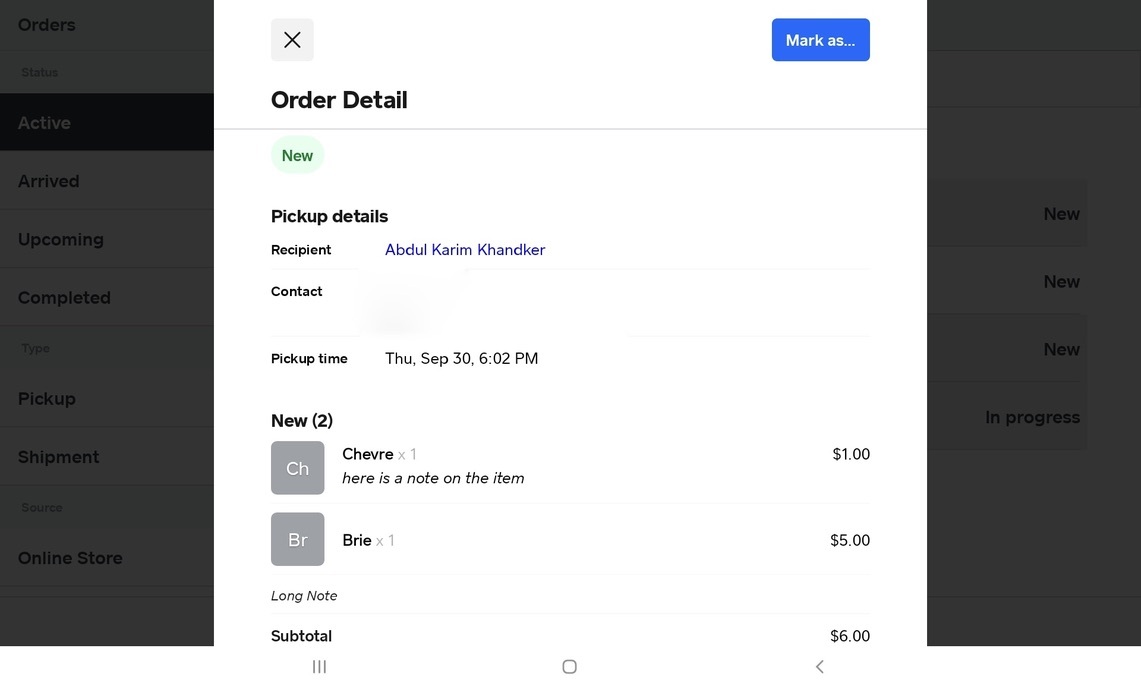
To manually split up any order:
Tap an order to bring up the Order Detail screen.
Under “Mark as,” select items to place them into different fulfillment states. You can select multiple items at once or edit the status of items individually.
Items in an order are automatically grouped based on their fulfillment availability status. If an order fulfillment is split, then the Order List View shows the least progressed fulfillment state as the entire order fulfillment state. If Quick Actions is turned on, it will display the next action for the least progressed item on the order as the Quick Action.
Printer Station Setup
You can create printer stations to print order tickets for all in-person or online orders. This will ensure you or your team members can manage and prepare orders as they come in. To set up a printer station:
From your Square POS app, go to ≡ More > Settings > Hardware > Printers.
Create a new printer station or update the settings on an existing printer station.
Tap Printer and select your printer.
Make sure the printer and your device are connected to the same Wi-Fi network. To test your connection, tap Test Print.
-
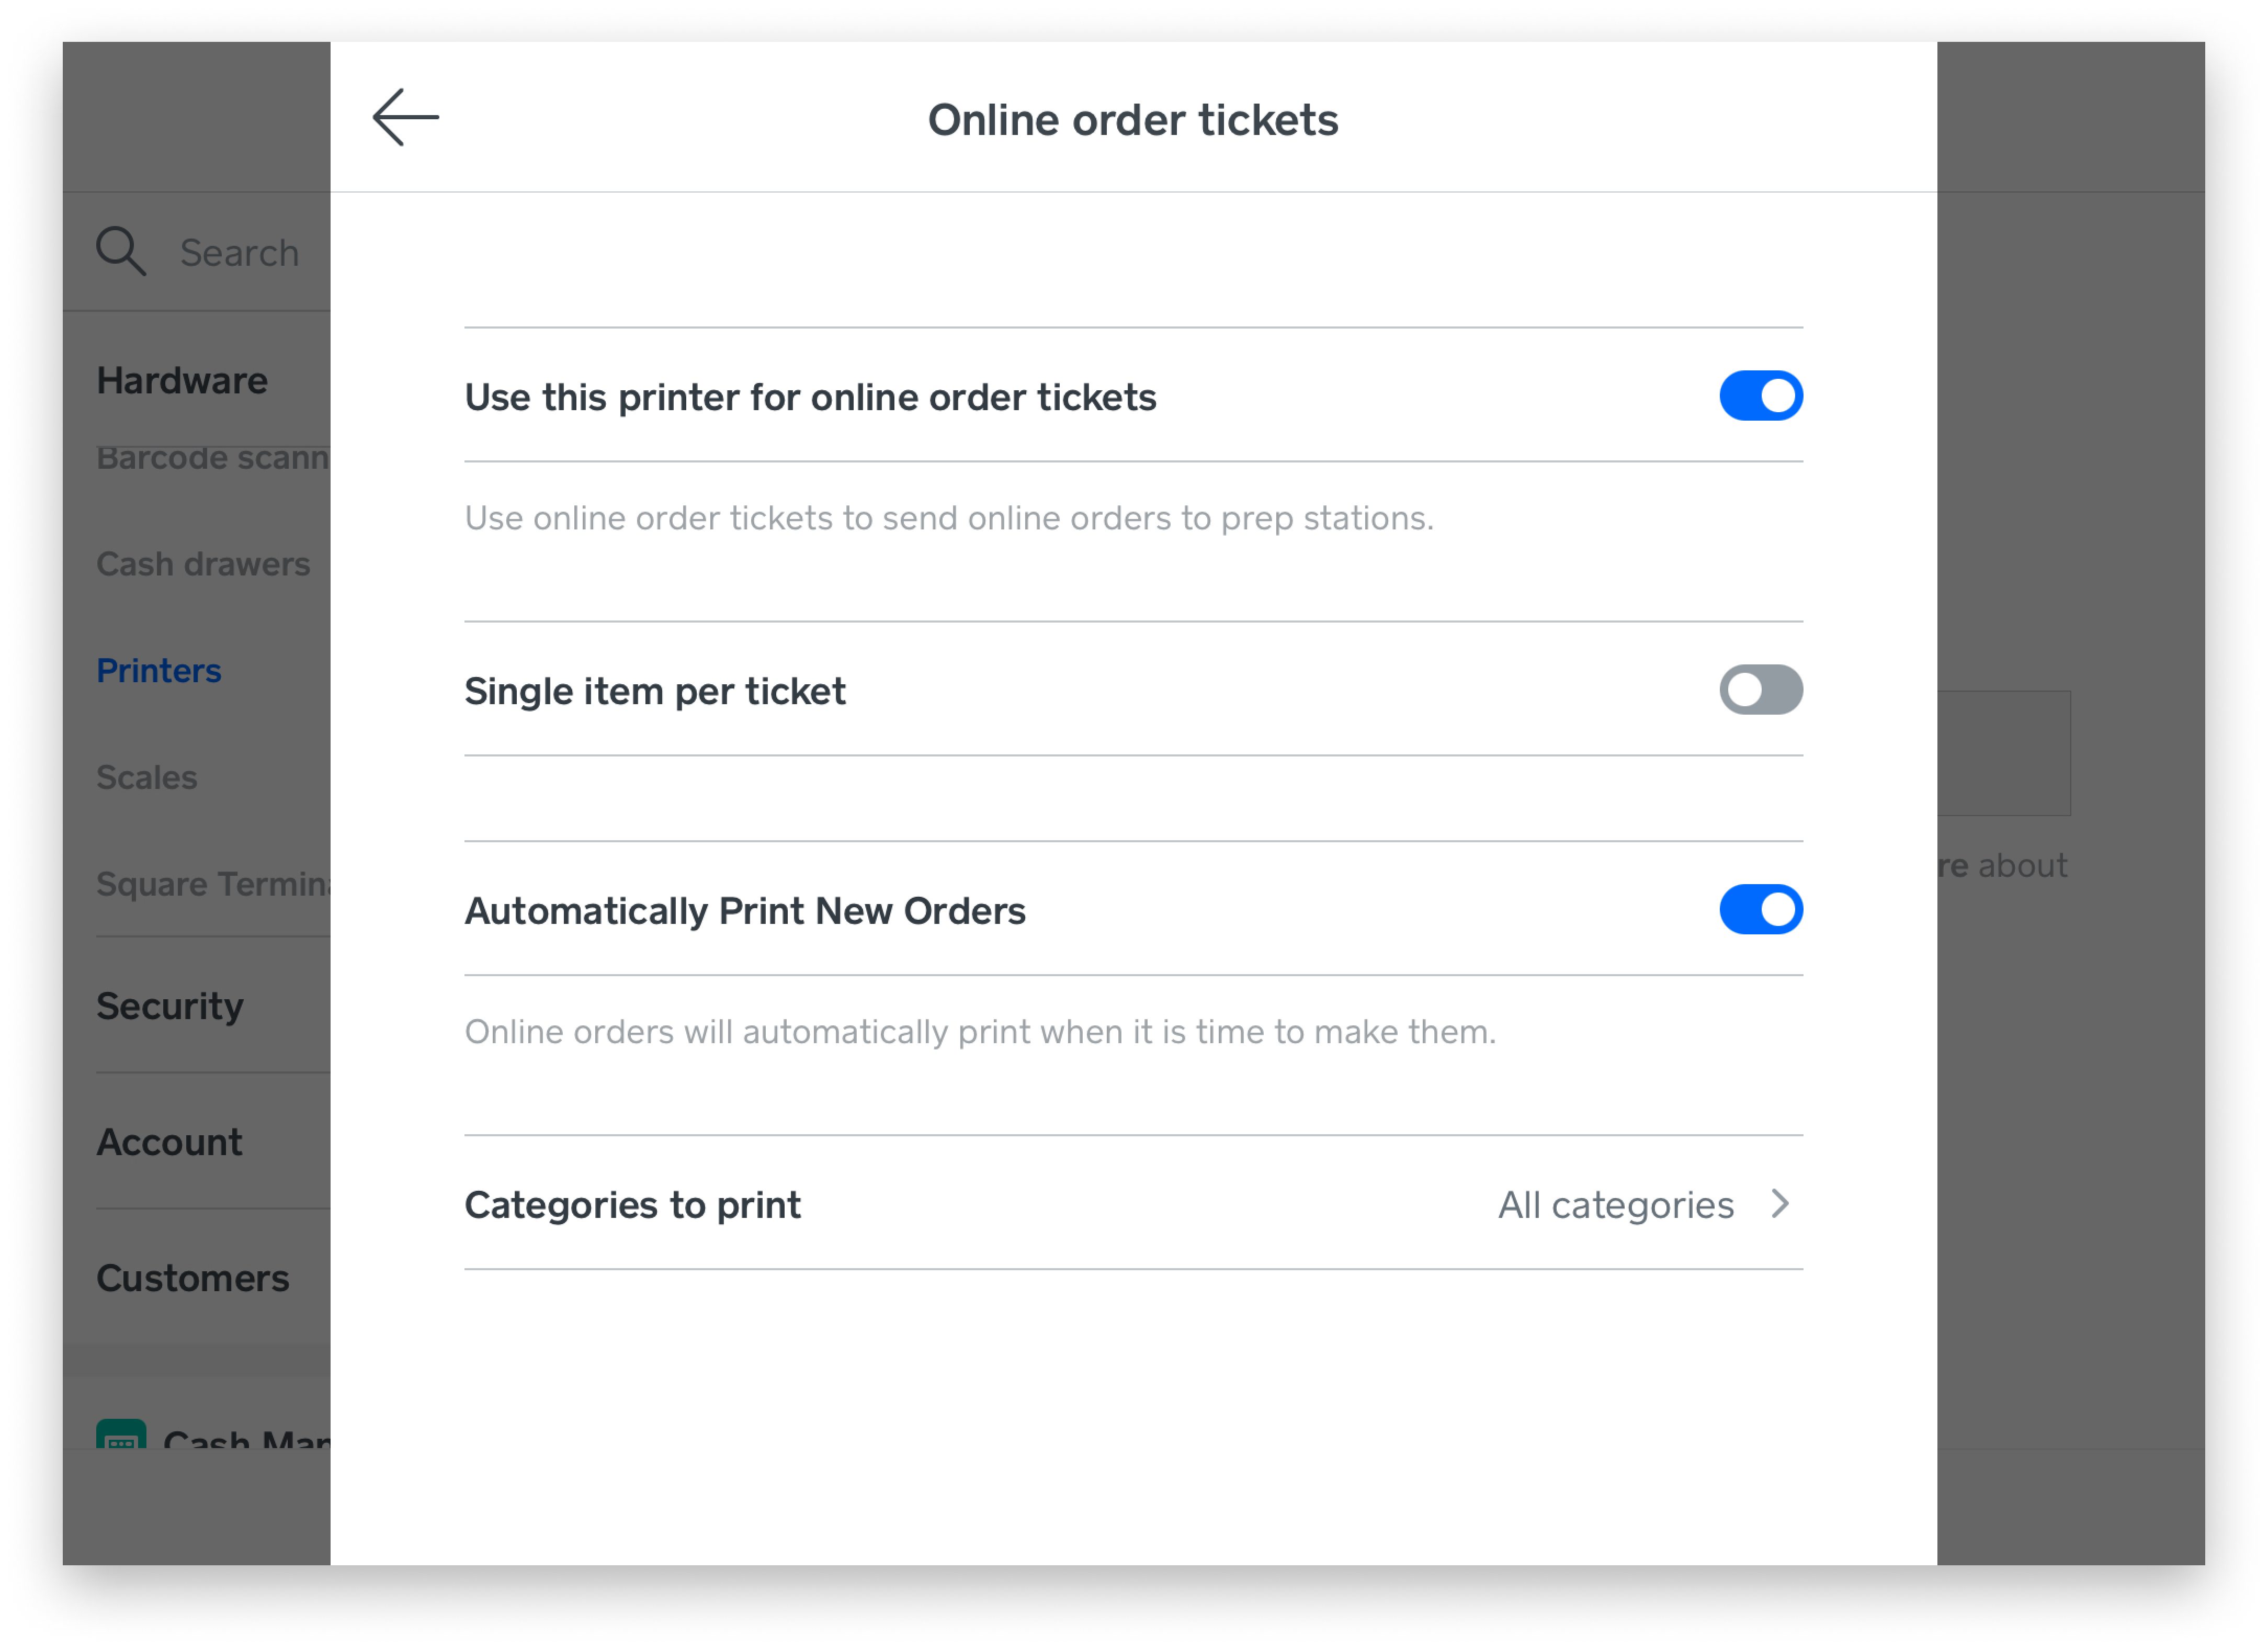
Be sure to enable the Online order tickets toggle option for the printer station(s) you want to print Order Manager order tickets. There are several other options:
Toggle on Single item per ticket. With this setting on, you will get a new order ticket for each item.
Toggle on Automatically print new orders. With this setting on, all new orders will print when they come in.
Select Categories to print if you want the print station to only print some item categories.
Tap Save.
Learn more about setting up a printer station on iOS or Android devices.
Auto-printing
You can toggle on the automatic order ticket printing functionality to ensure all new orders will automatically print when they come in. Follow the steps above to toggle on the Automatically Print New Orders feature. There is also a Print button on the Order Detail page.
Note: If you have the Square POS app minimized or the device locked, auto-printing will not work. The Square POS app needs to be open on the screen for auto-printing to work.