Table of contents
Booking websites are essential for businesses that rely on client appointments, such as hair salons, tattoo shops, massage and therapy locations, beauty and nail salons, and fitness studios.
Rather than relying on a random collection of tools for scheduling appointments and sending follow-ups and reminders, a purpose-built booking website integrates these features into a single platform, helping to attract more customers, simplify scheduling for clients, and save your business valuable time and money.
And while they have many benefits for your business, they’re also a preferred way for customers to schedule time with your team. In the Square 2025 Future of Beauty report, 52% of beauty consumers said they like interacting with automated appointment scheduling apps, and 62% like automated appointment reminders.
Building a booking website may sound complex, but you can easily design one with no coding involved, set up 24/7 scheduling for clients, and accept payments anywhere using a platform built specifically for appointment scheduling. Here’s how to create a booking website that meets your needs and helps your business run more smoothly in the background.

What is a booking website?
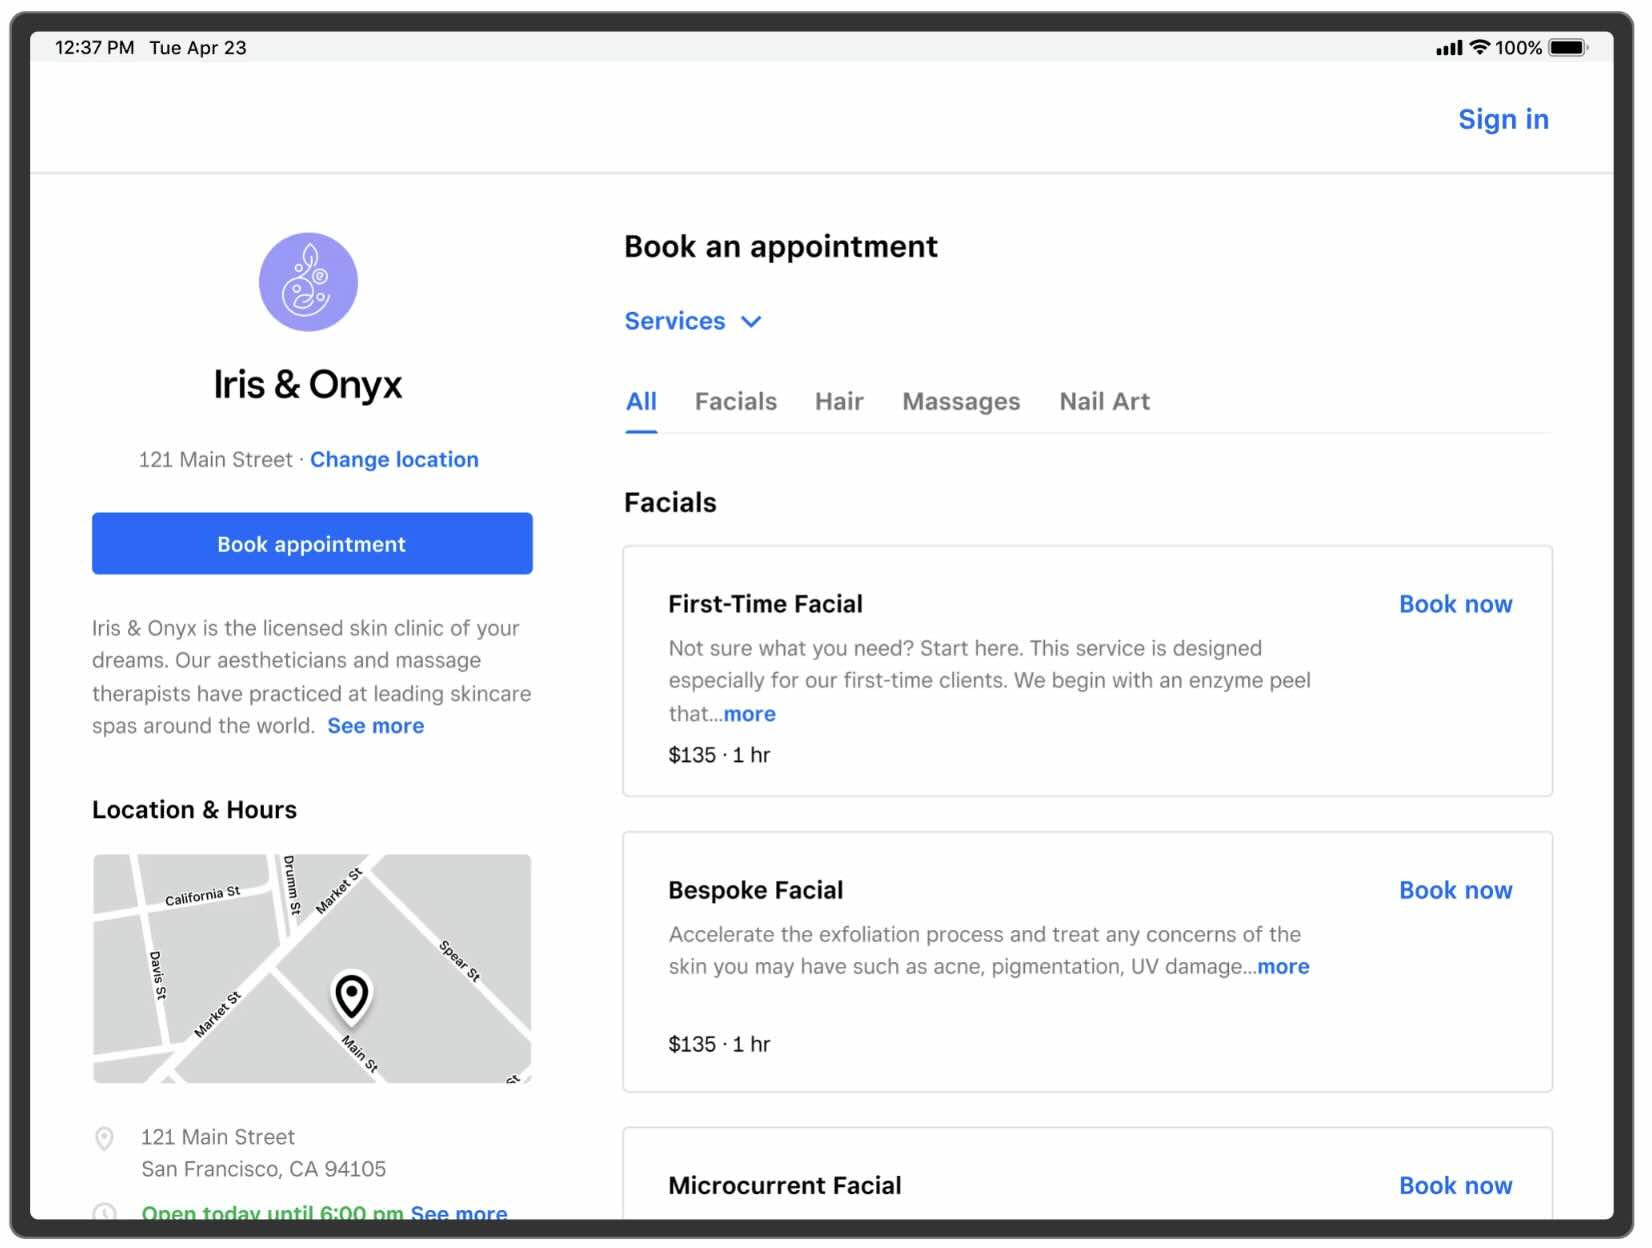
A booking website is an online platform that lets customers schedule appointments, book services or make reservations digitally without having to call or visit a physical location.
These websites give users a dedicated place for potential customers to explore services, check availability with staff and schedule appointments any time of day and from any device. This functionality can be part of a larger website experience, or it can be a purpose-built app or portal that’s specifically designed to accept and schedule appointments.
The three most common types of booking websites are:
- Online booking pages that are primarily focused on listing relevant business details (like address, hours of operation, services and pricing) and intaking appointment requests.
- Full-service websites, where the booking portal is integrated into a wider website experience that might include service pages, contact forms, image galleries, customer reviews and testimonials, and eCommerce capabilities.
- Social media integrations, which let businesses set up booking portals directly in social platforms like Instagram or Facebook.
For businesses, booking websites make it easier to schedule staff, and eliminates the need to constantly be on the phone taking appointment requests or manually sending reminder messages.
How to create a booking website
Launching an impactful booking website requires a combination of careful planning and the right platform. Below, we break down eight steps to making a booking website that converts more visitors into appointments and makes your business easier to manage day-to-day.
1. Pick a domain name
Before launching a website, you’ll need to pick a domain. This is the address that customers will use to access your booking website, and what you’ll share and link to in your sales and marketing material.
If you don’t have a website already, you’ll need to purchase a domain. Some website platforms, like Square Online, let you buy an available domain or transfer one you already own into the platform.
Typically, your domain should be your business name, a personal name, or something that aligns with your business or location. It should be short and easy to share, which means avoiding the use of hyphens, numbers, underscores or symbols that can make it difficult to remember.
To register a .ca domain, you must be able to meet the Canadian Presence Requirements (CPR) by being a Canadian citizen or permanent resident, or by operating as a Canadian-registered corporation.
2. Select a website platform and theme
There are plenty of website platforms that allow you to create a booking website. Finding the right one comes back to your requirements as a business and what type of booking website you want to create.
Here’s what to consider when choosing an online booking system:
- Customizable: Your booking website should reflect your brand and leave an impression on customers. Make sure you can customize the site’s font, colours and layout to make it your own. The best website builders for small businesses will give you intuitive drag-and-drop tools to build your pages, customizable page templates and layouts, and built-in mobile responsiveness features.
- Easy to use: The whole point of a booking website is to help your business run smoothly and free up time. Be sure to choose a platform that’s easy for you, your staff and customers to use and offers the right functionalities. Tools like automated appointment reminders, waitlists, the ability to book multiple appointments with different staff members in the same visit, or automatic tip allocation among staff are all essential time-saving functions.
- Mobile–friendly: Since many clients discover and book appointments online, it’s critical that your online booking website is mobile-friendly and easily enables clients to book and manage appointments from their devices. An added bonus? Instagram and Facebook compatibility. With this, clients can follow or discover your business on Instagram or Facebook and book directly from your social pages.
- Accepts multiple payment forms: Don’t limit your business to a single payment form. Customers want flexibility when it comes to how they pay for services, so your online booking website should cater to that. You’ll of course want to accept credit and debit cards, but be sure your online booking platform also accepts mobile wallets (like Apple Pay or Google Pay) and buy-now, pay-later options, which are particularly popular with younger consumers for larger purchases.
- Will scale with your business: Finally, it’s imperative that your online booking platform offers the tools and capabilities to scale with your business as you grow. Whether you want to add an online store to sell retail products or expand to new locations, your booking platform should fuel your growth, not hinder it.
Once you’ve chosen a website platform, the next step is selecting a theme that reflects your brand and makes booking easy for your clients. A well-chosen theme lets you incorporate your business’s fonts, colours, and imagery, while also ensuring your site is easy to navigate. When your site feels professional and on-brand, customers are more likely to trust it and book your services.
- Design flexibility to match your brand: Choose a theme that allows you to upload your logo, customize font styles, and apply your brand’s exact colour palette (via RGB or HEX codes).
- A clear visual hierarchy and navigation menu: Opt for themes with a simple top navigation bar, clearly labeled buttons (like “Book Now” or “Services”), and homepage layouts that prioritize key content above the fold. This helps first-time visitors instantly understand what you offer, making it more likely that they’ll book with you.
- Polished, modern styling that builds trust: Modern templates with minimal clutter, consistent spacing, and high legibility make your website look polished and professional. This adds credibility to your business, making the choice to book your services easier.
- Dedicated space for visual content: Choose themes with gallery blocks, image carousels or full-width hero images that let you showcase your work. This is especially helpful for salons, tattoo studios or pet groomers, where photos of past work build customer confidence.
- Modular layouts for growth: Look for themes that let you easily add new sections or pages (like “Shop,” “Gift Cards,” or “Team”) without needing to start over. This is useful for businesses that may expand from services into retail or hire additional staff in the future.
If you’re just getting started, Square Online offers a library of templates tailored to industries like beauty, wellness, food and professional services — all of which can be customized and connected directly to Square Appointments for seamless booking.
3. Design and personalize your booking site
After you’ve picked your theme and loaded it into your website builder, it’s time to start making the booking pages look and behave the way you want it to. This means making tweaks to the design and customizing the user flow so that it creates the desired experience for your customers.
Here’s a quick checklist of things to consider when designing and personalizing your booking site:
- Change the colour palette so that it aligns with your brand’s style guide.
- Add logos and custom imagery to showcase your space, services and staff.
- Choose a font that aligns with your brand and is easy to read across devices.
- Build your homepage, service pages and contact page, and include messaging that resonates with your brand and target audience. For example, if you run a Nordic spa business, you can include copy on your website that speaks about relaxation and rejuvenation.
- Create a simple website navigation that makes it easier for users to find services and book. This includes a top navigation and drop down menu, the buttons and links you use on your homepage and service pages, and the footer menu for your website.
- Simplify your booking process so that it only asks for must-have information from customers, like their name, contact details and, if required, pre-payment information.
- Strategically place calls-to-action (CTAs) on your website to funnel users to booking pages.
- Include social proof like testimonials, reviews and social media shares.
- Ensure your website looks great on desktop, mobile devices and tablets. To do this, you can toggle between desktop and mobile views in your website builder and adjust the layout based on what you see in the preview.
When customizing your site, make sure to balance creativity with functionality. You want your site to be on-brand and reflective of your personality, but it should also be easy-to-use. Visitors should be able to easily find your service and booking pages without having to sift through too much content or too complex of a website navigation.
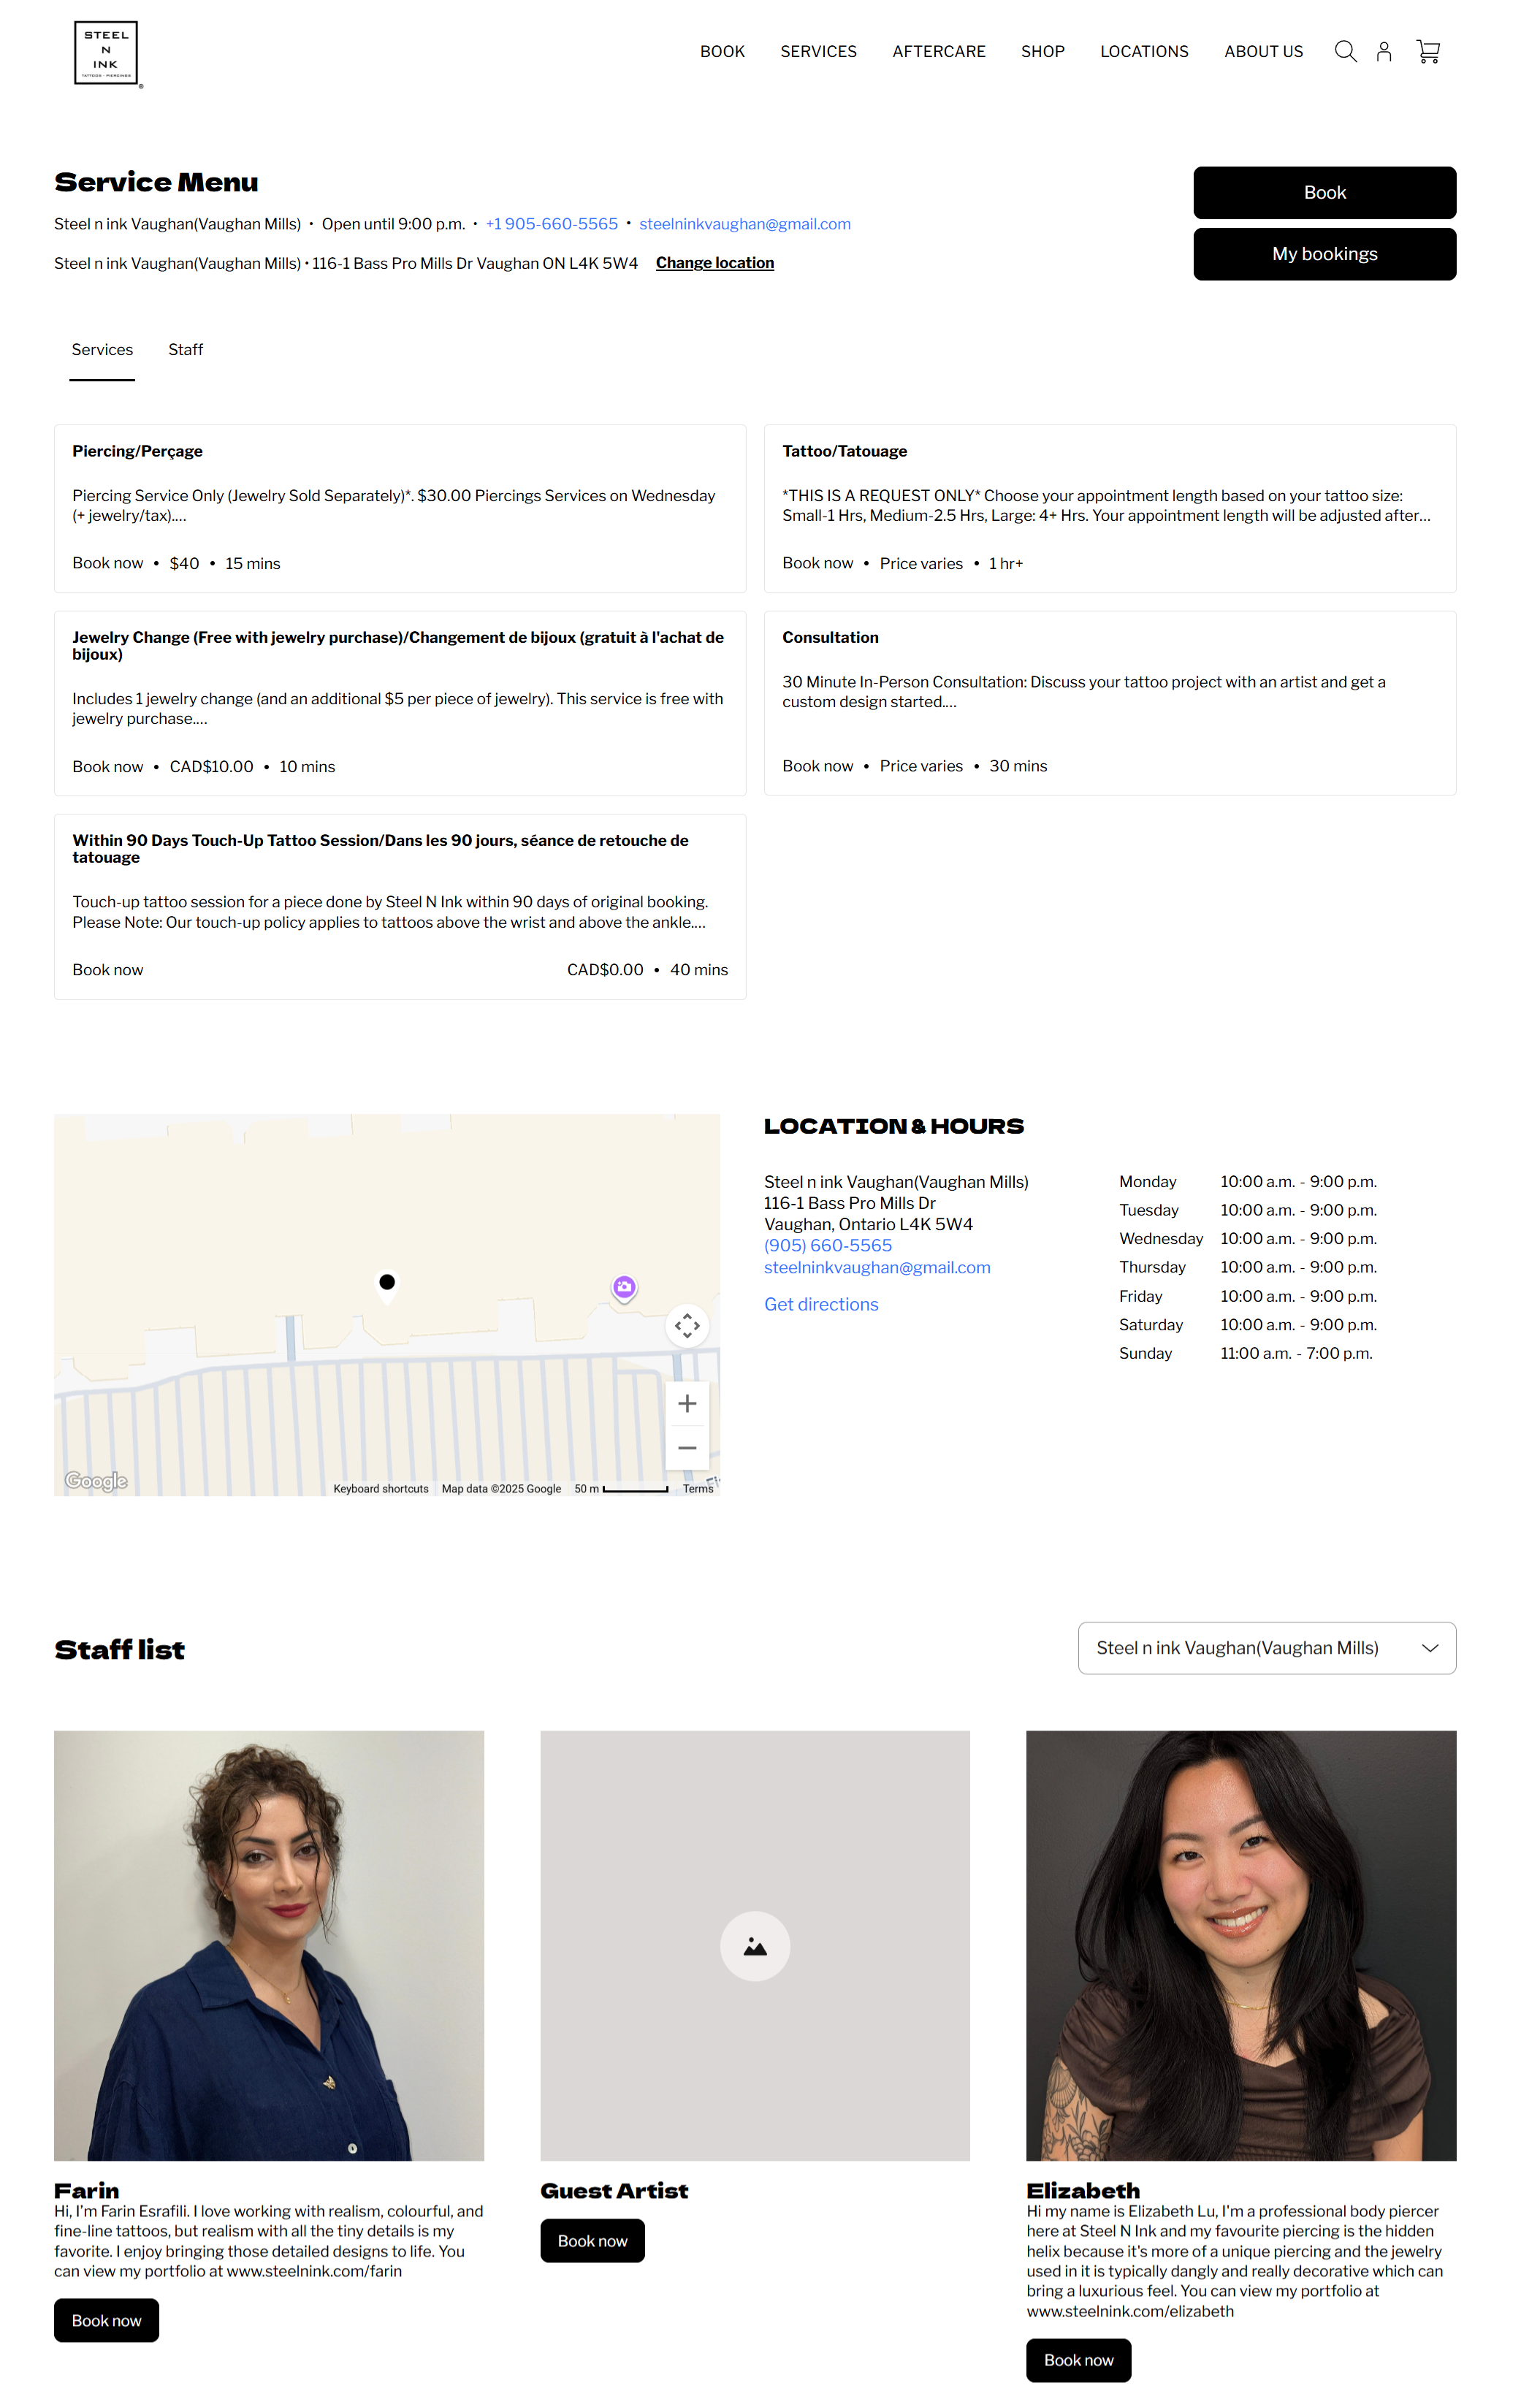
Square customer Steel N Ink strikes this balance perfectly, using a combination of Square Online and Square Appointments to create a compelling, on-brand website with a simple and intuitive booking portal.
This starts with a visually striking homepage with custom fonts, colours, stylistic imagery and quick links to the company’s two key services.
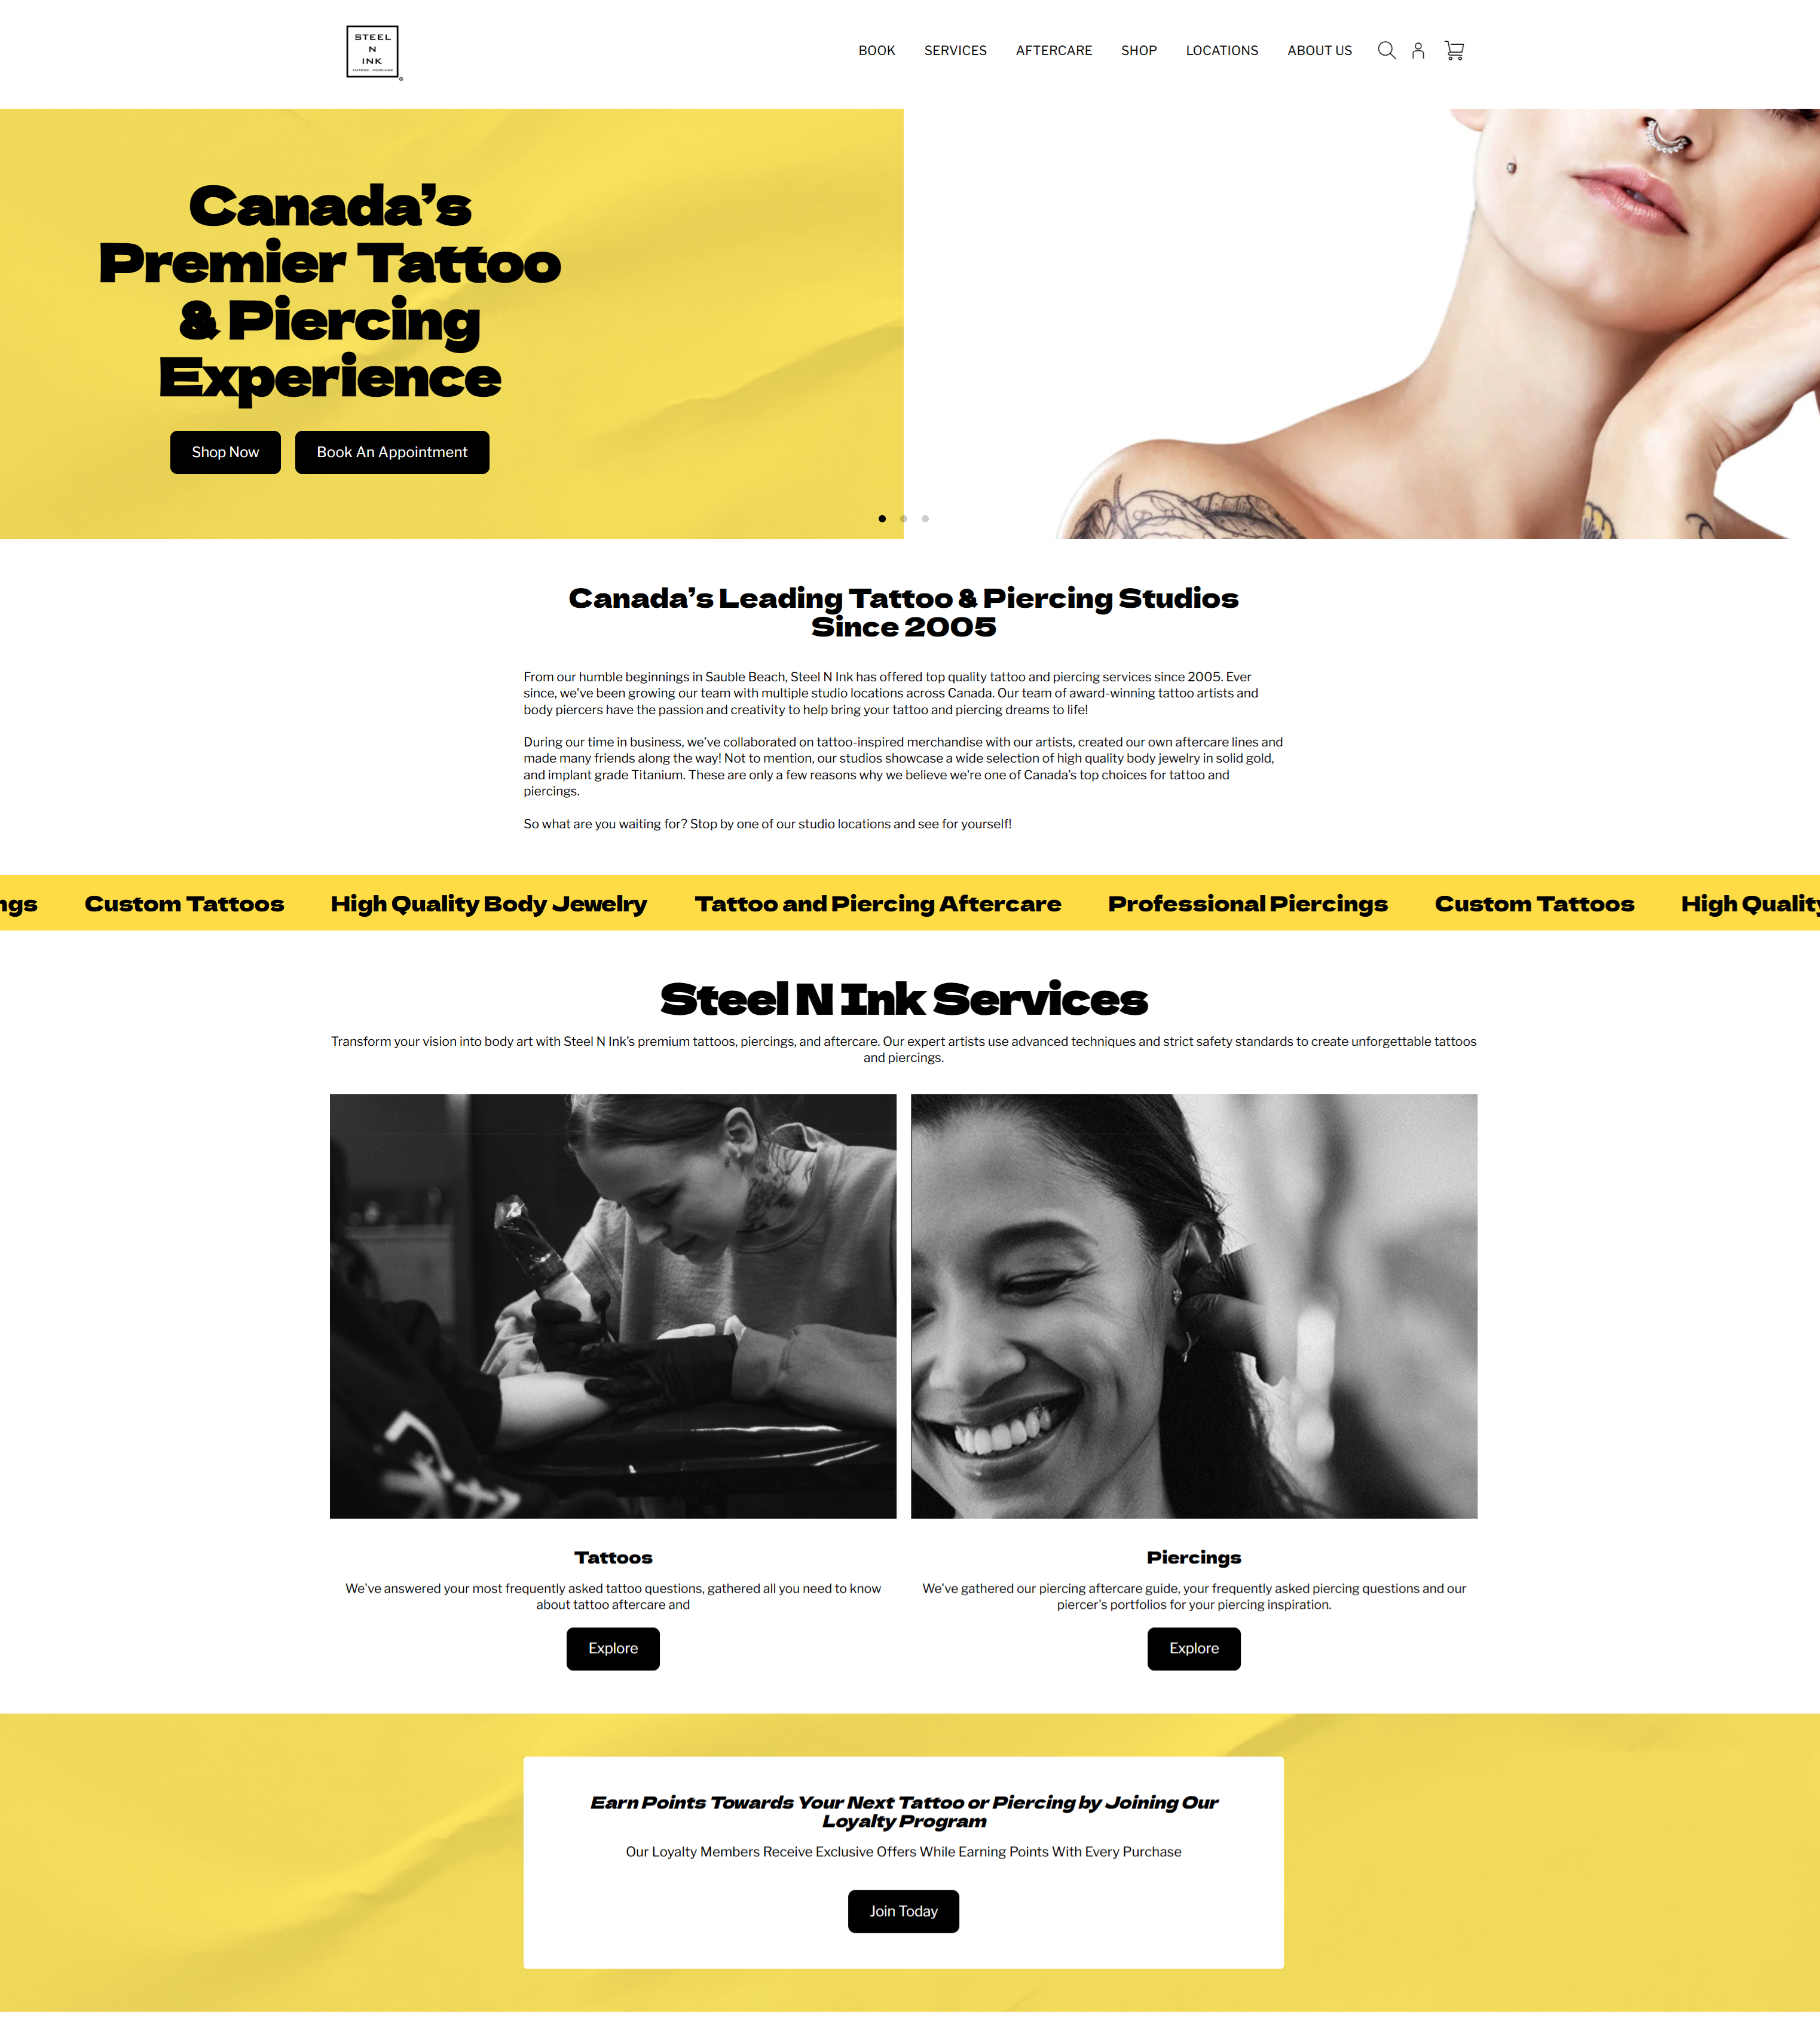
Once visitors have learned about the services and are ready to go, they’re directed to a clean service menu and booking page that shows them all of the information needed to make a decision, including:
- Appointment options
- Staff list and availability
- Booking management
- Pricing and appointment durations
- Store locations and hours (with the ability to change locations)
This creates a seamless booking experience that lets visitors book time and checkout in just a few clicks.
4. Add your service, pricing and availability
Once your website has been built, the next step is to populate your appointment booking platform with service offerings, pricing, staff profiles and availability windows. This is the underlying information against which customers will be able to book appointments and pay for your services online or in-store.
Using Square Appointments, you can build and maintain a service library where you can add details about the services you offer, including price and appointment duration. You can also add variations and modifiers to your services (for example, the ability to add on a beard trim to a men’s haircut or creating pricing variations for short vs. long visits).
You can edit and remove services as needed, organize them into categories, assign them to specific staff members, and change the order in which services are presented in your booking portal. This ensures you’re always presenting the most up-to-date information.
In addition to services, you might also consider selling products (like retail items or merch) on your booking website to introduce a new revenue stream and keep clients engaged with your brand.
With Square, you can add a free, shoppable site to your online booking platform that allows customers to order online or pick up in-store. You can direct customers to your online store from social channels or promote new online products from your email marketing newsletter, and all inventory is automatically tracked and managed via your Square Dashboard, whether it’s sold online or in person.
5. Set your availability and schedule
Now that your online booking website has been created, it’s time to customize your site and enable booking so clients can start making appointments. This means making booking available on your site, and setting staff schedules to ensure that all appointments that are booked have the right coverage.
In your Square Dashboard, navigate to the channels section and make sure the “enable online booking” option is turned on.
To manage your staff’s schedule, Square Appointments users will need to create bookable staff members to make them available for booking, and to allow them to manage their own schedules. After creating the bookable staff member profile, you can customize their customer-facing information (or how they appear in your booking portal), the services they perform and their hours of availability. If you set staff members to “bookable online,” customers will be able to schedule appointments with them through your booking website.
To enable waitlists, Square Appointments users can navigate to the settings section of online bookings and toggle “Enable waitlist” on. Once waitlists are enabled, clients will see a prompt to join the waitlist if their preferred day or time isn’t available.
6. Add a services page and necessary legal pages
Service pages are a crucial part of your booking website. They help visitors understand what you offer and are where they gather important information that will help them make a decision about whether or not to book an appointment with your team.
When making a booking website, build out dedicated pages for each of the main services you offer. This will ensure you provide enough information about each service to inform customers appropriately. It’s also important for search engine optimization (SEO) and makes it easier to share links to specific offerings on social media and emails.
On each service page, be sure to include:
- Detailed descriptions about the service you offer
- Pricing and appointment types
- Photos and videos showcasing your service and results
- Testimonials and reviews from happy customers
- FAQs and specific information about your policies and rules
- A clear “Book Now” CTA to direct users to your booking page
While you’re building your service pages, it’s also a good idea to create either a dedicated legal page or a section at the bottom of your services pages where you outline your:
- Terms of service
- Privacy policy
- Cancellation policy
- Refund policy
These pages help to educate customers and build trust by showing that you’ve thought of not only the service you’re offering, but the policies and processes needed to protect your staff and customers.
7. Connect to a payment provider
Before launching your site, ensure that you have a dedicated payment provider in place that allows clients to pay for their appointments online when booking. If possible, offer multiple ways to pay, including through debit and credit cards, mobile wallets and buy now, pay later. This creates a convenient, end-to-end booking experience where visitors can secure appointment times and pay for your services all in one checkout experience.
With Square Appointments, you don’t need to connect a third party payment provider. Instead, you can use Square’s integrated payment processing capabilities to process transactions directly within the Square Appointments app, which can process payments either online or in-store.
With Square Appointments, Plus and Premium tier users can also set requirements for pre-paying for services, apply rewards to transactions, customize payment options, set and enforce no-show or late cancellation fees, and even allow visitors to check out directly from your booking calendar.
8. Market your booking website
Now that you know how to make a booking website, you need to promote setting appointments with current, past and potential customers. A strategy that includes organic and paid promotions can help you reach the greatest number of people effectively.
Ways you can promote your booking website include:
- Adding a booking button to your Google Business Profile and social media pages to make it easy for social users to create an appointment with just one click.
- Creating social media posts and sharing links for booking features. Make sure to showcase the ease of booking online and the customer benefit of selecting their own appointments anytime, anywhere.
- Running paid ads, such as Google Ads, to reach customers searching online for your product or service. Google Ads can be a cost-effective paid strategy for a local business.
- Creating content to help your website rank in organic search (also known as SEO). A strong website with content people want to click on can help make it easier for customers to find you in search engines. Make sure your website includes keywords related to your business and the services you provide, and that you have online bookings or appointments available.
- Providing quality customer experiences to encourage word-of-mouth promotion. Delivering a great experience makes it more likely that your most loyal customers will share information about your business with others.
- Emailing existing customers to let them know that online booking has been added to your website. Square Marketing allows you to send automated campaigns via email and/or text message to customers following a one-time setup.

Select a platform to build your appointment-booking website
If you’re just starting a website for your business and you’re not sure where to begin, we recommend deciding on the type of booking experience you want to create.
You have three choices for building a booking appointments website:
- Option 1: Create a simple webpage.
- Option 2: Add booking to a new, full-service website.
- Option 3: Add booking to an existing website.
Option 1: Create a simple booking webpage with Square Appointments
Square Appointments can help you create a simple booking webpage with just a few clicks, so you can start taking appointments immediately.
This is where you can list business hours and get bookings that sync with your calendar. It’s included in your Square Appointments subscription and can be set up right from your online Square Dashboard.
This option is ideal for a new business or a business that doesn’t already have a website and needs only the most basic booking options to streamline operations. For example, stylists who are either renters or independent and don’t need a full-blown website just yet.
Here’s how to build a simple booking webpage with Square:
- From your Dashboard, click Online Booking, then Channels.
- Then choose “Enable online booking.”
- Click Manage to edit your business details, service category and order and view booking flows.
Option 2: Create a custom, full-service site with Square
A custom, full-service website gives you the design freedom to showcase your brand online and provides a dedicated, more sophisticated website for service businesses.
You can create a free website with Square Online and allow clients to book appointments, purchase items, and stay up-to-date with your business. Bookings and orders from your website are automatically synced with Square Appointments and your point-of-sale system. Everything from colours to fonts to styles can be customized so that every element of the website design looks and feels like your business. It’s a customized, all-in-one solution.
This option is great for small to medium-sized businesses that already have an online presence or are using Square as a point-of-sale solution. It’s also ideal if you need more booking features, such as creating appointments at multiple locations or offering a wider variety of services and options.
Here’s how to get started with a custom Square booking website with Square Appointments:
- In Square Dashboard, click “Online Booking”, then “Channels”.
- Select the Square “Online website” option, then click “preview and edit” to begin building your booking website. During first-time setup, Square automatically generates a website; this can take a few minutes.
- Customize your website specifications, including location, service list, colors, and designs. You can change as much or as little as you want, giving you full control of everything about your booking website design.
- When you have everything set up the way you want, click “Publish” so that you (and others) can see your website.
Option 3: Add booking to your existing website
If you already have a website, you can add Square Appointments booking to your existing site without having to start over. Square Appointments has a booking widget that you can add to practically any website — even if it was custom-built — as an easy way to incorporate appointments into your existing online infrastructure.
This option is often popular for businesses that already have a custom-built website and want their clients to stay on their website to book.
It’s easy to add this option to your website:
- Log in to your Square Appointments Dashboard and then click “Online Booking”, then “Channels”.
- If you have multiple locations, select the location you want to manage and navigate to “Add a booking flow to an existing site.” Click “Get started.”
There are multiple setup options for an integration with your existing website. Choose the one that makes the most sense for your business.
- Get a booking flow URL that you can add to your website by clicking “Get URL” and selecting a specific location if you have multiple options. Copy the URL and paste it anywhere on your current website. (We recommend adding a link in the main navigation or menu to make it easy for customers to find.)
- Create a button in Square and add it to your website by clicking “Create button” and selecting the proper location if you have multiple locations. This allows you to create the HTML for a button without coding. Choose a button colour, text, shape, and font. Copy the HTML and embed the button on your website or in emails.
- Embed the booking flow into your website using the Square Appointments booking widget. Click “Get embed code,” select the location you want to create a widget for if you have multiple locations, and copy the code provided. Then paste the code directly where you want the widget to appear on your website.
- Add a button to your email signature by clicking “Create button” in option 2 and pasting it into the email signature preferences for whatever email client you regularly use, including Outlook or Gmail.
Why use a booking website for appointment scheduling?
A strong booking website can make it easier to manage business operations and day-to-day tasks. According to the Square 2025 Future of Commerce report, 72% of consumers worldwide say they very much or somewhat like using an informative website, 62% say they like automated appointment reminders, and 52% say they like automated appointment scheduling. In addition to ensuring appointments are easily booked and managed, here are some other reasons to use a booking website:
- Generate leads or acquire new clients: A booking website can be shared online with current clients and can help you connect with prospective clients when they are ready.
- Book consultations: By offering an introductory appointment online, you can connect with new customers.
- Create operational efficiencies: A booking website saves time that would otherwise be spent by staff answering phone calls, emails, or in-person requests to set appointments.
- Save money: Businesses upgrading from taking phone calls to taking automatic bookings can see cost savings.
- Make your business discoverable on search: Because appointment pages are likely to be popular on your website, they can have extra search engine value, helping you get discovered online.
While booking sites are often associated with appointment-based businesses like health care and beauty, they can also be used for retail and food- and drink-based businesses. If you have that type of business, there are some additional reasons you might use a booking website:
- Book fittings: Certain types of businesses, such as tailors or clothing boutiques, can use appointments to set fitting times for customers to help keep in-store traffic moving with ease.
- Set up pickup times: Appointments can be beneficial for businesses where customers pick up products, such as a frame shop, to ensure that orders are ready when customers arrive.
- Schedule tastings or special events: Restaurants or wineries can use a booking website to set times for special tastings or events so that crowd flow is controlled.
What businesses benefit from having a booking website?
Not sure if your business needs a booking website? Here’s a simple litmus test to help you decide. If your business regularly takes phone bookings as part of your day-to-day interaction with customers, then you could likely benefit from a booking site.
Generally, the business types that see the biggest benefits from booking websites include:
- Spas
- Full-service salons (hair, nails, skin/esthetics)
- Barbershops
- Medical spas
- Independent yoga, pilates, or barre studios
- Retailers and food businesses
- Boxing gyms
- CrossFit gyms
- Tattoo shops
- Piercing studios
- Tutors
- Pet groomers
- Escape rooms
- Tailors
- Custom-fit retailers, including bridal shops, suit retailers, etc.
- Professional services, including tax preparers/accountants, lawyers, or web designers
If your business falls into one of these categories, you’re in a prime position to receive all the benefits that a booking website has to offer. For example, beauty and wellness businesses can cut back on phone tag with customers and give their staff a clear picture of their daily schedules with online scheduling that syncs with staff management software.
Fitness studios and gyms can manage class registrations and waitlists more efficiently by maintaining an up-to-date list of attendees. This can help them schedule classes more effectively, and potentially expand their offering if they can see growing demand.
How to make a booking website FAQs
Which booking site is free?
Square Appointments offers a free subscription tier that provides a fully operational booking website and calendar management system. Users on this free plan that want to accept payments through Square Appointments are subject to the Square standard transaction fees of 2.5% per credit card transaction, 0.75% + 7¢ for debit card payments and 2.8% + 30¢ for online transactions. All fees are chargeable on a pay-as-you-go basis.
How easy is it to make a booking website?
Making a booking website is fast and easy, as long as you use the right platform. An integrated platform like Square offers all of the functionality you need to create a full booking website, without the need to piece together disparate tools.
Users can use Square Appointments to create a booking portal and staff profiles, Square Online to create a full service website on which that booking portal will live, and the Square POS ecosystem to process and accept payments for services in-store and online.
How do I accept payments on my booking website?
To accept payments on your booking website, you need to integrate your booking portal with a secure payment processor. With Square Appointments, this payment processor is built in, allowing you to accept card payments, mobile payments, and buy now, pay later without any additional integrations.
How much does it cost to create a booking website?
The full cost of creating a booking website will depend on a combination of the subscription fees for your chosen website builder and booking portal, transaction fees for processing online payments, and any third-party help you may need to hire to create the website.
Square Appointments offers a free plan that includes unlimited appointments, an online booking site and payment processing. As your business grows, you can upgrade to a paid plan with multi-staff support, advanced team management and commission tracking. Paid plans through Square Appointments start at $35 per month.
![]()