Configurer Square Kiosk

À propos de Square Kiosk
Le matériel Square Kiosk est un système polyvalent fonctionnant sur iPad qui peut être facilement fixé à un mur, un comptoir ou un support au sol compatible VESA, n’importe où dans votre établissement. Grâce à ses lecteurs de cartes à puce et sans contact intégrés, vous pouvez traiter les paiements par carte passée ou insérée, ainsi que les paiements par téléphone cellulaire via Apple Pay et Google Pay.
Lorsque le matériel Square Kiosk est associé à l’application Square Kiosk, il se transforme en borne de commande en libre-service qui permet aux clients de passer commande et de procéder eux-mêmes au paiement.

Dans un autre cas d’utilisation, le matériel Square Kiosk peut également fonctionner comme un appareil de point de vente peu encombrant qui peut exécuter n’importe quelle application Solution PDV Square, et pas seulement l’application Square Kiosk. Cette option est idéale pour les entreprises qui opèrent dans des espaces restreints ou étroits et qui ont besoin de monter leur appareil de point de vente sur un mur.
Avant de commencer
Vous pouvez configurer votre Square Kiosk en installant le matériel Square Kiosk, en créant un code d’appareil à partir du Tableau de bord Square et en vous connectant à l’application Square Kiosk. Découvrez Square Kiosk en tant que solution globale.
Avant de pouvoir utiliser Square Kiosk comme borne de commande en libre-service pour accepter des commandes, imprimer des bonsn de commande et accepter des paiements en espèces, vous devez disposer d’un iPad compatible sur lequel l’Application Square Kiosk est installée. Vous avez également besoin d’au moins un appareil de point de vente actif (téléphone, iPad ou matériel Square) utilisant l’application Solution PDV Square.
Pour vérifier si votre iPad est compatible avec Square Kiosk, accédez à notre page de compatibilité d’appareil.
Étape 1 : installer le matériel Square Kiosk
La borne de commande Square Kiosk dispose de quatre options d’installation différentes pour répondre aux besoins de votre entreprise :
Support mural angulaire
Support mural plat
Support de comptoir
Support VESA
Obtenez plus de détail sur les Caractéristiques techniques du Square Kiosk, comme le contenu de la boîte, les dimensions, la connectivité et plus encore.
Pour plus de sécurité et de personnalisation, vous pouvez acheter un Câble d’extension USB-C de 14 cm pour Square Kiosk. Ce câble se branche directement sur la borne de commande Square Kiosk pour vous permettre de débrancher et de ranger votre appareil sans avoir à retirer le support de montage.
 Ce support mural incline l’écran vers le haut, en direction du personnel et des clients. Téléchargez le guide visuel ici.
- Choisissez un endroit sur le mur : maintenez la borne de commande contre le mur et déplacez-là pour trouver la bonne hauteur. Évitez de placer le support sur des montants.
- Positionnez le support incliné : mettez à niveau le support sur le mur et marquez la position des trous de vis avec un crayon.
- percez des trous sur les marques de vis : si vous installez le support sur une cloison sèche, utilisez la mèche incluse.
- Vissez le support incliné au mur : insérez les ancrages muraux dans les trous de vis. Positionnez le support incliné, insérez les vis à l’avant et vissez-les dans le mur. Vérifiez le niveau du support pendant vous serrez complètement les vis.
- Branchez le concentrateur sur la borne de commande Square Kiosk : à partir du bas du support, enfilez le câble USB-C du concentrateur par l’ouverture et insérez-le dans le connecteur à l’arrière du support de la borne de commande Square Kiosk.
- Insérez la borne de commande Square Kiosk sur le support : serrez la vis de fixation du centre jusqu’à faire disparaître le côté rouge sur la vis. vérifiez si tout est bien fixé et que rien ne bouge pas.
- Branchez la borne de commande Square Kiosk : branchez le câble USB-C de l’adaptateur d’alimentation dans le concentrateur, puis branchez une des extrémités du câble de l’adaptateur d’alimentation dans l’adaptateur d’alimentation et l’autre extrémité sur une prise.
- Faites glisser l’iPad et fixez-le : Insérez l’iPad au connecteur et enclenchez le loquet de sécurité. Facultatif : pour solidifier encore plus l’iPad, utilisez un petit tournevis cruciforme et vissez la vis de sécurité sur le côté du support de la borne de commande Square Kiosk.

Le support mural plat est compact, peu encombrant et se pose à plat contre le mur. Téléchargez le guide visuel ici.
- Choisissez un endroit sur le mur : maintenez la borne de commande contre le mur et déplacez-là pour trouver la bonne hauteur. Évitez de placer le support sur des montants.
- Positionnez le support plat : mettez à niveau le support sur le mur et marquez la position des trous de vis avec un crayon.
- percez des trous sur les marques de vis : si vous installez le support sur une cloison sèche, utilisez la mèche incluse.
- Vissez le support plat au mur : insérez les ancrages muraux dans les trous de vis. Positionnez le support plat, insérez les vis à l’avant et vissez dans le mur. Vérifiez le niveau du support pendant vous serrez complètement les vis.
- Branchez le concentrateur sur la borne de commande Square Kiosk : enfoncez le câble USB-C du concentrateur dans le passe-câble situé à l’arrière de la borne de commande Square Kiosk. Il ne doit pas y avoir d’interférence entre le câble et la vis de fixation.
- Insérez la borne de commande Square Kiosk sur le support : serrez la vis de fixation du centre jusqu’à faire disparaître le côté rouge sur la vis. vérifiez si tout est bien fixé et que rien ne bouge pas.
- Branchez la borne de commande Square Kiosk : branchez le câble USB-C de l’adaptateur d’alimentation dans le concentrateur, puis branchez une des extrémités du câble de l’adaptateur d’alimentation dans l’adaptateur d’alimentation et l’autre extrémité sur une prise.
- Faites glisser l’iPad et fixez-le : Insérez l’iPad au connecteur et enclenchez le loquet de sécurité. Facultatif : pour solidifier encore plus l’iPad, utilisez un petit tournevis cruciforme et vissez la vis de sécurité sur le côté du support de la borne de commande Square Kiosk.

Le support de comptoir permet d’orienter l’écran vers le haut pour créer un système peu encombrant pour comptoir. Téléchargez le guide visuel ici.
- Choisissez un endroit sur votre comptoir : positionnez le support incliné face à vous et passez le câble de l’adaptateur d’alimentation par l’ouverture.
- Branchez le concentrateur sur la borne de commande Square Kiosk : Vérifiez si le câble USB-C du concentrateur est bien enfoncé.
- Insérez la borne de commande Square Kiosk sur le support : serrez la vis de fixation du centre jusqu’à faire disparaître le côté rouge sur la vis. vérifiez si tout est bien fixé et que rien ne bouge pas.
- Branchez la borne de commande Square Kiosk : branchez le câble USB-C de l’adaptateur d’alimentation dans le concentrateur, puis branchez une des extrémités du câble de l’adaptateur d’alimentation dans l’adaptateur d’alimentation et l’autre extrémité sur une prise.
- Insérez l’iPad : Insérez l’iPad au connecteur et enclenchez le loquet de sécurité.
- Facultatif : Sécurisez l’iPad : à l’aide d’un petit tournevis cruciforme, vissez la vis de sécurité sur le côté de la borne de commande Square Kiosk pour solidifier l’iPad.

Le support VESA est compatible avec tous les supports VESA de 100 mm x 100 mm pour installer un socle autonome, un bras pivotant ou toute autre option d’installation. Téléchargez le guide visuel ici.
- Branchez le concentrateur sur la borne de commande Square Kiosk : décidez de quel côté vous sortez le câble USB-C du concentrateur, puis enfoncez-le dans le passe-câble ou si la fixation VESA le permet, faites passer le câble à travers la fixation VESA.
- Vissez la borne de commande Square Kiosk sur la plaque VESA : alignez les trous de vis de la plaque VESA de 100 mm x 100 mm sur les filetages à l’arrière de la borne de commande Square Kiosk et vissez-les.
- Branchez la borne de commande Square Kiosk : branchez le câble USB-C de l’adaptateur d’alimentation dans le concentrateur, puis branchez une des extrémités du câble de l’adaptateur d’alimentation dans l’adaptateur d’alimentation et l’autre extrémité sur une prise.
- Faites glisser l’iPad et fixez-le : Insérez l’iPad au connecteur et enclenchez le loquet de sécurité.
- Facultatif : à l’aide d’un petit tournevis cruciforme, vissez la vis de sécurité sur le côté de la borne de commande Square Kiosk pour sécuriser l’iPad.
Étape 2 : configurer l’application Square Kiosk
Pour vous connecter à l’application Square Kiosk pour la première fois, vous devez d’abord effectuer la configuration initiale et créer un code d’appareil à partir du Tableau de bord Square sur un ordinateur ou un iPad.
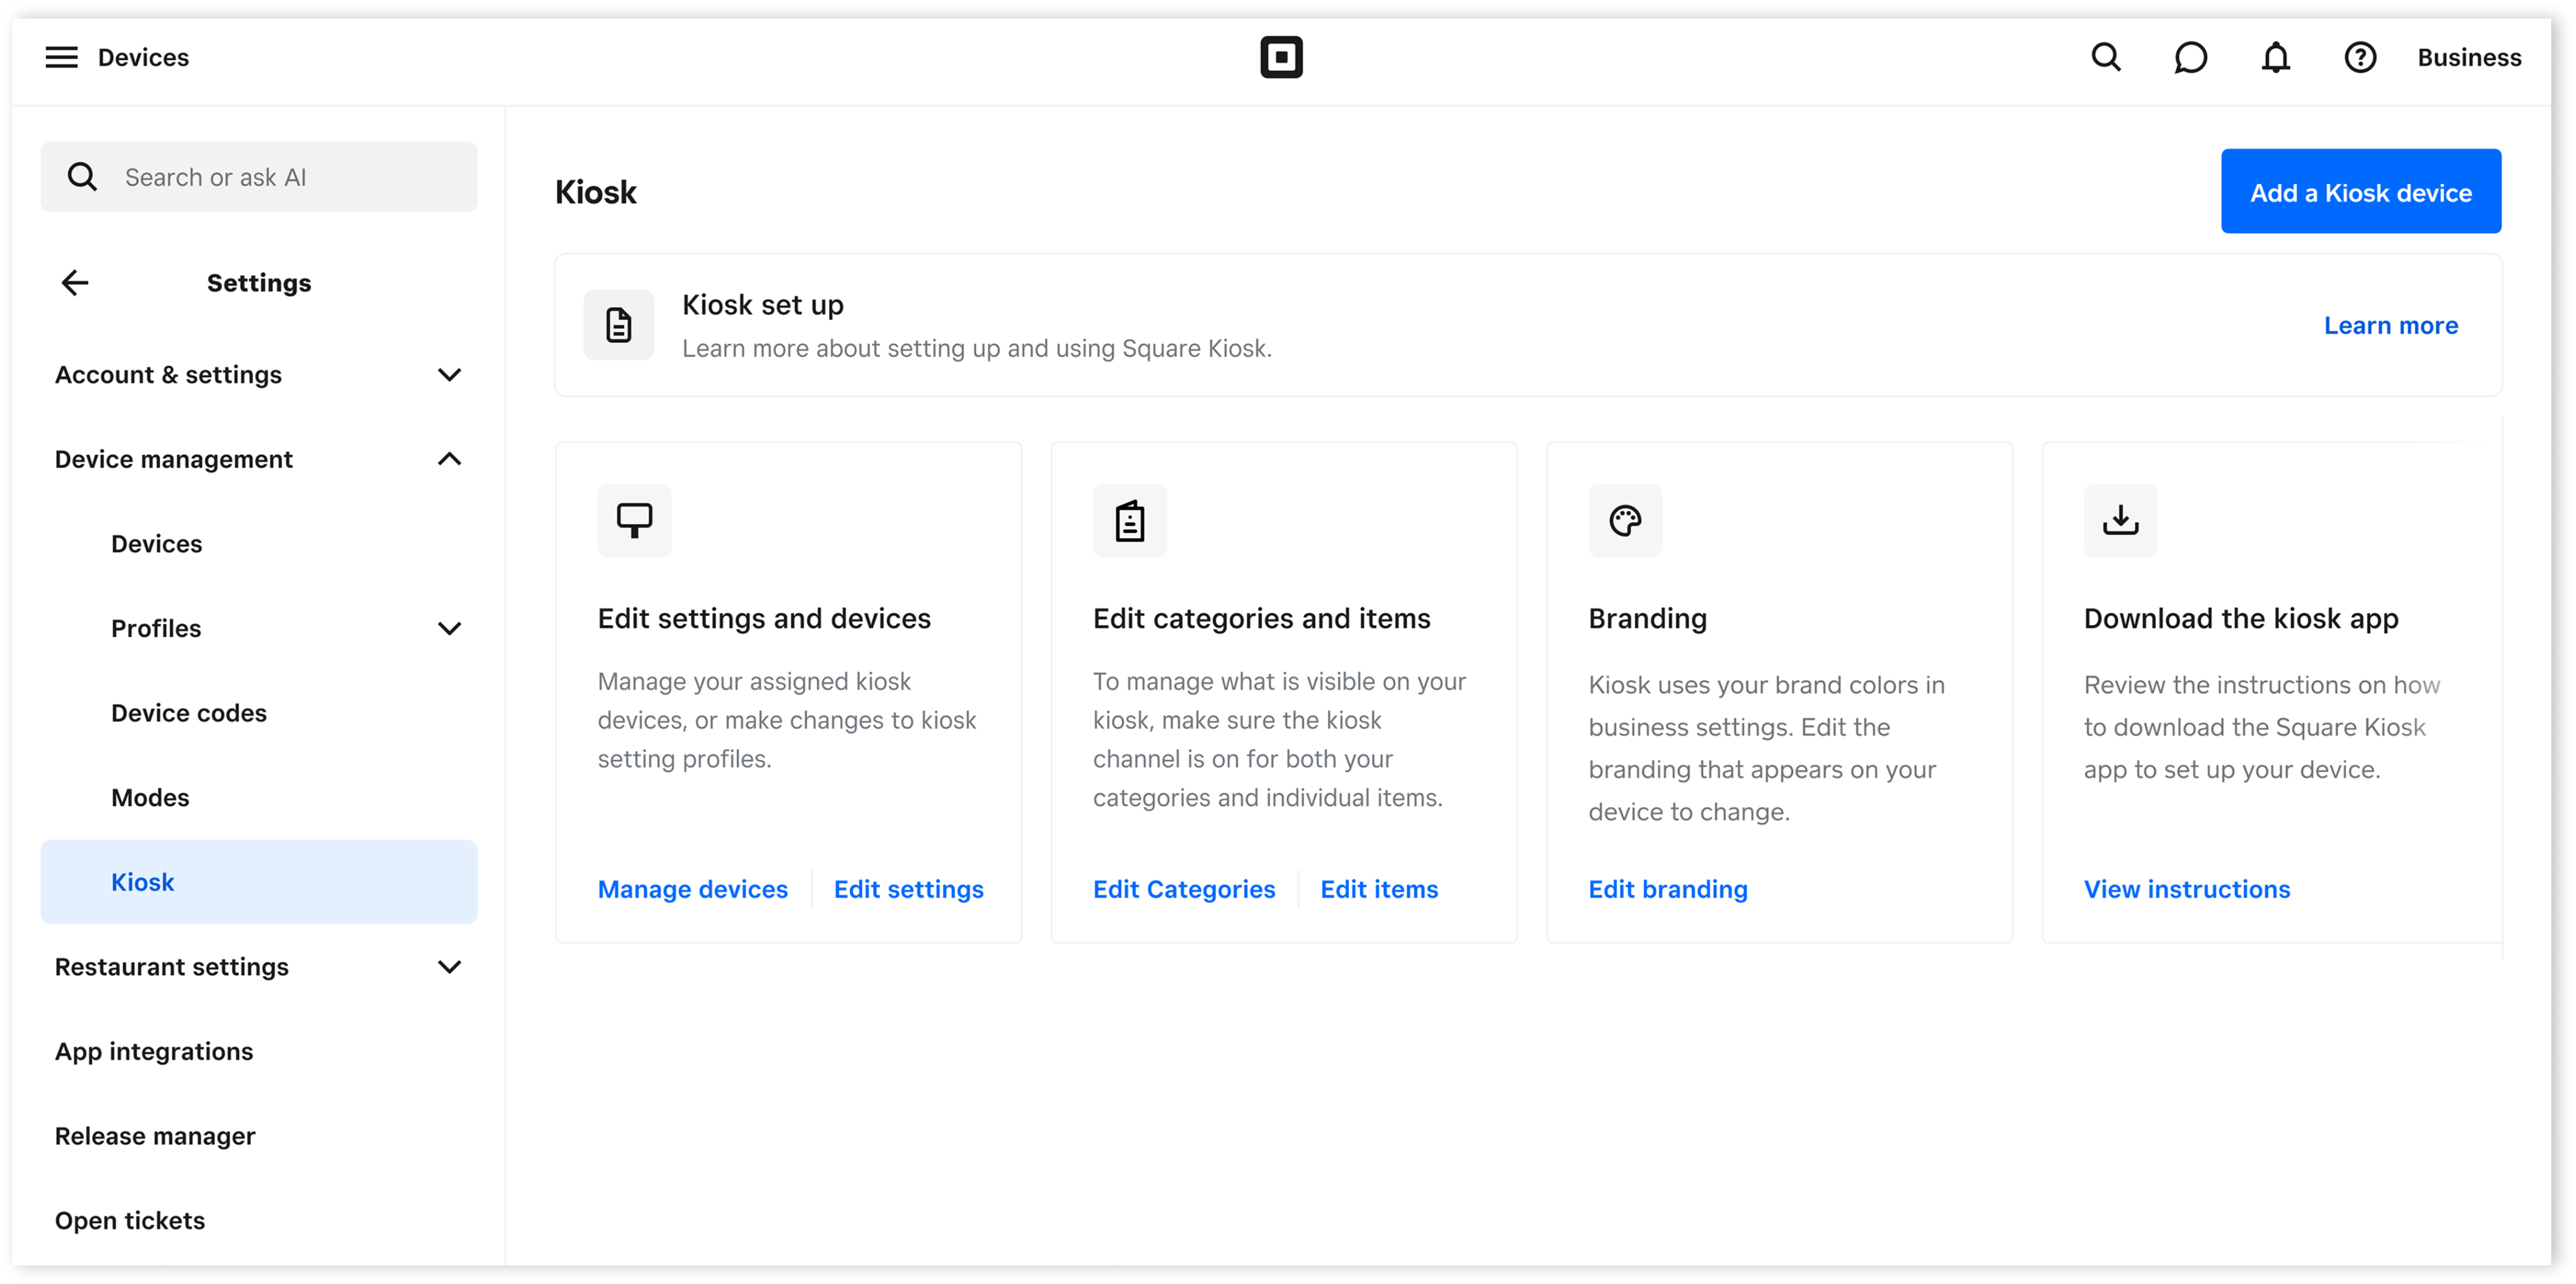
Connectez-vous au Tableau de bord Square et accédez à Paramètres > Gestion des appareils >Square Kiosk.
Sélectionnez Obtenir Square Kiosk.
Le cas échéant, confirmez les coûts liés au nouvel appareil associés à votre abonnement.
Sélectionnez le point de vente où vous utiliserez la borne de commande.
Saisissez un nom pour la borne de commande et cliquez sur Suivant.
Sélectionnez les catégories d’articles que vous souhaitez afficher sur le menu de votre borne de commande. Vous pourrez les modifier ultérieurement. Découvrez comment modifier les articles et les catégories du menu Square Kiosk.
-
Associez des images à chaque catégorie qui s’affichera sur votre borne de commande en utilisant des images existantes de votre catalogue d’images ou en téléversant de nouvelles images :
Cliquez sur l’icône grise à côté de la catégorie > sélectionnez les images ou cliquez sur Téléverser de nouvelles images > Terminé. Si vous ne disposez pas d’images de catégorie, la borne de commande utilisera automatiquement une image disponible parmi les articles de la catégorie.
Cliquez sur Suivant.
Cliquez sur J’ai du matériel si vous avez déjà acheté votre Square Kiosk. Si ce n’est pas le cas, cliquez sur Acheter du matériel pour en acheter ou sur Ignorer pour le faire plus tard.
Téléchargez l’application Square Kiosk sur votre iPad et notez votre code d’appareil à 12 chiffres. Vous pouvez également cliquer sur Copier pour copier ou sur Envoyer le code d’appareil pour l’envoyer par courriel ou par texto.
Cliquez sur Terminé.
Vous êtes maintenant sur la page Paramètres de Square Kiosk où vous pouvez gérer tous les aspects de votre expérience avec Square Kiosk :
Gérer les appareils et les paramètres Square Kiosk
Modifier les catégories et les articles
Modifier l’image de marque
Créer de nouveaux appareils Square Kiosk
Étape 3 : se connecter à l’application Square Kiosk
Assurez-vous qu’un iPad compatible est branché sur le matériel Square Kiosk. Si l’iPad est déconnecté du matériel Square Kiosk, vous ne pourrez pas utiliser l’application Square Kiosk.
Ouvrez l’application Square Kiosk sur votre iPad compatible et touchez Se connecter.
Saisissez le code d’appareil que vous avez généré sur le Tableau de bord Square pour vous connecter à l’application Square Kiosk.
Si le nouveau code d’appareil n’est pas utilisé dans les 48 heures, il expirera et vous devrez le réinitialiser pour vous connecter à l’application Square Kiosk.
Une fois que vous avez configuré votre première borne de commande, vous pouvez configurer des codes d’appareil pour d’autres appareils de bornes de commande. Découvrez comment configurer des codes d’appareil.
Étape 4 : imprimer des bons de commande en cuisine pour les commandes Square Kiosk (facultatif)
Lorsque Square Kiosk est utilisé comme borne de commande en libre-service avec l’application Square Kiosk, il ne peut pas se connecter directement à des accessoires tels que des lecteurs de code à barres et des imprimantes de reçus via USB, Wi-Fi/Ethernet ou Bluetooth.
Vous pouvez imprimer des bons de commande Square Kiosk à partir de vos appareils de point de vente associés s’ils sont connectés à vos imprimantes de cuisine. Découvrez comment configurer des profils d’imprimante et connecter une imprimante un appareil de point de vente.
Pour envoyer vos commandes sur borne de commande à l’imprimante de votre cuisine via votre appareil de point de vente associé à partir des applications Solution PDV Square :
Dans l’application Solution PDV Square de votre appareil de point de vente associé.
Touchez ≡ Plus > Paramètres > Matériel > Imprimantes.
Touchez Profils et sélectionnez un profil d’imprimante.
Touchez Modifier à côté de Détails du profil et activez l’option Bons de commande en ligne et sur borne de commande.
Touchez Enregistrer.
Si vous imprimez par catégorie, assurez-vous que les catégories activées pour Square Kiosk sont bien sélectionnées dans le profil d’imprimante.
Ces bons de commande en cuisine seront imprimés sur l’imprimante configurée via votre système de caisse, de même que tout autre bon de commande en cuisine émis à partir d’une commande issue du logiciel de caisse.
Découvrez comment imprimer des bons de commande.
Étape 5 : Verrouiller l’application Square Kiosk (recommandé)
Vous pouvez configurer l’accès guidé pour empêcher les clients d’altérer votre borne de commande ou de fermer l’application Square Kiosk. L’accès guidé limite l’utilisation de votre iPad à l’application Square Kiosk.
Ouvrez l’application Paramètres de votre iPad et accédez à Accessibilité > Accès guidé.
Activez l’Accès guidé.
Définissez un code confidentiel pour l’Accès guidé.
Ouvrez l’application Square Kiosk sur votre iPad.
Appuyez trois fois sur le bouton latéral ou sur le bouton Accueil.
Appuyez sur Accès guidé > Démarrer.
En savoir plus sur l’accès guidé dans Article d’assistance sur l’Accès guidé d’Apple.
Se déconnecter de l’application Square Kiosk
Appuyez sur les trois lignes (≡) dans le coin supérieur droit de l’écran Démarrer pour ouvrir les paramètres.
Saisissez votre code confidentiel pour accéder aux paramètres de l’appareil.
Appuyez sur Déconnexion.
Utiliser le matériel Square Kiosk comme système de caisse
Comme Square Kiosk fonctionne avec un iPad, vous pouvez également accéder à l’application Solution PDV Square via votre matériel Square Kiosk. L’utilisation du matériel Square Kiosk comme point de vente fonctionne de la même manière que le Square Stand (seconde génération), mais sans le pivot intégré.
Découvrez comment configurer le Square Stand (2e génération) et accepter les paiements avec le Square Stand.
Articles connexes
Ajuster les paramètres de notification de passage en caisse et de commande de Square Kiosk
Prévisualiser l’expérience de commande de vos clients sur Square Kiosk