Set up online booking
About online booking
Square’s online scheduling software and tools with appointments provides a variety of ways for your clients to book appointments with you.
Before you begin
There are two options for setting up online booking:
Create a free and simple online booking site that your clients can access if you don’t already have a website, or that you can link out to from an existing website.
Create a free, custom full-service website that allows clients to book appointments, purchase items, and stay up-to-date with your business. Learn how to set up your website.
Once you create an online booking site, you can embed a booking widget or button on your existing website built outside of Square, or add a booking button to your email, so clients can easily request appointments based on your availability.
To accept prepayments for bookings, you can activate credit card processing on your account. Learn how to set a prepayment policy.
Your customers can book an appointment and prepay by using a credit or debit card, Google Pay, Apple Pay, a Square Gift Card, Afterpay, or prepaid packages.
Option 1: Create an online booking site only
Your online booking site can be a simple website where you list your business address, hours and website links and get bookings from customers that sync with your calendar. You can either use this as your website or link out to your online booking site from an existing website.
- Sign in to your Square Dashboard and click Appointments or Payments > Appointments.
- Click Online Booking > Channels.
- Toggle ON Enable online booking.
- If applicable, click Manage next to Locations to choose your location(s).
- Under Booking channels, click Preview & edit next to Square Online website.
- Use the options to create your online booking site.
- When you’re done, click Publish in the top right corner.
- From the Site published page, you can view and copy your online booking site URL.
From the Square POS app with bookings mode enabled or from the Square Appointments POS app:
- Open your point of sale app.
- Tap ≡ More > Online Booking.
- Toggle ON Enable online booking.
- Tap Square Online website > Preview > Preview & edit.
- Use the options to create your online booking site.
- When you’re done, click Preview > Publish.
- From the Site published screen, you can view and copy your online booking site URL.
You can edit the business information reflected in your online booking site. Learn how to create and manage multiple locations.
Get your booking flow URL
Once you've published your online booking site, you can then get the URL to add the site to your existing website as a button or embed.
Sign in to your Square Dashboard and click Appointments or Payments > Appointments.
Click Online Booking > Channels.
Under Add your booking flow to an existing site, click Get Started.
Click Get URL.
If you have multiple locations, select your location.
Select your booking type.
Copy and paste the booking flow URL to add to your existing website.
Click X > Done.
Add a booking button to your existing website
Add a “Book Appointment” button to your existing website or your email signature, linking to your Square Appointments online booking site.
Sign in to your Square Dashboard and click Appointments or Payments > Appointments.
Click Online Booking > Channels.
Under Add your booking flow to an existing site, click Get Started.
Click Create button.
If you have multiple locations, select your location.
Customize the button color, text, shape, and font.
Copy and paste the HTML code to embed the button on a website or email.
Click Done > Done.
Embed the booking flow in your website
Sign in to your Square Dashboard and click Appointments or Payments > Appointments.
Click Online Booking > Channels.
Under Add your booking flow to an existing site, click Get Started.
Click Get embed code.
If you have multiple locations, select your location.
Copy and paste the HTML code to add to your existing website. Your clients will be taken to a flow in another tab or window.
Click Done > Done.
Option 2: Create a custom full-service website that includes online booking
You can create a free website and allow clients to book appointments, purchase items, and stay up-to-date with your business.
Your customers will be able to choose the location they wish to book the service in, as well as the services and preferred staff member for the appointment. Bookings and orders from your website are automatically synced with appointments and your point of sale app.
- Sign in to your Square Dashboard and click Appointments or Payments > Appointments.
- Click Online Booking > Site Preview.
- Click Site setup in the top-right corner.
- Select a free or paid theme and start customizing your website.
- Select Publish to see your changes live.
- Once the website is generated, you’ll be redirected to the Square Online site editor where you can edit and preview the mobile version of your site.
From the Square POS app with bookings mode enabled or from the Square Appointments POS app:
- Open your point of sale app.
- Tap ≡ More > Online Booking.
- Under the Square Online option, tap Preview > Preview & edit to start creating your website. It may take some time to generate.
- Customize your website and select Publish to see your changes live.
You can edit the business information reflected in your online booking site. Learn how to create and manage multiple locations.
Create advanced widgets (optional)
You can create a widget that only shows specific services, specific staff or a combination of both using Advanced Widgets.
Sign in to your Square Dashboard and click Appointments or Payments > Appointments.
Click Online Booking > Advanced widget.
If you have multiple locations, select your location.
Click Create New Widget for Location.
Choose a name for the widget or keep the default name.
Customize the staff and services to include and select Save when finished.
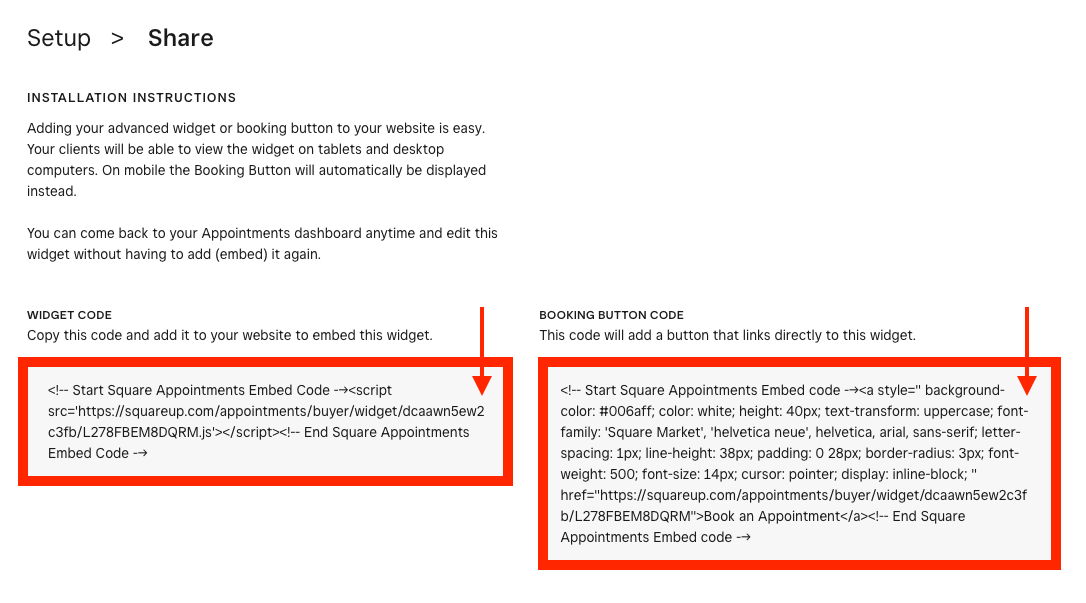
Copy the widget embed code and add it to your website or email.
Edits made to the widget will automatically update anywhere that widget is installed. Deleting a widget from your Dashboard will not automatically delete embedded widgets on other websites. If the deleted widget code is not removed from a website, an error message will display in place of the widget. Learn how to add external content to your Square Online site with embedded code.
Disable your online booking site
- Sign in to your Square Dashboard and click Appointments or Payments > Appointments.
- Click Online Booking > Channels.
- Toggle OFF Enable online booking.
- Click Confirm.