System updates

We’re experiencing issues that may affect your Square services. We’ll continue to update our status page with more information.

Home>Taking Payments On A Mobile Device

Accept Payments with Square Stand

The Square Stand family is comprised of the classic first generation of Square Stand and the newest generation: Square Stand (2nd generation) and Square Stand Mount. Learn how to accept payments using all models below.

Not sure which Square Stand you have? Learn how to Identify Your Square Stand

Square Stand (2nd generation) and Square Stand Mount

Square Stand Mount left, Square Stand (2nd generation) right.

Once you’ve set up your Square Stand with your iPad, you’ll be able to accept chip cards or tap an Apple Pay or Google Pay-enabled device to accept payments. Connect a Square Reader for Magstripe directly into the Stand’s audiojack to swipe credit cards without a chip.

Create a sale using Square Stand (2nd generation) or Square Stand Mount:

  1. Sign in with the email address and password associated with your Square account.

  2. If you’ve created items, tap the item(s) you’d like to sell from your Item Library or Favorites Page, or scan the barcode of an item with a SKU saved to your Item Library. Your item will be added to the current sale on the right.

  3. To enter a custom sale amount, tap Keypad. You can also select a variable price item saved to your Item Library.

  4. Tap on the item in the right-hand panel to add a description, create modifications, change the quantity and apply tax. When you’re done, tap the "X" icon or Save.

To accept payments using the Square Stand (2nd generation):

  1. Tap Charge to check out, and swivel the Square Stand 180 degrees to face the customer.

  2. The customer-facing checkout screen will prompt the customer to pay on the right side of the Square Stand by either inserting their card into the chip reader or tapping their contactless card or mobile device near the flashing contactless icon. 

  3. To view other payment options, including cash, manual card entry, or CashApp, tap All payment options in the upper left corner prior to swiveling the Square Stand toward the customer. If you don’t regularly swivel your Square Stand to your customers, you can set this to be the default payment screen in Checkout settings.

    1. For additional security, you may require a passcode to change payment types on the customer-facing checkout screen. To learn more, view the Enable Checkout Passcode section below.

Note: Connect a Square Reader for Magstripe directly into your Square Stand (2nd generation) headset jack to swipe magstripe cards or gift cards.

To accept payments using the Square Stand Mount:

Unlike the first and second generations of the Square Stand, the Square Stand Mount is affixed in one position and does not swivel 180 degrees. The checkout process is very similar across all Square Stands and can be led by you, your employees, or the customer themselves.

  1. Tap Charge to check out.

  2. The checkout screen will prompt you or your customer to pay on the right side of the Square Stand Mount by either inserting a card into the chip reader or tapping a contactless card or mobile device near the flashing contactless icon.

  3. To view other payment options, including cash, manual card entry, or CashApp, tap All payment options in the upper left corner. You can set this to be the default payment screen in Checkout settings.

    1. For additional security, you may require a passcode to change payment types on the customer-facing checkout screen. To learn more, view the Enable Checkout Passcode section below.

Note: Connect a Square Reader for Magstripe directly into your Square Stand Mount headset jack to swipe magstripe cards or gift cards.

Stand Mount Magstripe Payment


To complete checkout with the Square Stand (2nd generation) and Square Stand Mount:

  1. With tipping enabled, your customer will see the option to leave a tip on the signature screen.

  2. If you have signature collection enabled, have your customer sign with their finger. If you have the signature screen turned off for payments under $25, the signature screen will be skipped. If you’re processing a phone or internet order, write “Internet Order” or “Phone Auth” on the signature screen. 

  3. Input your customer’s preferred receipt delivery method. If your Square Stand is connected to a receipt or kitchen printer, you also can print a receipt and kitchen ticket.

  4. With sign and tip on printed receipts enabled, you can print a paper receipt for your customer to sign and choose to leave an additional tip. Once you’ve finished swiping a payment and the paper receipt is printed, the final screen reads “Receipt Printed.” 

  5. If you’ve chosen to print a receipt that requires a signature, you can settle these payments, including tip, from Square Point of Sale on the iPad within 36 hours. 

Accept Offline Payments with Square Stand Mount and Square Stand (2nd generation)

Square Stand Mount and Square Stand (2nd generation) can accept offline payments if your internet connection becomes temporarily unavailable. There are duration limitations associated with how long you can accept offline payments once you go offline and how long you have to upload offline payments once you regain internet connectivity. You’ll have up to 24 hours from when your device goes offline to accept and upload offline payments using Square Stand Mount and Square Stand (2nd generation). If you do not reconnect your device to the internet within 24 hours, you risk expiration of these payments and the funds will not be collected from your customer.

Offline payments must be enabled while connected to the internet, prior to going offline. 

To enable offline payments:

  1. From the navigation bar at the bottom of your screen, tap ≡ More.

  2. Tap Settings > Checkout > Offline payments.

  3. Toggle Allow Offline payments to on.

  4. Review the information and then tap Allow.

  5. To set a limit for card transactions taken offline, enter an amount next to Per Transaction Limit.

Disable offline payments by tapping ≡ More > Settings > Checkout > Offline payments > turn off.

Your current processing rate will be applied to offline payments, so you’ll see no difference in fees. 

Once offline payments are enabled, an offline session will automatically activate whenever your internet connectivity is unavailable. A notification banner at the top of your device will indicate it has automatically entered into an offline session accompanied by a countdown clock showing how much time you have left to accept offline payments. You’ll have 24 hours to accept dip, tap, and swipe transactions as offline payments.

You will receive an in-app notification when your offline session has expired or if it was interrupted. After you have regained internet connectivity and uploaded your offline payments, another offline session will activate if you lose connectivity again.

If you’ve recently accepted payments while offline and have not yet uploaded them, do not delete and reinstall the Square Point of Sale app(s) or log out of your Square account. Doing so will delete any offline payments that have not yet been uploaded.

There is additional risk with any offline payments you accept. Square is not responsible for any loss due to declined cards or expired payments taken while offline. In addition, Square can not contact any customers on your behalf should an offline payment be declined or expire. 

Learn more about offline payment specifics for offline session duration, Square hardware, connected hardware, and accepted payment types.

Note: In order to take swipe payments on Square Stand (2nd generation), you’ll need to insert a Square Reader for magstripe into the audio jack on the lower right corner. You may add one to your cart for free when purchasing Stand, purchase separately on Square Shop, or purchase at one of our retail locations.

Square Stand (1st generation)

Once you’ve set up your Square Stand with your iPad, you can swipe cards through the track in the front of Stand, and accept contactless and chip payments on the Square Reader for contactless and chip. You can also accept contactless payments from Apple Pay or Google Pay-enabled devices. 

Note: Square Reader for contactless and chip (1st generation) and Dock for Square Reader (no longer available for sale) are pictured below. The newly improved Square Reader for contactless and chip (2nd generation) is available with Bosstab Dock (compatible with both generations of readers) and can be connected to Square Stand (1st generation) via USB-A to USB-C cable.

Create a sale using Square Stand:

  1. Sign in with the email address and password associated with your Square account.

  2. If you’ve created items, tap the item(s) you’d like to sell from your Item Library or Favorites Page, or scan the barcode of an item with a SKU saved to your Item Library. Your item will be added to the current sale on the right.

  3. To enter a custom sale amount, tap Keypad. You can also select a variable price item saved to your Item Library.

  4. Tap on the item in the right-hand panel to add a description, create modifications, change the quantity and apply tax. When you’re done, tap the "X" icon or Save.

To accept payments using the Square Stand:

  1. Tap Charge to check out.

  2. Swipe your customer’s card through the track at the front of your Square Stand, tap/insert your customer's card using the Square Reader for contactless and chip, or key in payment card information while your iPad is secured in the stand. 

To complete checkout with the Square Stand:

  1. With tipping enabled, your customer will see the option to leave a tip on the signature screen.

  2. If you have signature collection enabled, have your customer sign with their finger. If you have the signature screen turned off for payments under $25, the signature screen will be skipped. If you’re processing a phone or internet order, write “Internet Order” or “Phone Auth” on the signature screen. 

  3. Input your customer’s preferred receipt delivery method. If your Square Stand is connected to a receipt or kitchen printer, you also can print a receipt and kitchen ticket.

  4. With sign and tip on printed receipts enabled, you can print a paper receipt for your customer to sign and choose to leave an additional tip. Once you’ve finished swiping a payment and the paper receipt is printed, the final screen reads “Receipt Printed.” 

  5. If you’ve chosen to print a receipt that requires a signature, you can settle these payments, including tip, from Square Point of Sale on the iPad within 36 hours. 

Accept Offline Payments with Square Stand (1st generation)

Square Stand (1st generation) can accept magstripe payments while your device is not connected to the internet. There are duration limitations associated with how long you can accept offline payments once you go offline and how long you have to upload offline payments once you regain internet connectivity. You’ll have up to 24 hours from your first offline payment to upload all offline payments using Square Stand (1st generation). If you do not reconnect your device to the internet within 24 hours, you risk expiration of these payments and the funds will not be collected from your customer.

In addition, you can also accept chip and tap payments offline with a compatible Square Reader for contactless and chip (2nd generation, or 1st generation v3). Identify your Square Reader for contactless and chip and see if it is compatible with offline payments.

Offline payments must be enabled while connected to the internet, prior to going offline. 

To enable offline payments:

  1. From the navigation bar at the bottom of your screen, tap ≡ More.

  2. Tap Settings > Checkout > Offline payments.

  3. Toggle Allow Offline payments to on.

  4. Review the information and then tap Allow.

  5. To set a limit for card transactions taken offline, enter an amount next to Per Transaction Limit.

Disable offline payments by tapping ≡ More > Settings > Checkout > Offline payments > turn off.

Your current processing rate will be applied to offline payments, so you’ll see no difference in fees. 

Once offline payments are enabled, an offline session will automatically activate whenever your internet connectivity is unavailable. A notification banner at the top of your device will indicate it has automatically entered into an offline session accompanied by a countdown clock showing how much time you have left to accept offline payments. You’ll have 24 hours to accept dip, tap, and swipe transactions as offline payments.

You will receive an in-app notification when your offline session has expired or if it was interrupted. After you have regained internet connectivity and uploaded your offline payments, another offline session will activate if you lose connectivity again.

If you’ve recently accepted payments while offline and have not yet uploaded them, do not delete and reinstall the Square Point of Sale app(s) or log out of your Square account. Doing so will delete any offline payments that have not yet been uploaded.

There is additional risk with any offline payments you accept. Square is not responsible for any loss due to declined cards or expired payments taken while offline. In addition, Square can not contact any customers on your behalf should an offline payment be declined or expire. 

Learn more about offline payment specifics for offline session duration, Square hardware, connected hardware, and accepted payment types.

Accept Card Payments on Square Stand Without Connecting to a Power Outlet (1st generation only)

When Square Stand (1st generation) is not plugged into a power outlet, it utilizes the iPad’s battery as a power source. In this mode, the Square Stand (1st generation) will allow you to swipe magstripe cards and connect to the Square Reader via Bluetooth to accept contactless and chip card payments.

Note: USB accessories are not supported in this mode.

Accept Square Gift Cards

There are multiple ways to accept Square Gift Cards with Square Stand.

On Square Stand (2nd generation) you can:

  • Swipe the gift card through a Square Reader for magstripe attached to the Stand’s audio jack.

  • During the checkout process, navigate to all payment options, select Gift Card and either manually enter the gift card details or press the camera icon to scan the gift card using your iPad’s front-facing camera (only available for newer gift cards).

On Square Stand (1st generation) you can:

  • Swipe the gift card through your Square Stand’s magstripe reader.

  • During the checkout process, navigate to all payment options, select Gift Card and either manually enter the gift card details or press the camera icon to scan the gift card using your iPad’s front-facing camera (only available for newer gift cards).

Accept Cash App Payments

Your customers can also use Cash App as another form of contactless payment. During the checkout process, navigate to all payment options, select Cash App Pay as the payment method, then swivel your Square Stand screen to your customer so they can scan the QR code with their mobile device and complete the payment. Learn more about Cash App Pay.

Enable Checkout Passcode

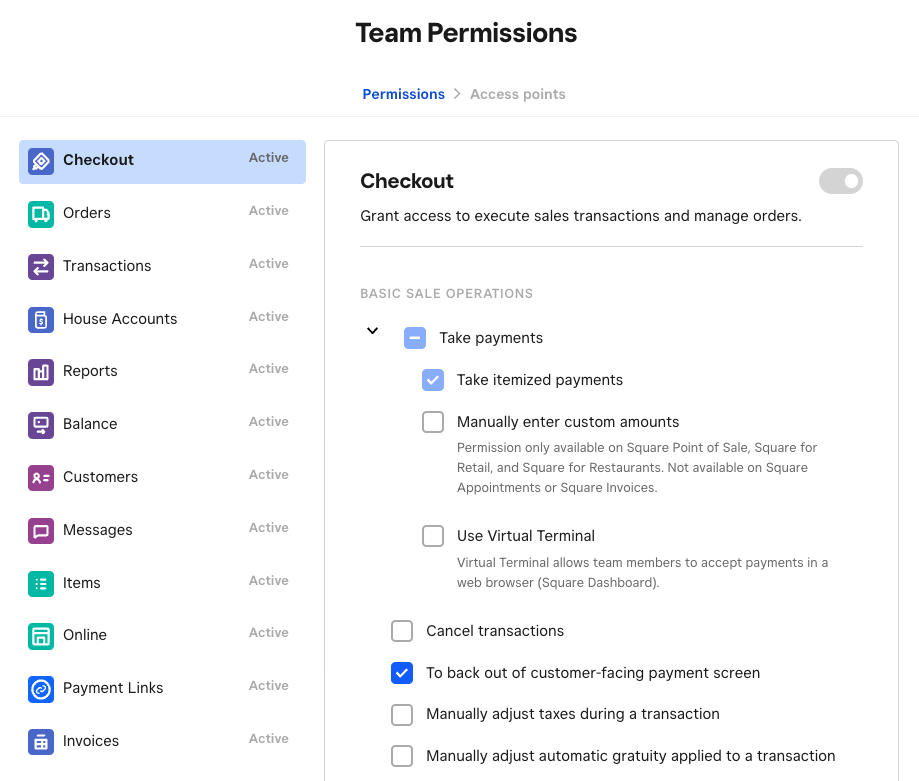
If you are interested in using additional security features on your Square Stand (2nd generation), you can enable free Team Permissions. Team Permissions requires a passcode to take certain actions, such as canceling a sale or changing the payment method displayed on the customer-facing screen.

This feature can be enabled directly on the Square Point of Sale app and Square Appointments app. Square for Retail will automatically apply the permissions that are set in your Square Point of Sale app. To apply this feature for Square for Retail, download the Square Point of Sale app and follow these steps:

  1. Sign in to your Square Dashboard and enable Team Permissions

  2. On Square Point of Sale or Square Appointments app: Tap More > Settings > Security > Passcodes.

  3. Toggle on Passcodes.

  4. Under Require passcode, toggle on any that apply: After each sale, To back out of a sale, To back out of customer-facing payment screen.

To enable for Square for Restaurants:

  1. Sign in to your Square Dashboard and enable Team Permissions

  2. Click Settings > Device Management > Points of sale > POS devices

  3. Select Square Stand or Square Stand Mount.

  4. Scroll to Team Management and enable Lock POS backing out of customer-facing payment screen under Passcode Options

  5. Click Save


Once enabled, a passcode will be required to change the payment method after you’ve begun a credit card transaction and are ready to swivel your Square Stand.

Enable Mastercard Audio Tone

To enable or disable the Mastercard audio tone for the Square POS app at the completion of a successful transaction with Mastercard:

  1. Tap More

  2. Tap Settings > Checkout > Payment sounds.

  3. Toggle on or off Allow card network sounds.

If enabled, the tone will only be heard for dipped or tapped Mastercard debit and credit cards.