System updates

We’re experiencing issues that may affect your Square services. We’ll continue to update our status page with more information.

Home>Fulfilment of Online Orders

Set Up Self-Serve Ordering and QR Codes with Square Online

Ready to set up your website with Square? Get started >

Note: Enable self-serve ordering by upgrading your Square Online site.

Self-serve ordering through Square Online offers a contactless, in-person ordering experience that increases safety and workflow efficiency. Instead of browsing a paper menu and placing orders with a staff member, customers use their mobile devices to scan a QR code at their table, seat, parking spot or anywhere you want them to order. You can automatically tie each QR code to a specific ordering station – great for smaller food venues and restaurants – or require customers to enter their location manually when they order – best for large-scale events and stadiums.

In order to better prepare for your self-serve operations, take a look at best practices for self-serve ordering through Square Online for helpful tips.

Start Setting Up Self-Serve Ordering

To set up self-serve ordering for one or more locations: To get started, in your Square Online Overview page, go to Fulfillment > Self-Serve Ordering and select Set up QR codes.

Self-serve ordering overview

  1. QR codes are automatically generated when you set up self-serve ordering. You’ll have a unique code for every table, seat, or any other station. Print and place an ordering card wherever you want customers to order from.
  2. Guests scan the QR code to open your online ordering page using their mobile device. They can select items, add special requests, place their order and pay – all directly from their mobile device. Since everything’s processed online, there’s no need to handle credit cards or cash.
  3. Once your customer completes their order, the order will appear on your Square POS, and feed directly to your kitchen ticket printer or kitchen display system (KDS). Since each QR code is connected to a specific ordering station, your staff knows where to send each order.
  4. Fulfill the self-serve order in whatever way works best for your business. Customers will see instructions and other information on your online ordering page that let them know what to expect.

Things to know before you start

Here are a few things you need to know before getting started with self-serve ordering:

  • Your website must be published to use self-serve ordering. The QR codes send customers to your website, so it won’t work if the site isn’t published. You can publish your website in your Square Online site editor by selecting Publish.
  • Self-serve ordering only works with the Order Online ordering page template. If you haven’t already done so, be sure to create or switch to the Order Online template.
  • If you have more than one website, make sure you’ve selected the site you want to link the QR codes to. You can switch sites using the site switcher menu in the Square Online Overview page.

After you select Set up QR codes, proceed using the following steps.

Choose Items

Items must have self-serve ordering selected as a fulfillment method. Select the items you'd like to make available for self-serve ordering using the check boxes, then select Continue. Learn more about adding items and categories to Square Online.

Note: You can also update fulfillment settings later for multiple items at once using the bulk editing method.

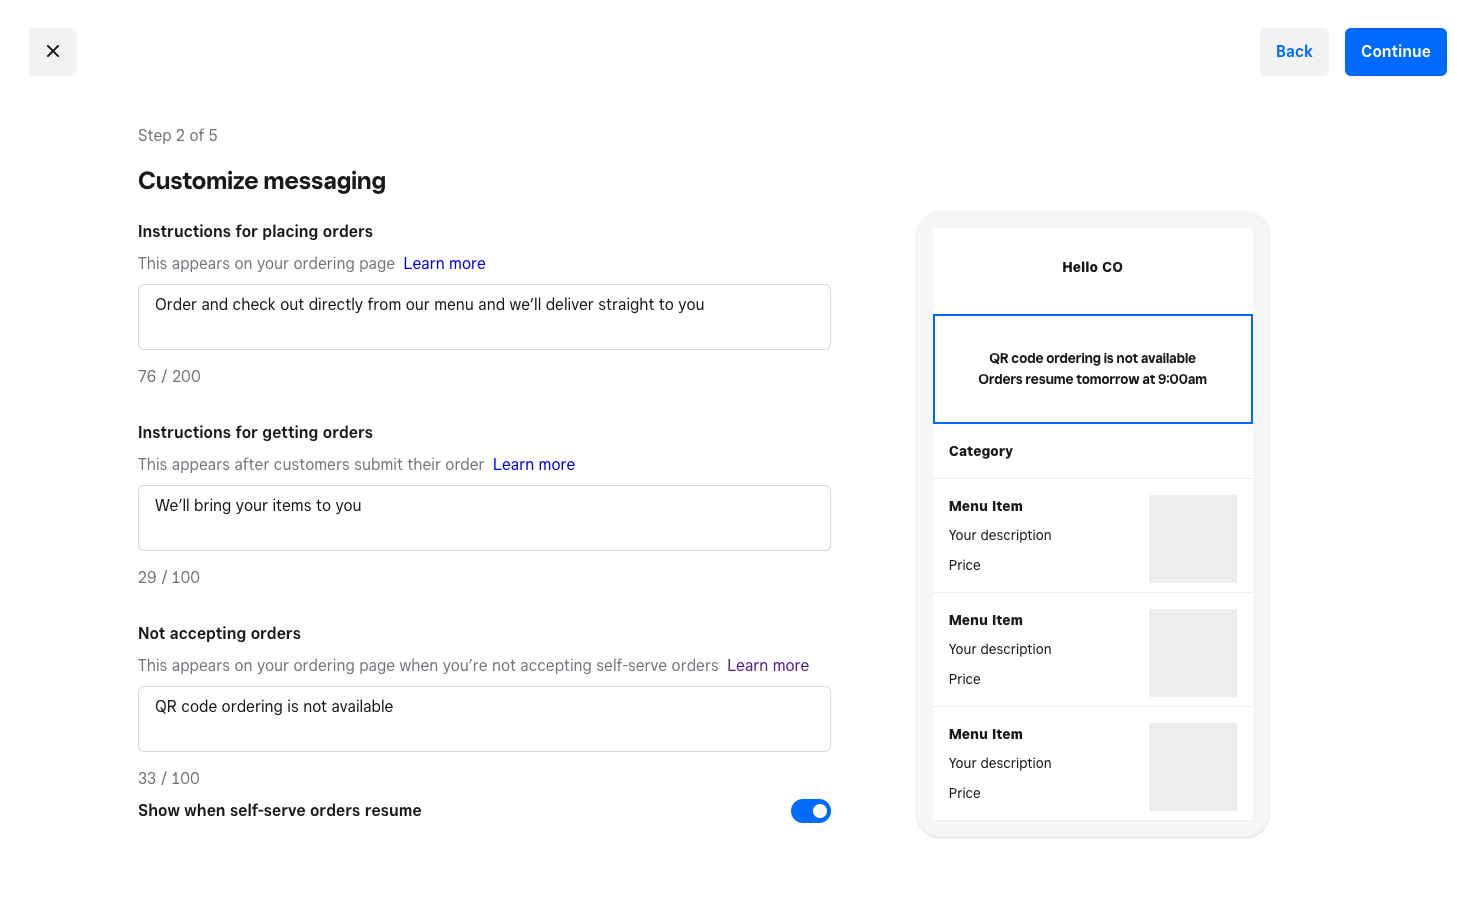
Add Customer Instructions

Square-Online-Self-Serve-Ordering-Add-Customer-Instructions-EN

Enter any information your customers need to know when placing or receiving orders. These instructions are shown after customers scan a QR code and after they submit an order. You can see a preview for each set of instructions during setup.

  • Placing orders: This message will display on your ordering page before your customers finalize their orders.

  • Getting orders: This is the message your customers see after they submit their order.

  • Not accepting orders: This message will display when you disable self-serve ordering (during busy hours or after your business hours) and customers can’t place orders through self-serve ordering. If you know when you’ll be ready to fulfil orders again, you can toggle on Show when self-serve orders resume, and your customers will see what time you will begin accepting new orders.

Select Continue when you’re finished adding instructions.

Add Ordering Stations

Select Add ordering stations to start creating ordering stations that match with the setup of your business. Add details for your stations such as a group name, a name for each station and the number of total stations. Select Save when complete and select Add ordering stations again to add more. Finally, select Continue to complete the last steps and preview your QR codes.

Set Ordering Hours

Select the days of the week and the hours when your customers can place an order. Customers won’t be able to place self-serve orders outside of these hours. 

  • If you have another location, you can choose to import the previously set business hours, pickup hours or self-serve ordering hours of your other location as self-serve ordering hours. If you have multiple locations, you will need to choose a location from the drop-down menu and select which hours you want to import.

  • You can also set up business hours manually by selecting or deselecting days of the week and clicking the + icon to add hours. Select your location’s time zone and click Continue.

Note: Self-serve ordering times are updated in real time as different options are selected.

Your items will still be available for purchase outside of self-serve ordering hours if the items or categories are set up for pickup and delivery. During that time, your default fulfilment settings will apply.

Get Multiple QR Codes

To preview and download your QR codes:

  1. Select Get QR code on the Self-Serve Ordering page.

  2. Choosing one of the following options:

    1. Customers are automatically assigned an ordering station: Unique QR codes must be placed at each ordering station. This is best for smaller establishments like restaurants.

    2. Customers manually enter their ordering station: Use the same QR code and place it throughout your business. This is best for larger establishments like stadiums or large-scale events.

  3. Choose your design with one of the following options:

    1. Ordering card with QR code: Predesigned cards with instructions. Great for quick and easy printing and setup.

    2. QR code only: QR codes to place on your own designs. You can also hire an expert to create custom ordering cards through our partnership with 99designs.

  4. Choose the stations you want to Download. Print your downloaded document and place your QR codes where they’re needed.

Note: To try out the live ordering process, click a QR code on your computer or scan it with your phone and place a test order on your site to see it in action.

Edit Self-Serve Ordering Settings

Self-serve ordering has additional settings you can edit or enable after setup.

Edit ordering hours

To edit your existing self-serve ordering hours, select Edit from the Self-Serve Ordering page and select Edit under “Self-serve ordering hours.”

Edit ordering stations

You can edit your ordering stations at any time by selecting Edit from the Self-Serve Ordering page and selecting Edit under “Ordering stations.”

Note: If you choose to edit your ordering cards by reducing the number of stations you have, you’ll also end up disabling the QR codes you’ve already created. For example, if you lower the number of stations from 12 to 10, then the existing ordering cards for stations 11 and 12 will no longer work.

Edit customer messaging

You can edit your customer instructions at any time by selecting Edit from the Self-Serve Ordering page and selecting Edit under Messaging.

Enable text message alerts

Enabling text alerts for self-serve ordering provides customers live updates on the status of their order while they’re dining with you in-person. Self-serve ordering provides two text alert types:

  • Order received automatically sends a text when you receive an order.
  • Order ready for pickup sends a text after an order is marked Ready.

To enable text alerts for self-serve ordering, select Edit from the Self-Serve Ordering page and select Edit under “Text message alerts.”

Enable open tabs

Enabling open tabs allows customers to continue ordering items on the same tab throughout their visit. They’ll enter payment information upfront, but won’t need to check out and pay until the end of their stay. With open tabs disabled, customers need to pay individually for each order they place.

To enable open tabs, select Edit from the Self-Serve Ordering page and toggle on Allow open tabs.

Learn more about self-serve ordering open tabs with Square Online.

Enable order consolidation

You can customize when orders from the same QR code will be printed; either immediately upon receiving the order, or grouping them together within a specific time frame. Enabling order consolidation gives you the option to set a time limit (between 30 seconds and 10 minutes) for tickets to wait and be printed together.

To enable order consolidation:

  1. From the Self-Serve Ordering page, select Edit.
  2. Under Order tickets, select Edit.
  3. Choose Wait and print together.
  4. From the drop-down menu, select your desired timeframe.
  5. Select Save.

Sell alcohol

With self-serve ordering, you can allow your customers to place alcohol orders online while dining at your restaurant or attending your event. You can also place a limit on how many alcoholic items a customer can order.

To allow alcoholic items for self-serve orders, select Edit from the Self-Serve Ordering page and select Edit under Alcohol.

Learn more about selling alcohol with Square Online for additional details specific to self-serve ordering.

Add a service fee

To add a service fee for self-serve orders, select Edit from the Self-Serve Ordering page and select Edit under “Service fee.”

You can also use these other optional features with self-serve ordering.

Enable customer notes

You can let your customers leave you a note when placing an order. Turning this feature on makes it available for any type of online order.

To enable customer notes:

  1. In your Square Online Overview page, go to Settings > Checkout or Shared Settings > Checkout.
  2. Select Edit customer inputs.
  3. Under ‘Checkout fields’, check the box to allow notes from customers.
  4. Select Save when finished.

Order tipping

Turn on tipping to let your customers leave a tip on their order. You can set a default tip percentage or leave it blank. Customers can change the amount or opt to not leave a tip when they check out.

Learn more about checkout options for more information on tipping.

Use a Single QR Code

If you don't need multiple QR codes mapped to all of your ordering stations, Square Online also generates a single QR code for every site. To manage and use a single QR code, go to your Square Online Overview page and select Website > Site Preferences. Place this QR code on marketing materials to point directly to your site for customers to order.

Learn more about setting up site preferences for Square Online and accepting QR code payments with Square.

Can't find what you need?