Set up printer profiles
About printer profiles
A printer profile allows you to configure one or more devices with default or customized printer settings. You can create and assign a printer profile before or as you connect your printer to apply the settings. For example, you can use a printer profile to make all devices connected to a printer automatically print receipts.
When creating printer profiles, you can set up the following printer job types:
-
Receipts
Font size: Select Small, Medium, or Large for printed receipt text. This setting is configured per printer station from the device (Settings > Hardware > Printers > [station name] > Receipts > Font size). The default is Medium. Each printer station can have a different font size. This setting syncs across your devices via the printer profile, but must be configured on-device — there is no Square Dashboard control for font size at this time.
-
In-person order tickets
Single item per ticket: This setting overrides grouping items and automatically prints each item, ungrouped, on its own ticket.
Remove top margin
Categories to Print: Order tickets include all items. You can create categories to specify which items to print on the order ticket.
Include future categories: Choose whether newly created item categories are automatically routed to this printer profile. Select Print all new categories automatically (default) to auto-route new categories, or Don't print new categories to require manual assignment.
Print kitchen names: Items, variations or modifiers printed from this station will print with their kitchen names. Kitchen names can be set up from Square Dashboard.
Combine identical items: Items with the same details will be automatically combined to form one line item.
Compact tickets: Reduces the amount of space each item takes on the ticket to save printer paper.
Font size: Select Small, Medium, or Large for printed ticket text.
-
Online & kiosk order tickets
Single item per ticket: This setting overrides grouping items and automatically prints each item, ungrouped, on its own ticket.
Remove top margin
Automatically print new orders
Automatically print in-progress orders
Categories to Print: Order tickets include all items. You can create categories to specify which items to print on the order ticket.
Include future categories: Choose whether newly created item categories are automatically routed to this printer profile. Select Print all new categories automatically (default) to auto-route new categories, or Don't print new categories to require manual assignment.
Print kitchen names: Items, variations or modifiers printed from this station will print with their kitchen names. Kitchen names can be set up from Square Dashboard.
Combine identical items: Items with the same details will be automatically combined to form one line item.
Compact tickets: Reduces the amount of space each item takes on the ticket to save printer paper.
Font size: Select Small, Medium, or Large for printed ticket text.
Order ticket stubs
Void tickets
Barcode Labels
Before you begin
You have three options for creating printer profiles before connecting your printer:
Create a printer profile in Square Dashboard
Create a printer profile from your point of sale app
Create a printer profile from Square KDS
Once a printer profile is created, you can assign it to your point of sale device directly from your point of sale app.
When connecting a printer, you can also create a new profile with default or custom settings. If you use the default settings, the profile is automatically assigned and named according to the printer type and location. Learn how to connect a printer to your point of sale.
When an order includes an item that belongs to multiple categories, it triggers printing of the order ticket on each printer linked to a printer profile matching any of those categories.
Step 1: Create a printer profile
- Sign in to Square Dashboard and go to Settings > Device management > Profiles > Printer profiles.
- Click Create a profile and enter the printer profile name.
- Toggle on the items you want to print with this profile depending on your needs.
- Select a location. By default, printer profiles are available across all locations. You can also choose to have them show only at specific locations.
- Click Save.
- Open your point of sale app.
- Tap ≡ More > Settings > Hardware > Printers.
- Tap Profiles if it has not already been selected.
- Tap Create profile and enter the printer profile name.
- Toggle on the items you want to print with this profile depending on your needs.
- Tap the back arrow > Save.
- You will then need to manually assign a connected printer to the printer profile on each device. While devices share printer profiles, a specific printer-to-profile connection is made locally on the device.
- On the KDS tap Settings > Printers.
- From Connect and manage, tap Printers.
- Select Create a Printer profile.
- Name your printer and select the ticket types you want sent to this printer.
- From Use this printer for, select Order Tickets.
- Toggle on Use this printer for order tickets, Single item for ticket, Compact tickets, and Receipts.
- Tap Save.
Note: Order tickets are not automatically printed for each order, and you’ll need to manually select the orders you want to print.
Step 2: Assign a printer profile to your printer
- You can assign a printer profile to your printer from your point of sale app. To do so:
- Tap ≡ More > Settings > Hardware > Printers.
- Tap Profiles and select an existing printer profile.
- Tap Edit next to Linked printers.
- Select a connected printer and tap Connect new printer.
- Tap Save.
- Sign in to Square Dashboard and go to Settings > Device management > Profiles > Printer profiles.
- Next to the relevant printer profile, click (•••) > Edit assigned printers.
- If you have multiple locations, select the relevant location.
- Assign the printers, then click Save.
Step 3: Edit a printer profile or device
You can adjust printer profile settings, clone a printer profile, or delete a printer profile from Square Dashboard. You can disable a printer profile, adjust printer profile settings, or delete a printer profile from your point of sale app. You can also edit or rename your device on Square hardware or other devices such as an Android tablet or Square Stand running the Square app.
- Sign in to Square Dashboard and go to Settings > Device management > Profiles > Printer profiles.
- Select an existing printer profile.
- Click Edit next to Profile settings.
- Adjust the printer jobs and location(s).
- Click Save.
Changes made to the profile will be applied to all printers that the profile is assigned to.
- Sign in to Square Dashboard and go to Settings > Device management > Profiles > Printer profiles.
- Select an existing printer profile.
- Click the three dots (•••).
- Click Clone profile or Delete profile.
- Enter the printer profile name for the cloned profile, if applicable.
- Click Save.
- Open your point of sale app.
- Tap ≡ More > Settings > Hardware > Printers.
- Tap Profiles and select an existing printer profile.
- Toggle Status OFF.
- Open your point of sale app.
- Tap ≡ More > Settings > Hardware > Printers.
- Tap Profiles and select an existing printer profile.
- Tap Edit next to Profile details.
- Toggle on the items you want to print with this profile depending on your needs.
- Tap Save.
Changes made to the profile will be applied to all printers that the profile is assigned to.
- Open your point of sale app.
- Tap ≡ More > Settings > Hardware > Printers.
- Tap Profiles and select an existing printer profile.
- Tap Delete profile > Delete.
Deleting printer profiles may affect printing on devices that the profile is assigned to.
From Square Register, Square Handheld, and Square Terminal
- Tap the (≡) menu in the top-left corner.
- Tap Settings > Hardware > General > About.
- Tap Device Name and edit it to your preferred name.
- Tap Save.
From other devices
- On Android devices, open the Square app, tap More > Settings > Hardware > General > Device Name > enter a name.
- On iOS devices, open your device’s Settings > tap General > About > Name > edit the name associated with your device.
Once you update it, you’ll see the new name appear in your Square Dashboard under Devices, making it easier to identify in reports and settings.
From Square Kiosk
- From Square Kiosk, go to Settings > Hardware > Device name.
- Enter passcode.
- Tap device name and edit it to the preferred name.
- Tap Save.
Review visual examples of different printer profiles
Listed below are a few examples of different ways to route order tickets to specific printers, prep stations, and expo stations. If the images are too small for your screen, click the image and select Open in a new tab or window to view the full size.
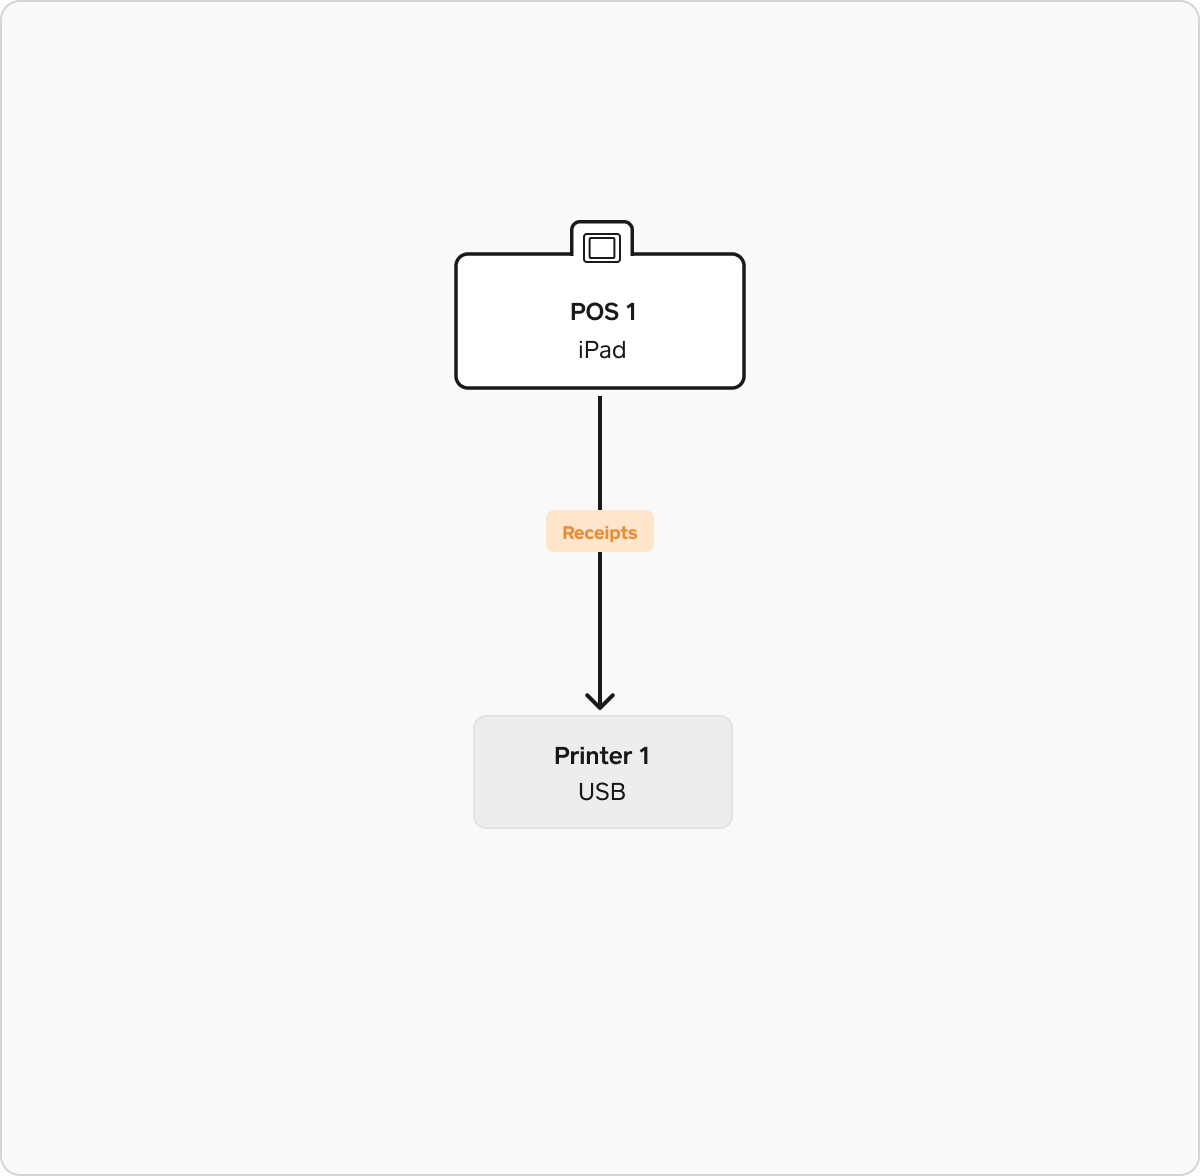
This example features one Point of Sale with a USB-connected printer for receipts. This setup is common in retail or grab-n-go style restaurants. There is a single printer profile configured for receipts with the setting “Print receipts: Automatically”.
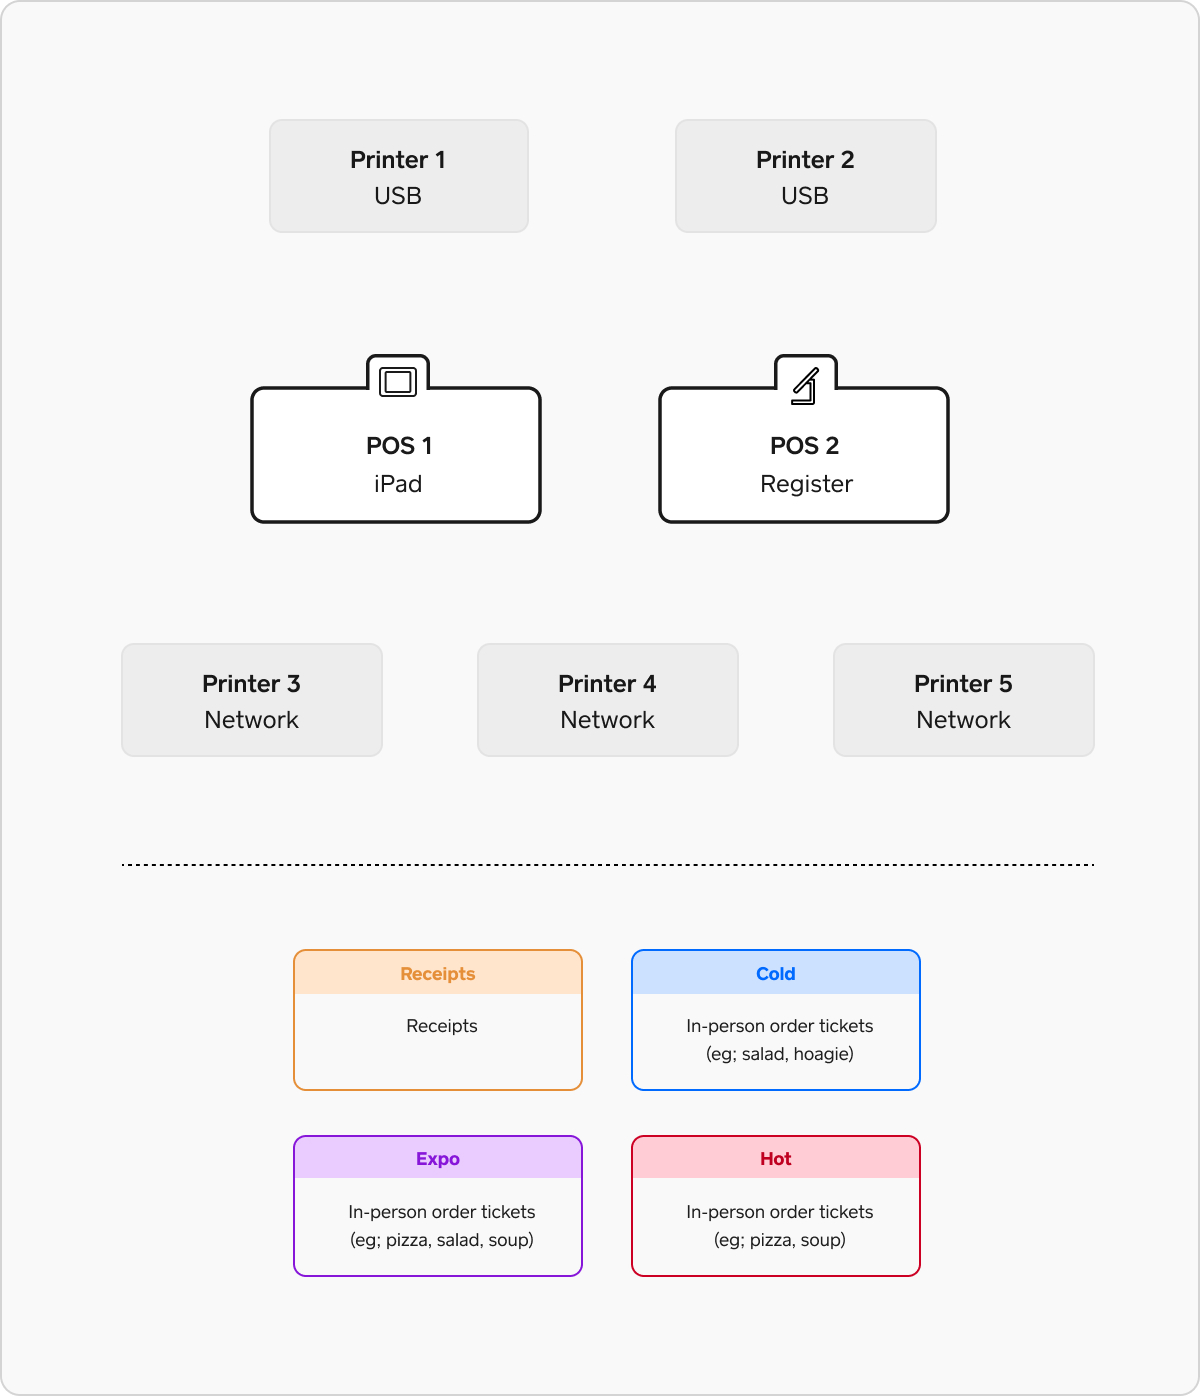
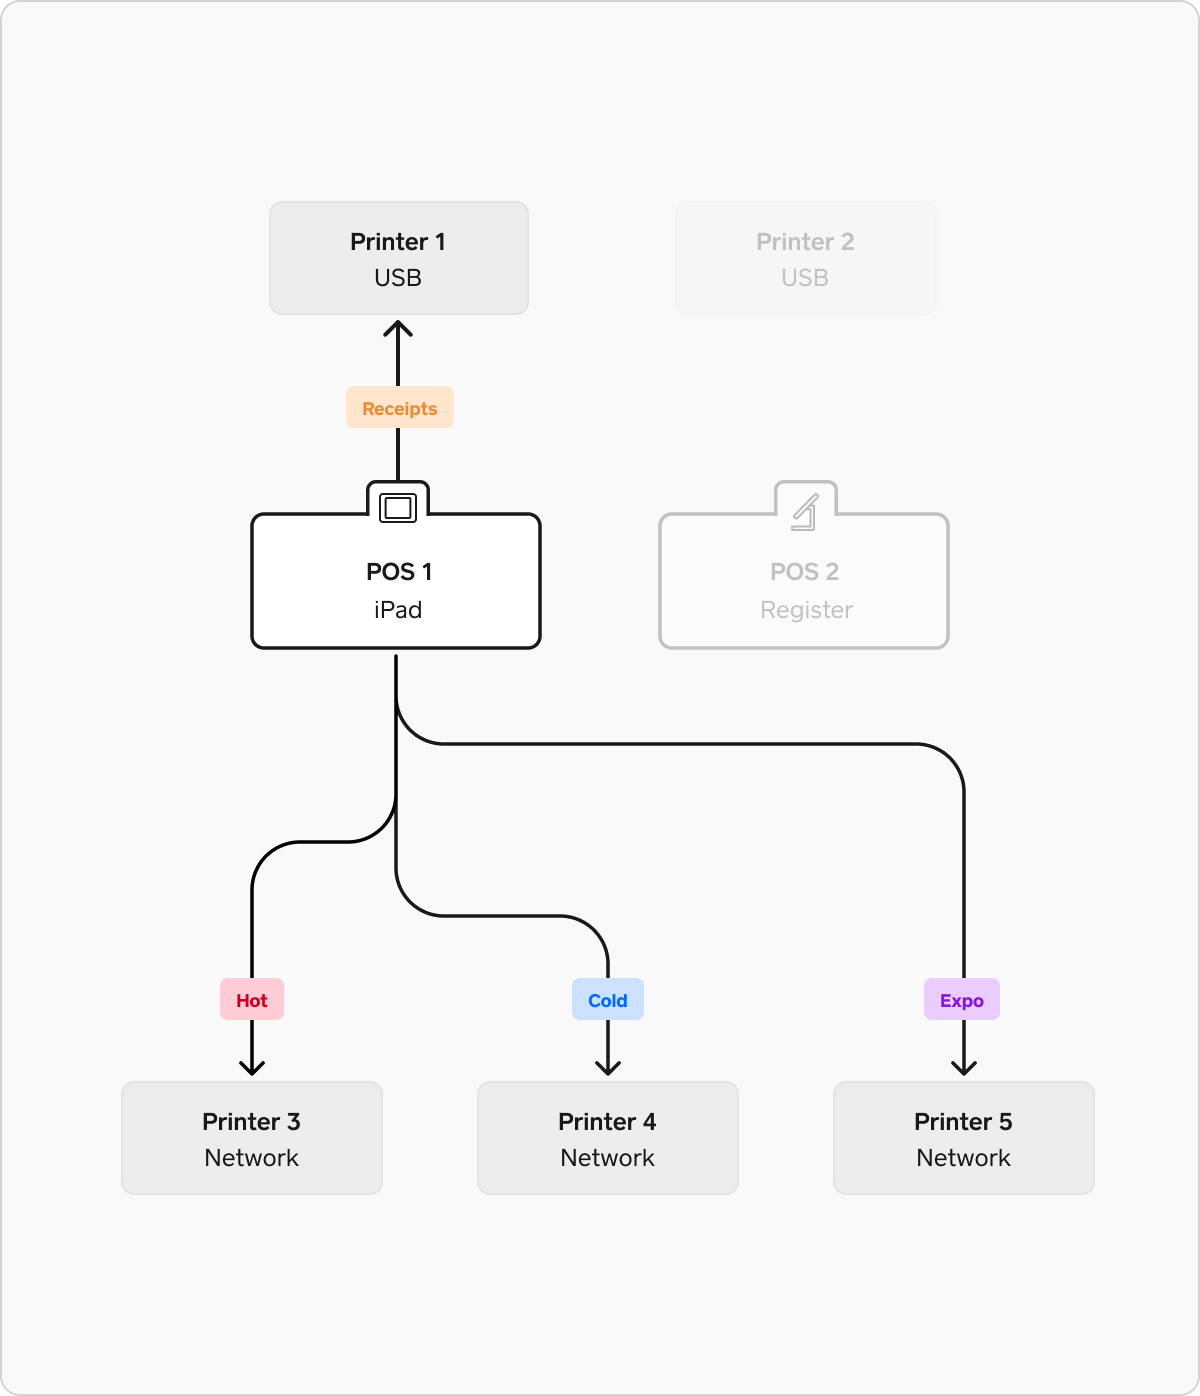
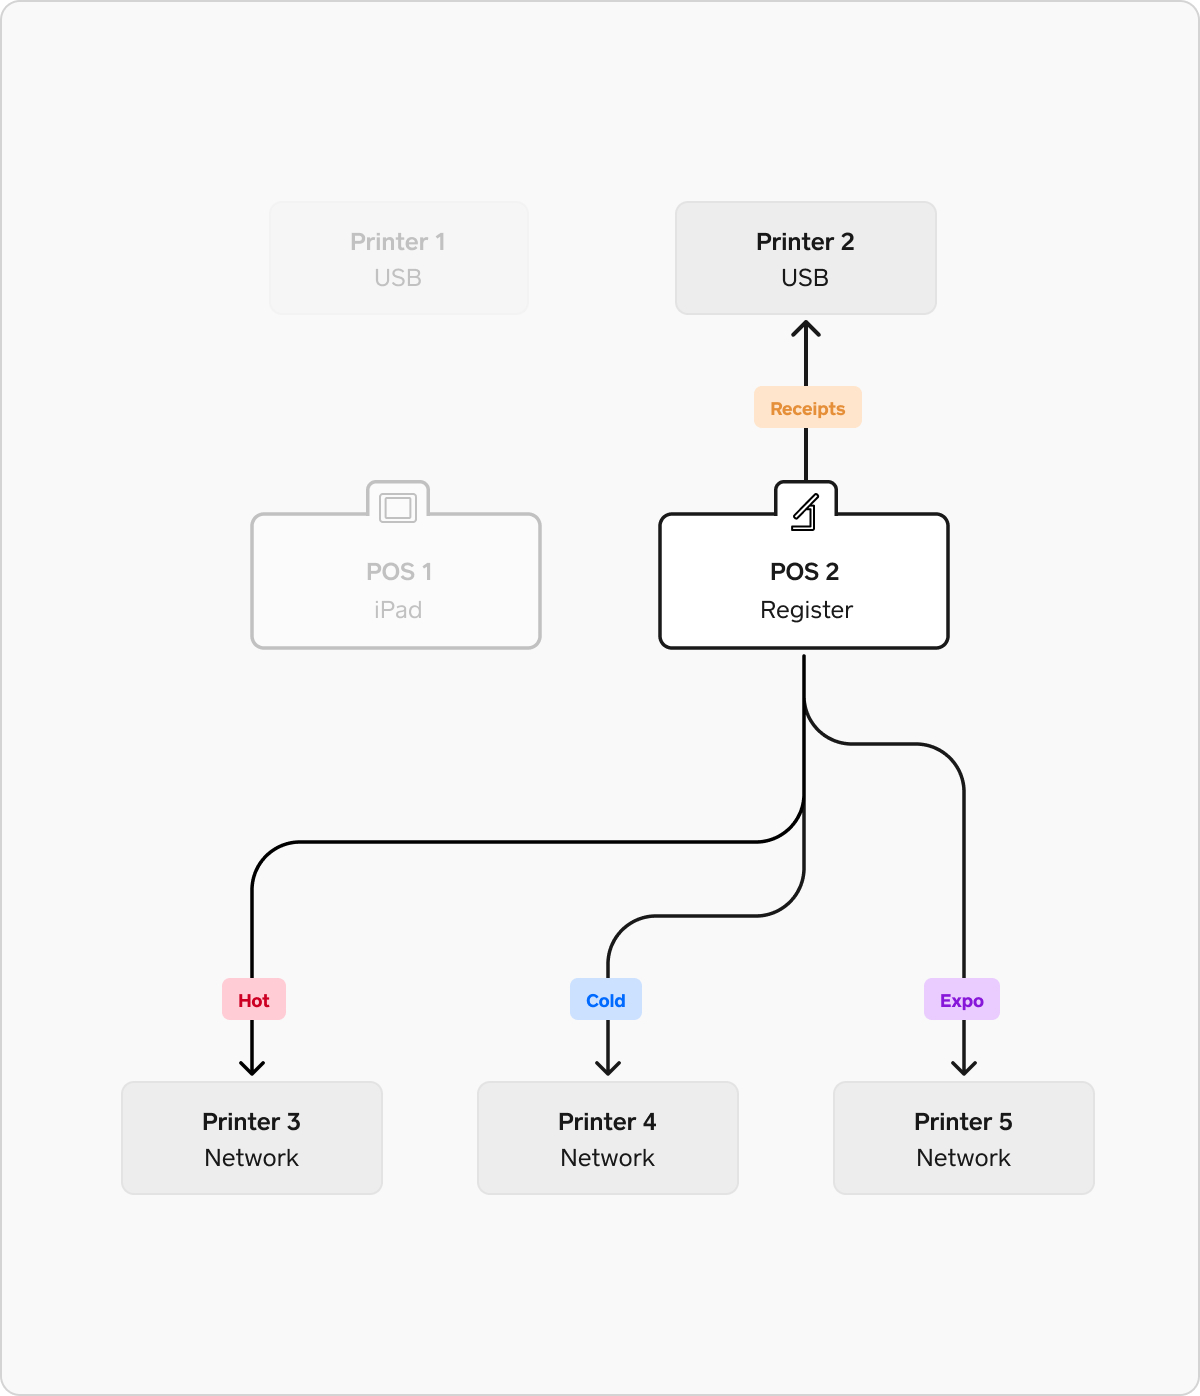
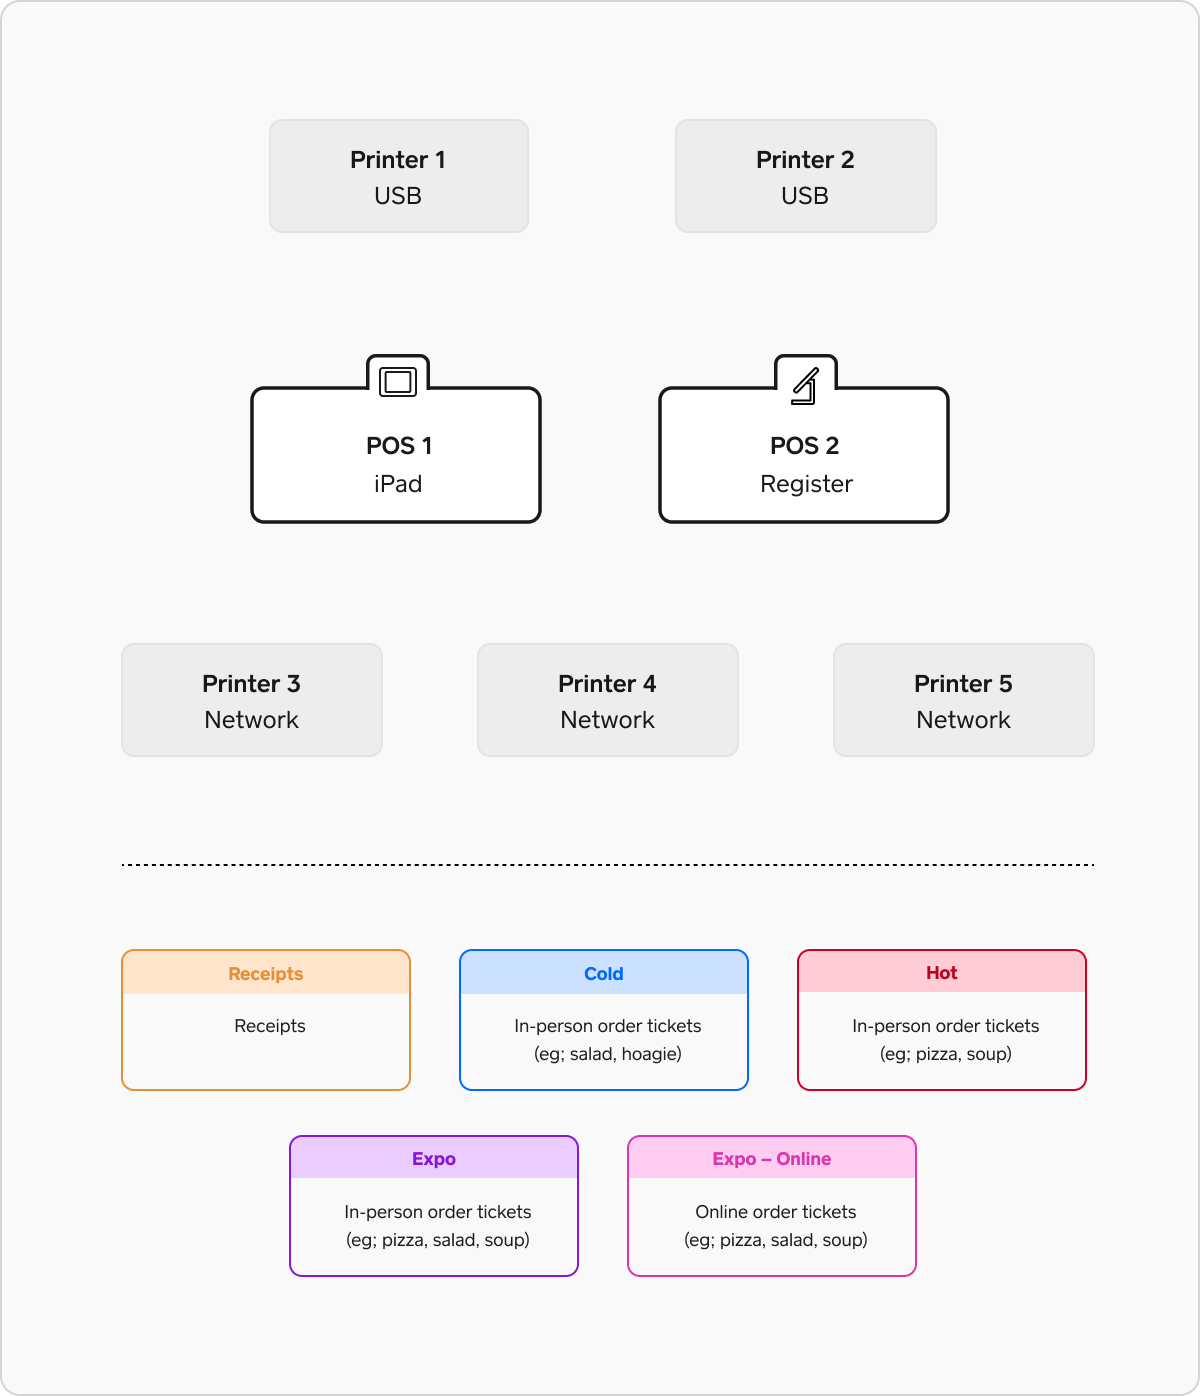
In this example there are multiple points of sale and a more complex kitchen environment with multiple prep stations. This example has a prep station for “hot” foods, a prep station for “cold” foods, and an expo station where orders are assembled.
To configure printing in this environment, you will need 3 printer profiles (plus one for receipts, as shown in the simple retail example above).
- Hot profile: This profile is set to in-person order tickets and set to print only item categories that should go to the hot prep station (cooked food, fried foods, etc).
- Cold profile: This profile is set to in-person order tickets and set to print only item categories that should go to the cold prep station (salad, cold sides).
- Expo profile: This profile is set to in-person order tickets and set to print all item categories.
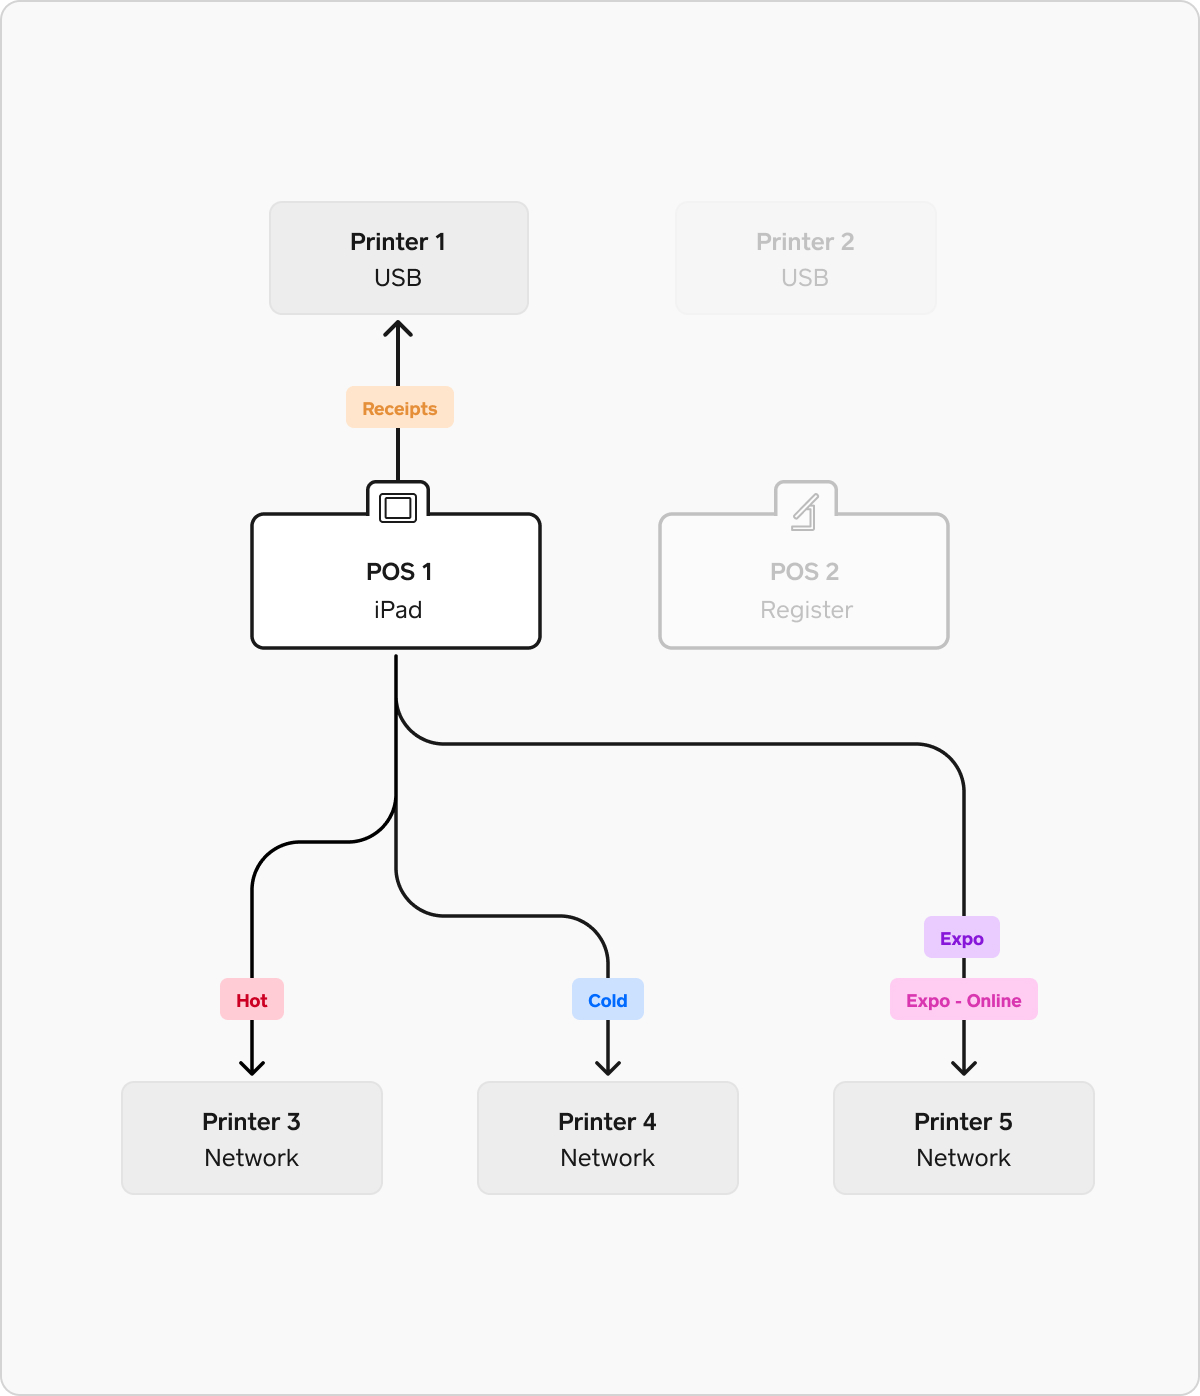
In this example there are multiple points of sale and a more complex kitchen environment with multiple prep stations. This example has a prep station for “hot” foods, a prep station for “cold” foods, an expo station where orders are assembled, and an expo station where all online orders are routed to.
To configure printing in this environment, you will need 4 printer profiles (plus one for receipts, as shown in the simple retail example above).
- Hot profile: This profile is set to in-person order tickets and set to print only item categories that should go to the hot prep station (cooked food, fried foods, etc)
- Cold profile: This profile is set to in-person order tickets and set to print only item categories that should go to the cold prep station (salad, cold sides)
- Expo profile: This profile is set to in-person order tickets and set to print all item categories
-
Expo online profile: This profile is set to online order tickets and set to print all item categories
This profile must be used by only one point of sale device–assigned to a printer from just one point of sale. This profile can not be active on other points of sale.
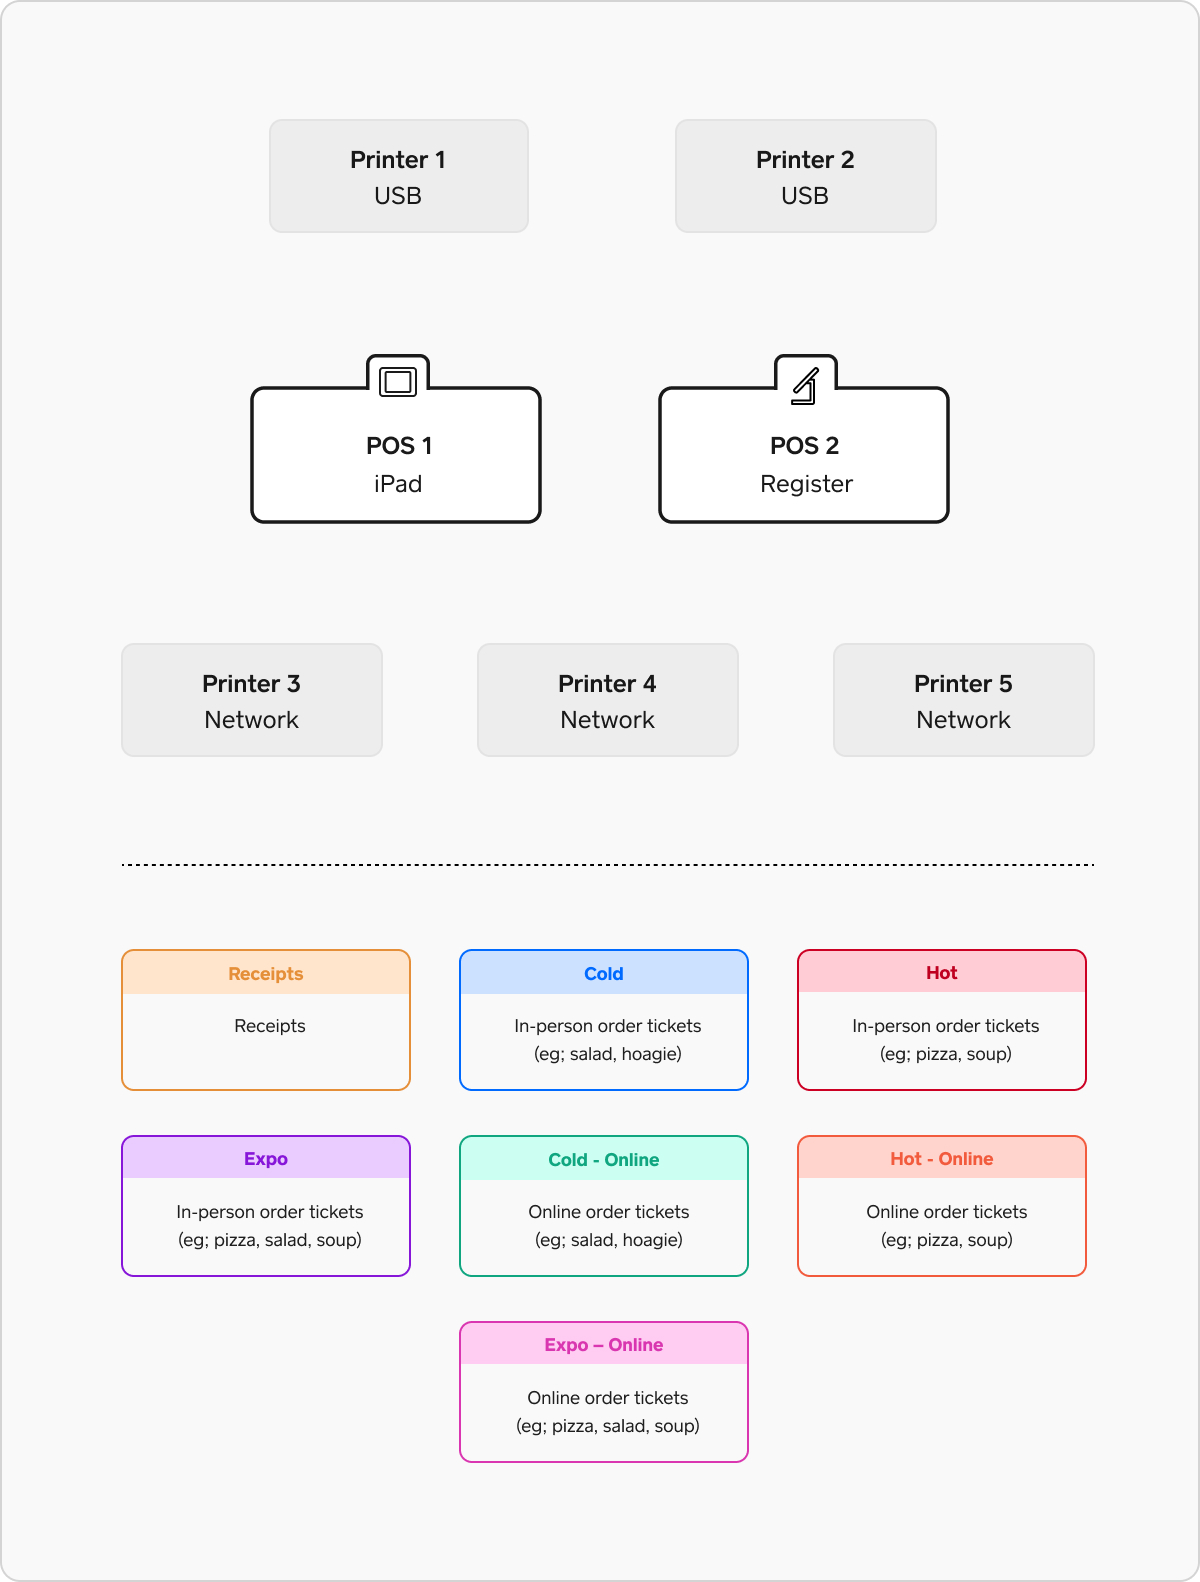
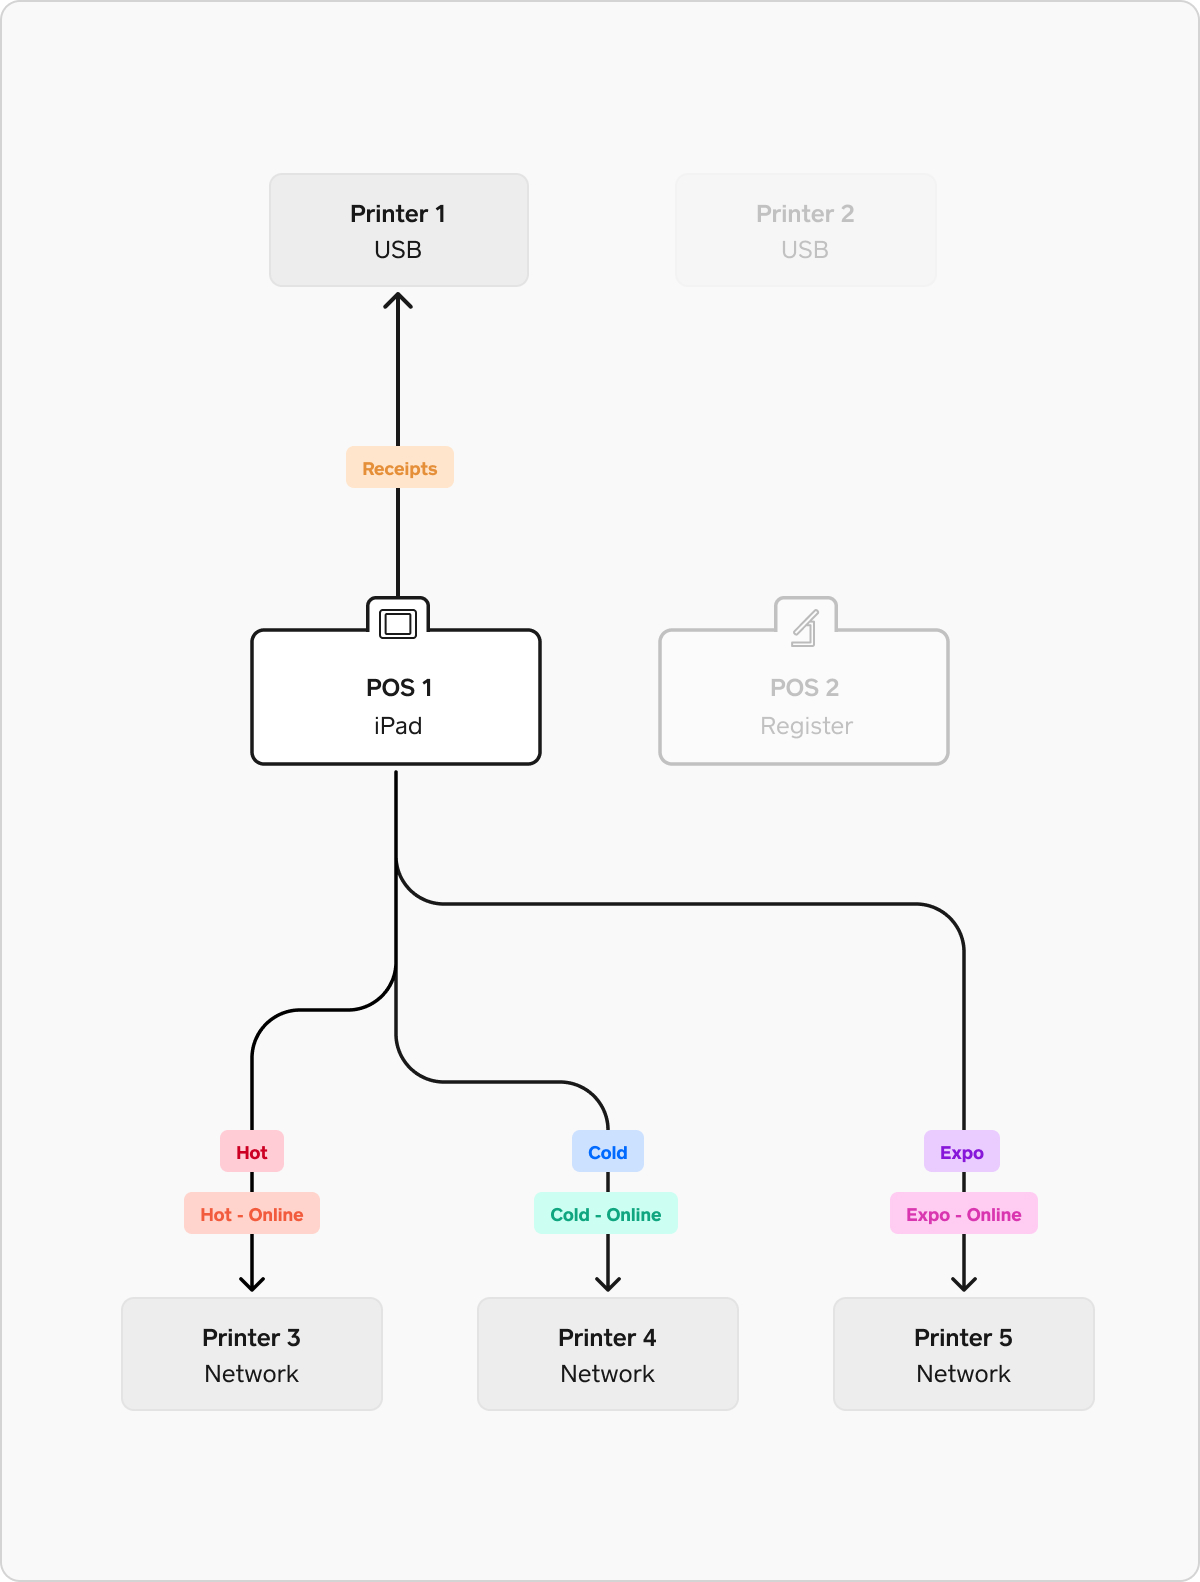
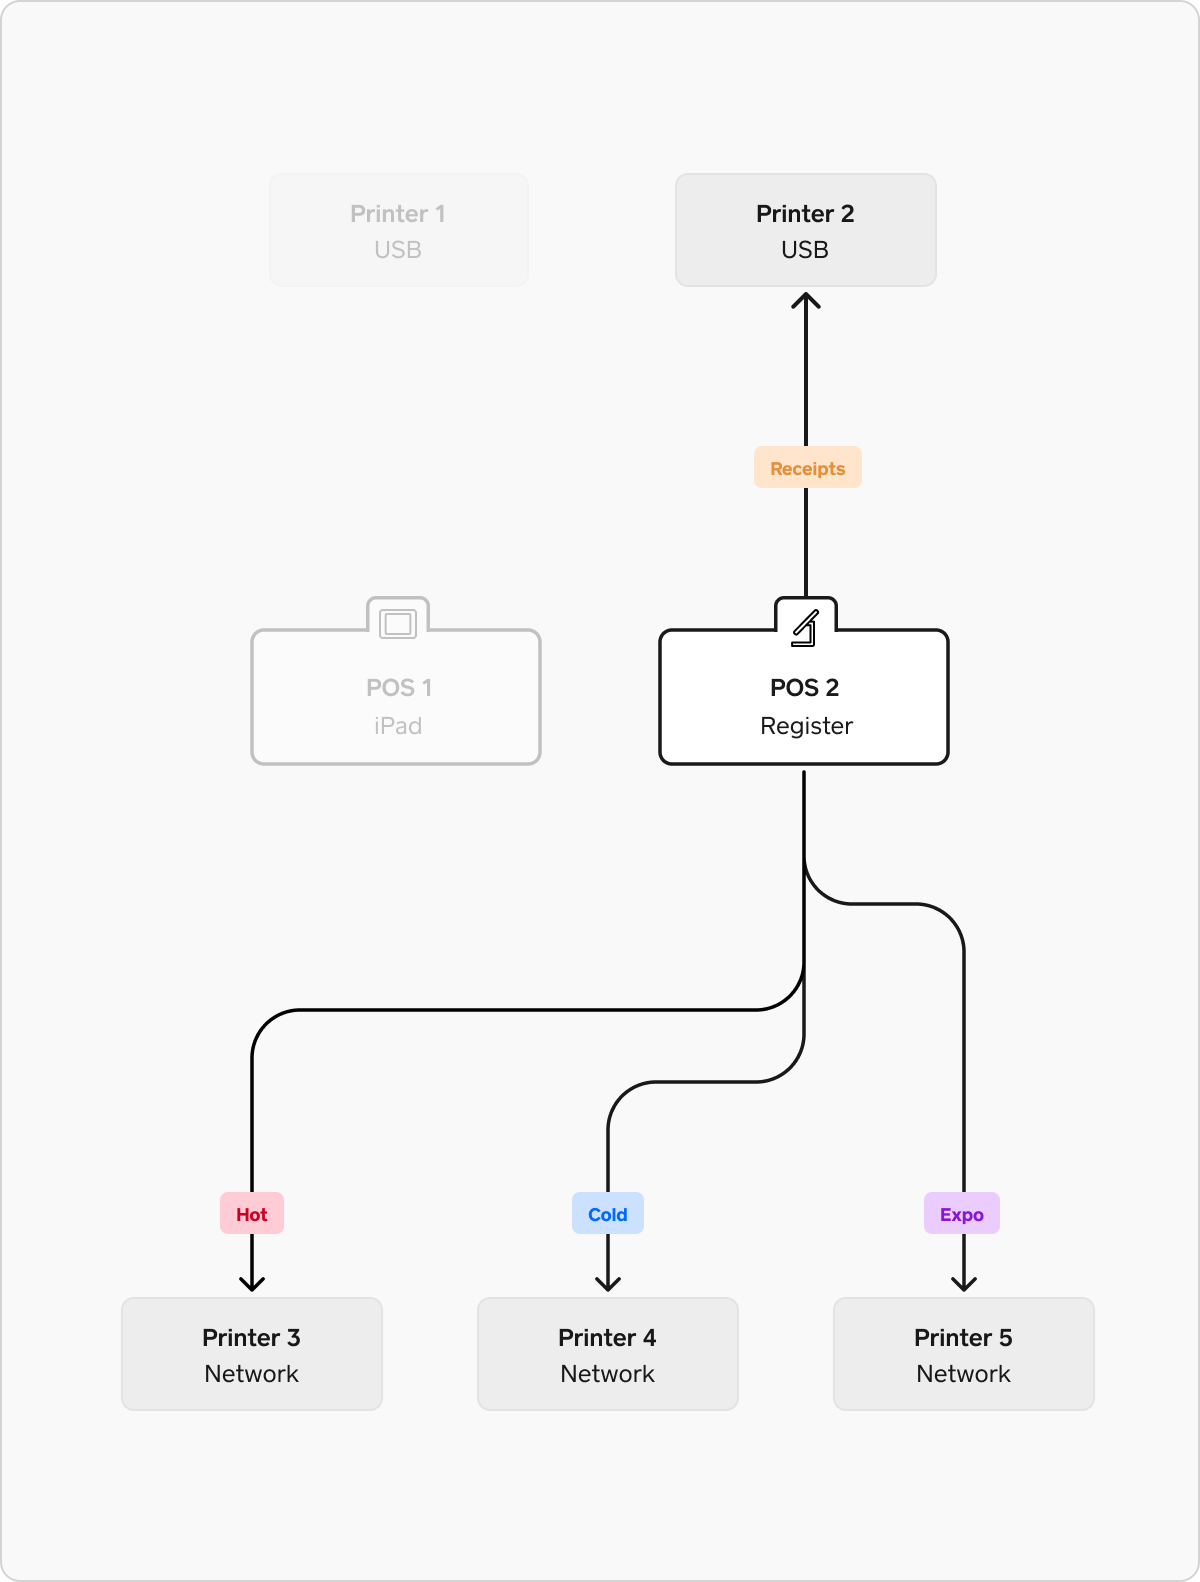
In this example there are multiple points of sale and a more complex kitchen environment with multiple prep stations. This example has a prep station for “hot” foods, a prep station for “cold” foods, an expo station where orders are assembled, with all online orders being sent to the prep stations and expo.
To configure printing in this environment, you will need 6 printer profiles (plus one for receipts, as shown in the simple retail example above).
- Hot profile: This profile is set to in-person order tickets and set to print only item categories that should go to the hot prep station (cooked food, fried foods, etc)
- Cold profile: This profile is set to in-person order tickets and set to print only item categories that should go to the cold prep station (salad, cold sides)
- Hot online profile: This profile is set to online order tickets and set to print only item categories that should go to the hot prep station (cooked food, fried foods, etc). This profile must be used by only one point of sale device–assigned to a printer from just one point of sale. This profile can not be active on other points of sale.
- Cold online profile: This profile is be set to online order tickets and set to print only item categories that should go to the cold prep station (salad, cold sides) This profile must be used by only one point of sale device–assigned to a printer from just one point of sale. This profile can not be active on other points of sale.
- Expo profile: This profile is set to in-person order tickets and set to print all item categories
- Expo online profile: This profile is set to online order tickets and set to print all item categories. This profile must be used by only one point of sale device–assigned to a printer from just one point of sale. This profile can not be active on other points of sale.