Create and edit modifiers
About modifiers
Modifiers are customisable options for your items (toppings, add-ons or special requests) that can be applied at checkout. You can also set requirements for how many modifiers can be selected at checkout. Use modifiers to offer choices and add-ons for specific items, allowing for flexibility in customising individual items.
For example, you can create a modifier set of sandwich toppings, and restrict it so that maximum three toppings can be selected.
Modifiers are helpful when you want to keep the primary item consistent, but offer additional options.
For example, you can allow your customers to choose burger doneness or add extra toppings.
Modifiers applied to items will display on your order tickets, customer receipts, in your Item Library and in the sales report.
The order of modifier sets is now defined at the item level in the Item Library. This means you can start by setting a default order in the Modifier Library, then control the exact order that these modifier sets show on a per-item basis across all POS modes, kiosk, and online ordering. Simply drag and drop the sets to put them in the exact order to optimize order entry for your staff and customers.
If you need to reset back to the default order in Modifier Library, you can select “Reset to default” on the item sheet, or reset in bulk via the Item Library by selecting the checkbox next to the item(s) you want to reset → Actions → “Reset modifier set order”.
Explore the demo video of the new functionality.
For additional questions, contact Customer Support.
Before you start
You have two options for creating modifier sets:
Create modifiers from the Square Dashboard on a laptop or desktop computer
Create modifiers directly from your Point of Sale app
Make sure you’ve created at least one item in your Item Library before assigning a modifier set to an item. Learn more about how to create and edit items with Square.
Variations and modifiers have different use cases:
Use variations to offer different forms of the item that are fixed, like small or large size. Learn how to create and edit item options and variations.
Use modifiers to provide customisation options during the sale of an item, like adding cheese to a burger.
Step 1. Create and edit modifier sets
- Sign in to Square Dashboard and go to Items & services (or Items & menus or Items & inventory) > Items > Modifiers.
- Click Create a modifier or select an existing modifier to edit.
- Enter the modifier name and display name, then choose the modifier type (text modifiers are only available on Square Online and Square Kiosk).
- If you have multiple locations, modifier sets will default to being available at all locations. If you’d like a modifier set to only be available at specific locations, change the location selection.
For modifiers list:
- Add new modifiers under the Modifier List section and enter the modifier details – including your modifier name, price, online visibility, default selection and stock status.
- Under Selection Rules, choose whether a selection is required and whether customers can select more than one modifier.
- If ‘Allow more than one modifier to be selected’ is turned on, you will have the option to enable Modifier Quantities by toggling Allow multiple quantities of a single modifier on.
- If a modifier is required, you can set a minimum greater than one if desired. If ‘allow more than one modifier’ is selected, you can set a maximum number of selections if desired.
- Under the Settings section you can:
- Toggle Hide modifiers on customer receipts if you don’t want modifiers in this set to appear on printed or digital receipts.
- Toggle Use Conversational Modifiers on POS to show operator buttons like ‘Add’, ‘No’ or ‘Extra’ on Square Restaurant POS app.
- Click Save.
Conversational modifiers cannot be used if ‘Allow multiple quantities of a single modifier’ is toggled on. To use conversational modifiers, disable that setting first.
To delete, click the Delete button next to a modifier. Rearrange the order your modifiers will appear within the set by using the drag handle.
For text modifiers
- Set a character limit for your text field. The maximum allowed characters is 150.
- Choose whether your text modifier is required.
- Click Save.
- Open your Point of Sale app and tap ≡ More > Items > Modifiers.
- Tap Create modifier set or select an existing modifier to edit.
- Tap Name and enter your modifier’s name.
- Tap on the New Modifier field within the Modifiers section and enter your modifier name. You can optionally add a price to the modifier.
- Tap Save.
To delete it, click the Delete icon next to a modifier. Rearrange the order modifiers appear in the list by using the three horizontal lines icon (≡).

Step 2. Apply a modifier set to items
To apply modifier sets to a single item:
- Sign in to Square Dashboard and go to Items & services (or Items & menus or Items & inventory) > Items > Modifiers.
- Select an existing item or Create item.
- Click Add within the Modifiers section.
- Select a modifier set (or several of them) from the list > click Done.
- Click Save.
Only modifier sets available at the same locations your item is available at can be added to an item.
To apply modifier sets to multiple items
- Sign in to Square Dashboard and go to Items > Modifiers.
- Click on Apply to items on the relevant modifier set.
- Select the items you want to apply the modifier set to.
- Click Apply to Items.
To apply modifier sets to a menu:
You can apply modifier sets to your menu items from the menu editor. Once you apply a modifier set, the modifier set name appears beneath the item name.
- Sign in to Square Dashboard and go to Items > Menus.
- Click Add Modifiers.
- Search for the existing modifier set you want to use.
- Select the display group or individual items to which the modifier will apply.
- Click Apply to Items.

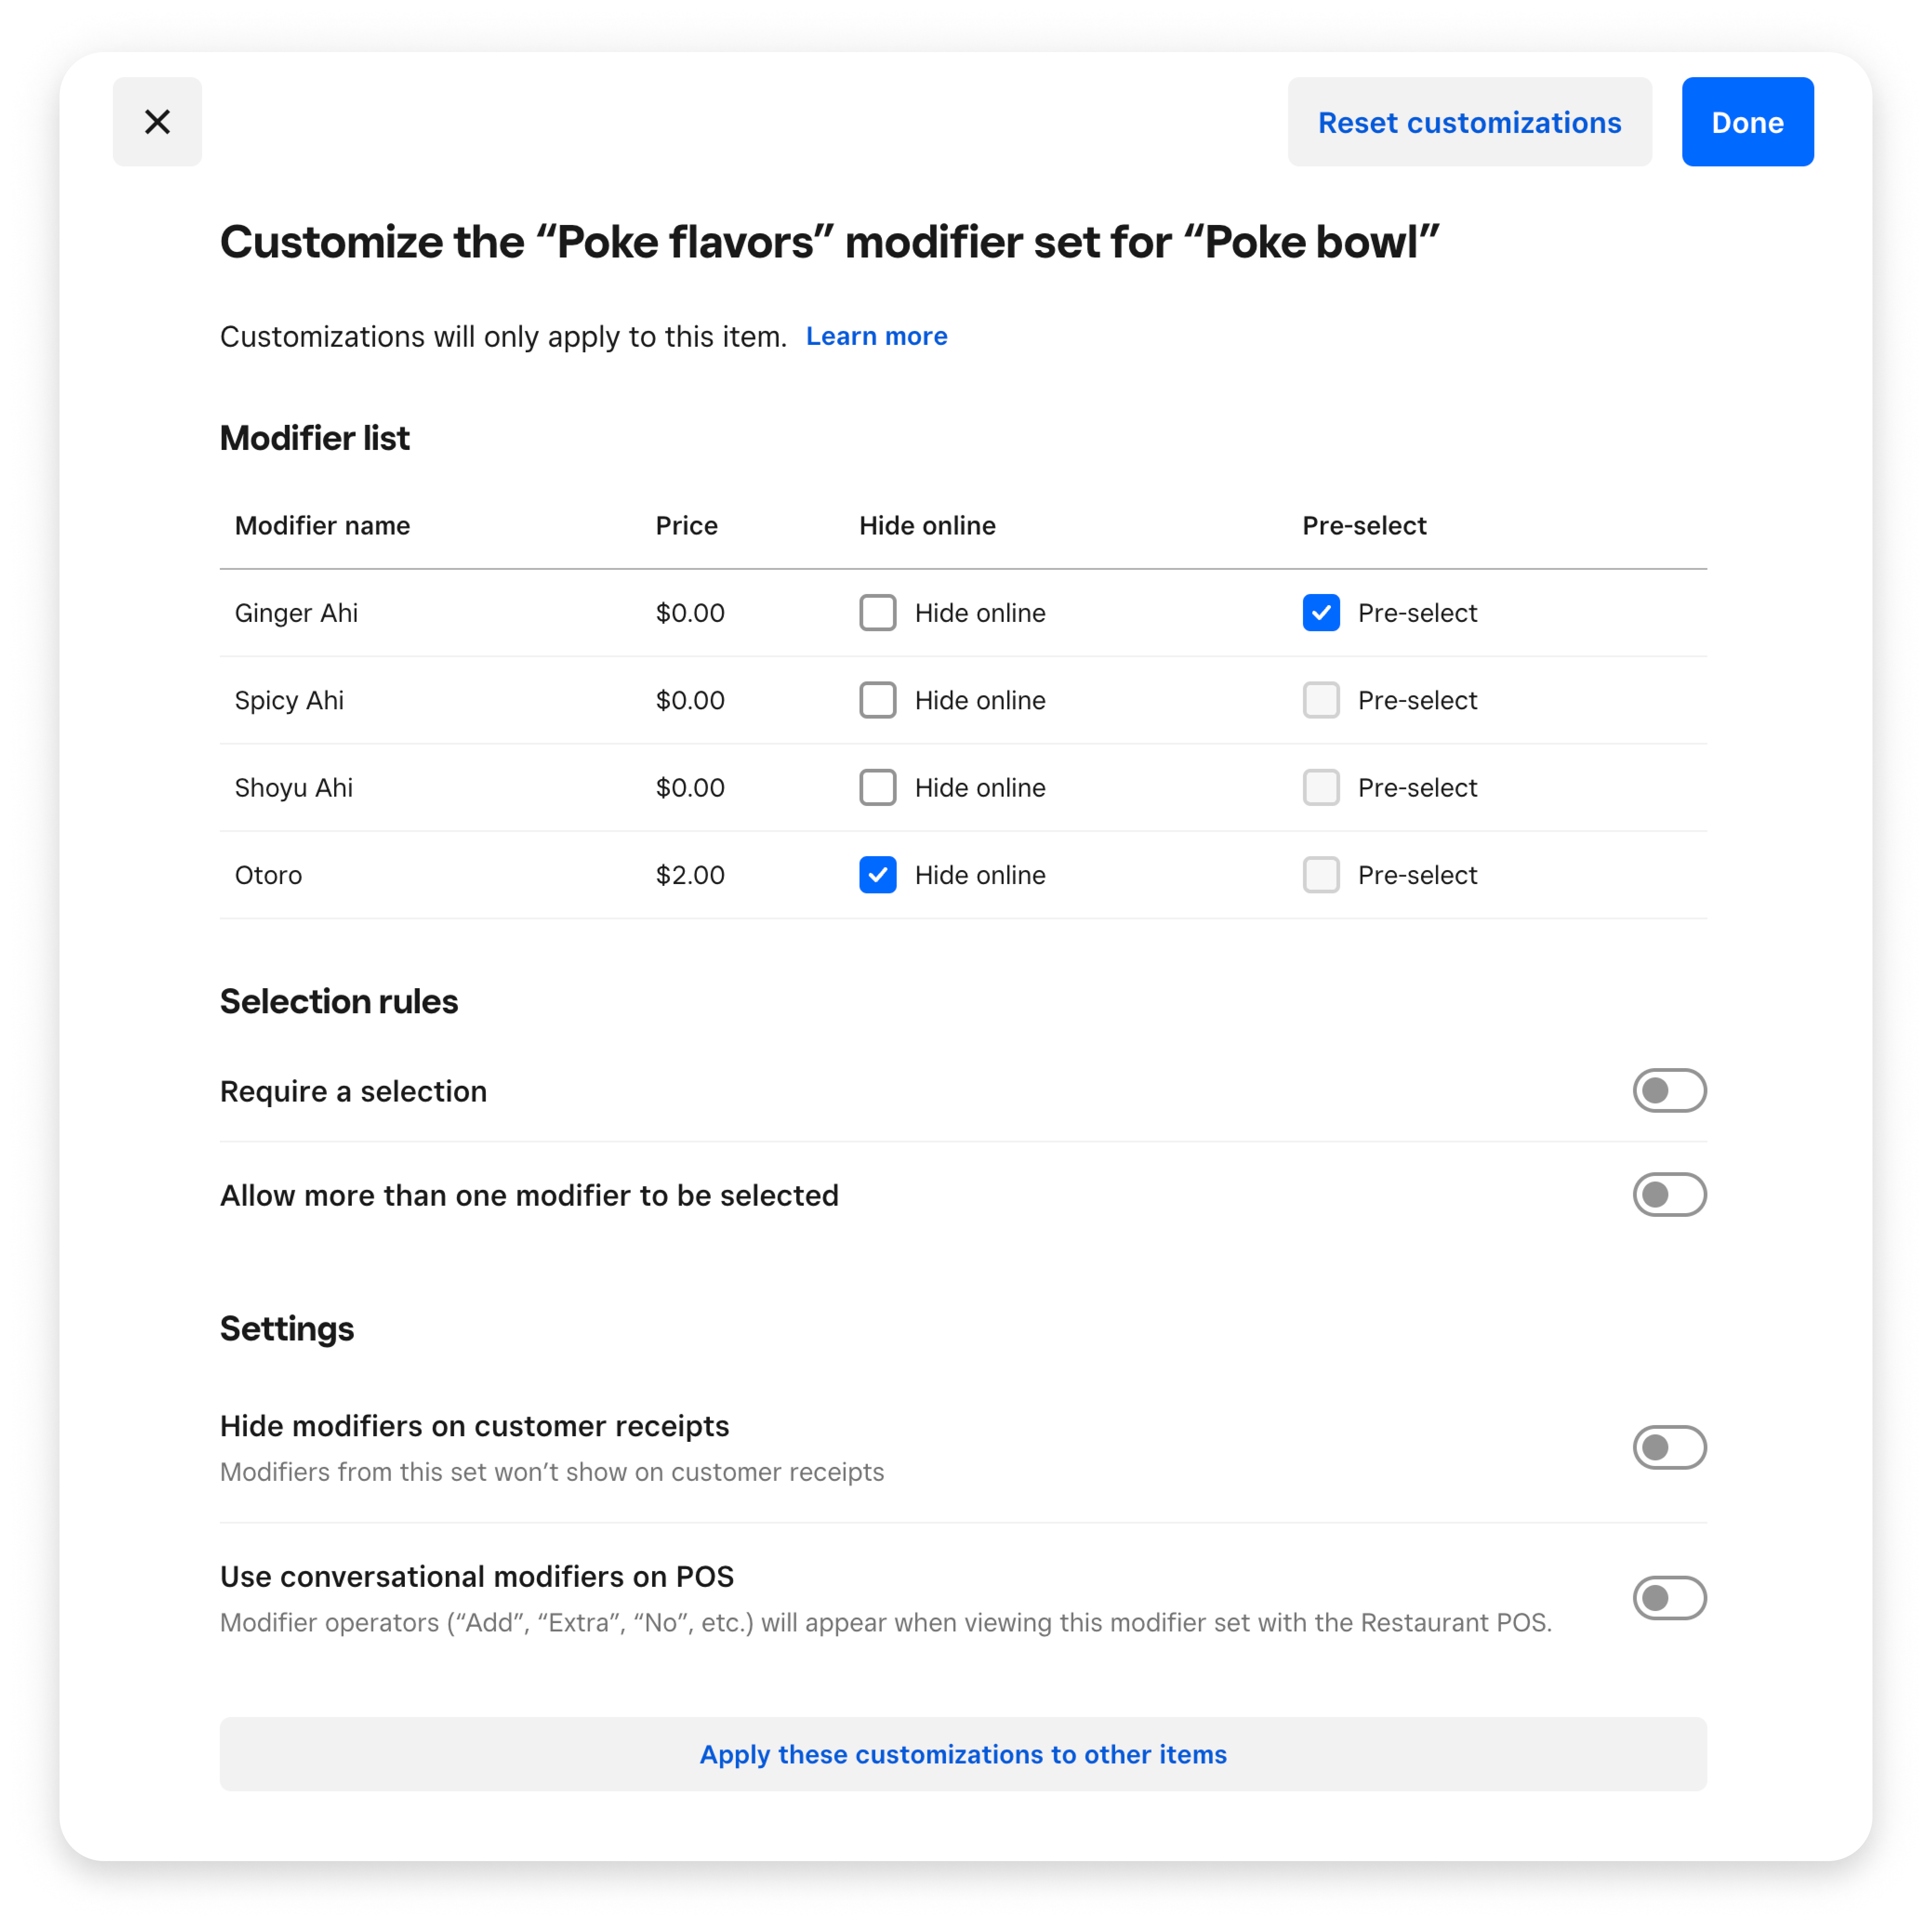
Step 3. Set item level modifier customisations (optional)
Once a modifier set has been added to an item, you can override its default settings by applying item-level customisations. This can be configured from the Modifiers section in the item detail page.
Sign in to your Square Dashboard and click Items & services (or Items & menus or Items & inventory) > Items > Item library.
Click (•••) More menu next to the modifier set and select Customise
Adjust any settings you want to override for this item – including modifier visibility, preselected choices, selection rules and quantity rules.
Click Done in the top-right-hand corner to save your changes.
When prompted, choose whether to apply these changes only to this item or to other items that use this modifier set.
To remove customisations and return to the original modifier set behaviour, click Reset customisations.
Once a modifier set is customised at the item level, it becomes independent – future changes made at the modifier set level will no longer apply to that item unless the customisation is reset.
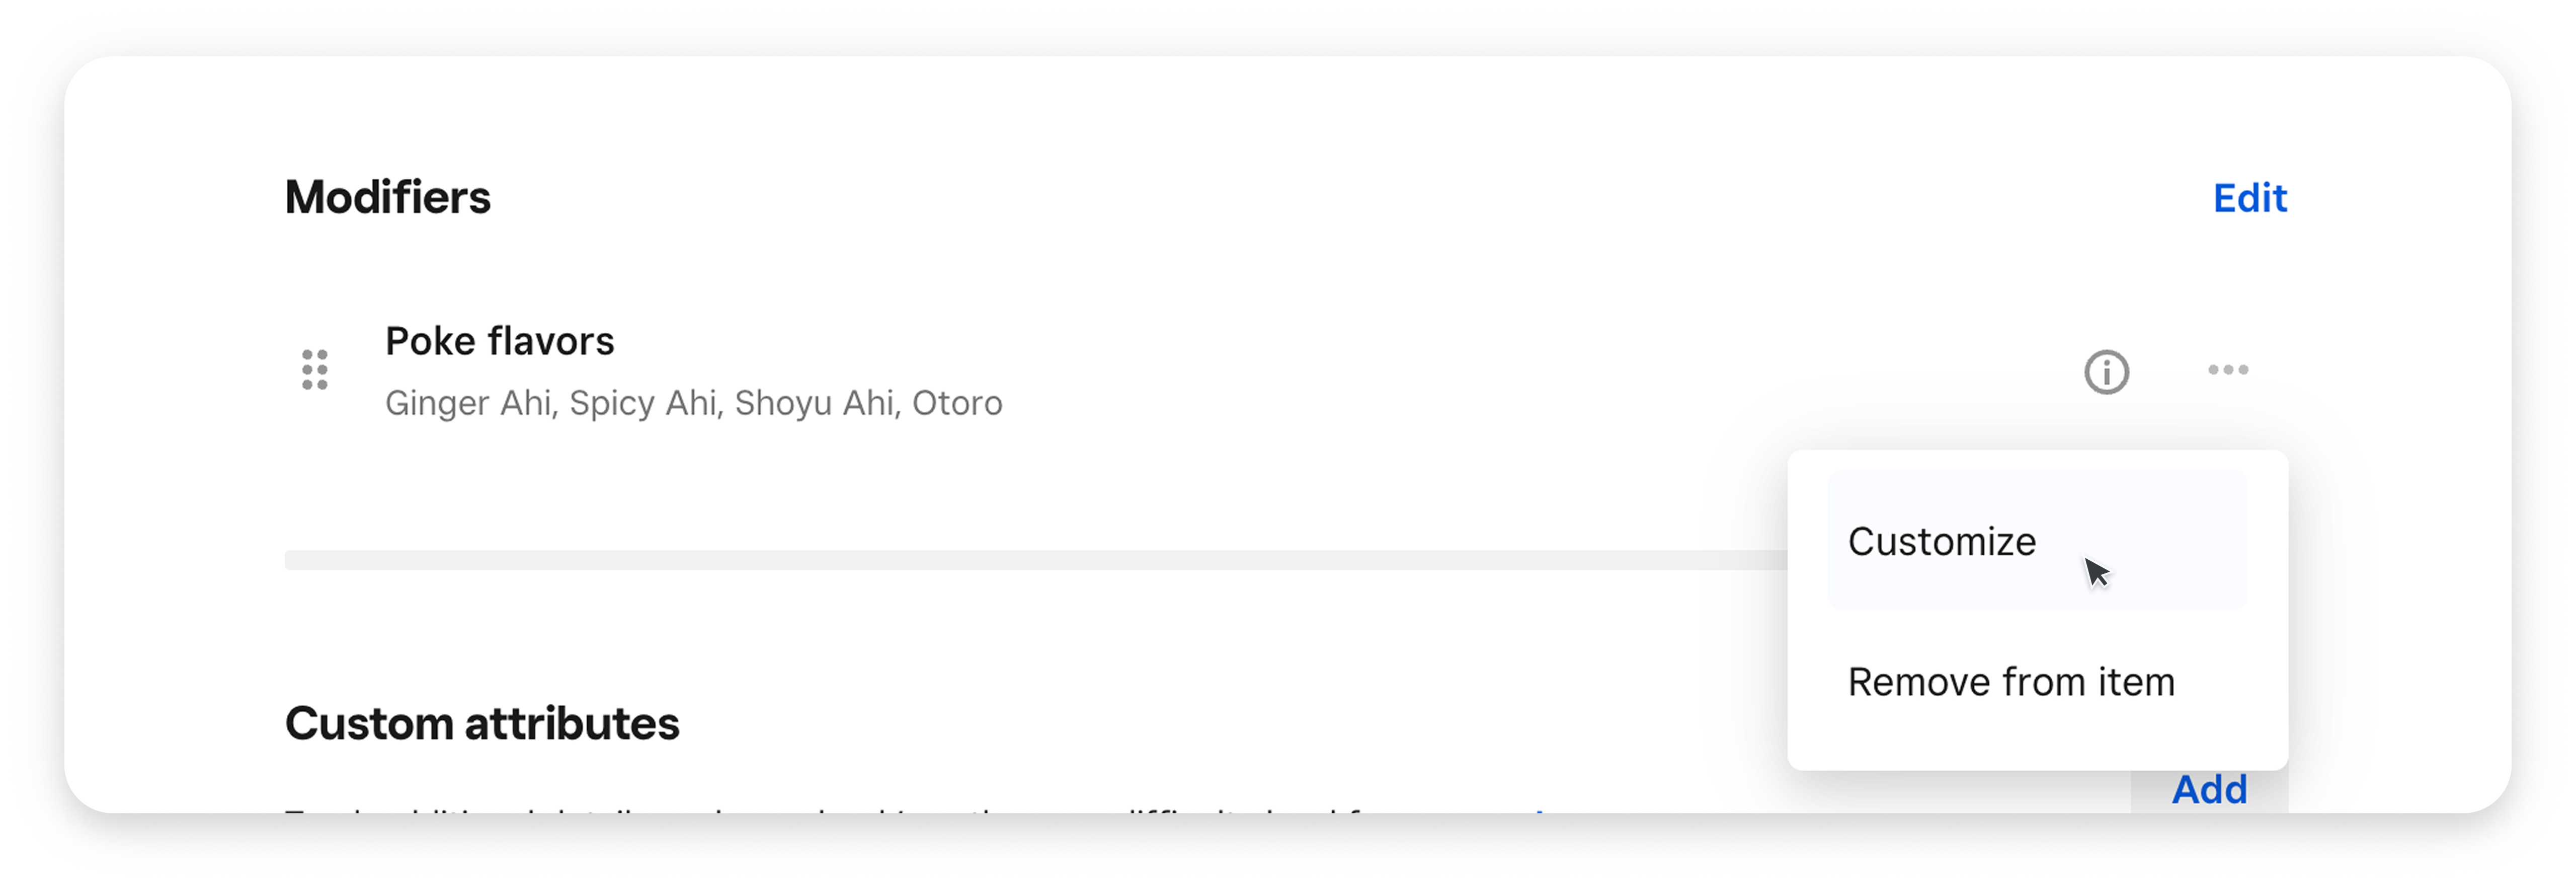
Remove a modifier set from items
Once you’ve assigned a modifier set to an item, you can remove the modifier set assigned to this item at any time.
To remove item modifiers from a single item:
- Sign in to Square Dashboard and go to Items & services (or Items & menus or Items & inventory) > Items.
- Click on the selected item from the list.
- Click (•••) next to your modifier set within the Modifiers section.
- Click Remove from item.
- Click Save.
To remove item modifiers from multiple items:
- Sign in to Square Dashboard and go to Items & services (or Items & menus or Items & inventory) > Items > Modifiers.
- Click Apply to items next to the relevant modifier.
- Untick the items you want to remove the modifier from.
- Click Apply to Items.
Adjust modifier display order in checkout, tickets and receipts.
You can control the order in which modifier sets appear during checkout on POS,Square Online, Invoices and Kiosk. This can be helpful if you want certain modifier groups (like base options or sauces) to show first.
- Sign in to Square Dashboard and go to Items & services (or Items & menus or Items & inventory) > Items.
- To set a default order for all modifier sets, navigate to Modifiers.
- Click the (⋮⋮) icon next to a modifier set.
- Click and drag the modifier sets to rearrange them in your preferred order.
- If you would like a custom order on specific items, navigate to Item Library and select the item in question.
- Then, drag and drop the modifier sets to reorder here. Note: you can always select ‘Reset to default’ if you’d like that item’s modifier sets to return to the default order set in the Modifier Library.
- Your changes will apply automatically
This ordering only applies to Square Online. Other sales channels follow different logic detailed below.