Set up Square Stand (2nd generation)
About Square Stand (2nd generation)
Square Stand is hardware that seamlessly turns your compatible iPad into a powerful point-of-sale. Whether you're a full service restaurant or a retailer, this countertop setup accepts every way your customers want to pay, including contactless options like Apple Pay, Google Pay, and Samsung Pay.
Square Stand (2nd generation) has two versions:
Square Stand (2nd generation, v2) features a USB-C iPad connector.
Square Stand (2nd generation, v1) features a Lightning iPad connector and is no longer being manufactured or sold by Square. However, we will continue to provide updates and troubleshooting support for this Square Stand.
This article will show you how to set up both versions of Square Stand (2nd generation).
Before you begin
To set up and use your Square Stand, you need the following:
A verified Square account. Learn how to set up your Square account.
A consistent power source via a wall outlet
-
A secure internet connection (Wi-Fi or Ethernet).
If you’re connecting via Ethernet, you need an Ethernet adaptor.
Learn more about Square Stand (2nd generation) technical specifications, like what's in the box, dimensions, connectivity, and more.
Square currently supports two different generations of Square Stand. Make sure you have correctly identified which generation of Square Stand you own to properly set up. Square Stand (2nd generation) has a white base with a black frame and includes an integrated card reader for contactless and chip payments. Learn how to Identify your Square hardware.
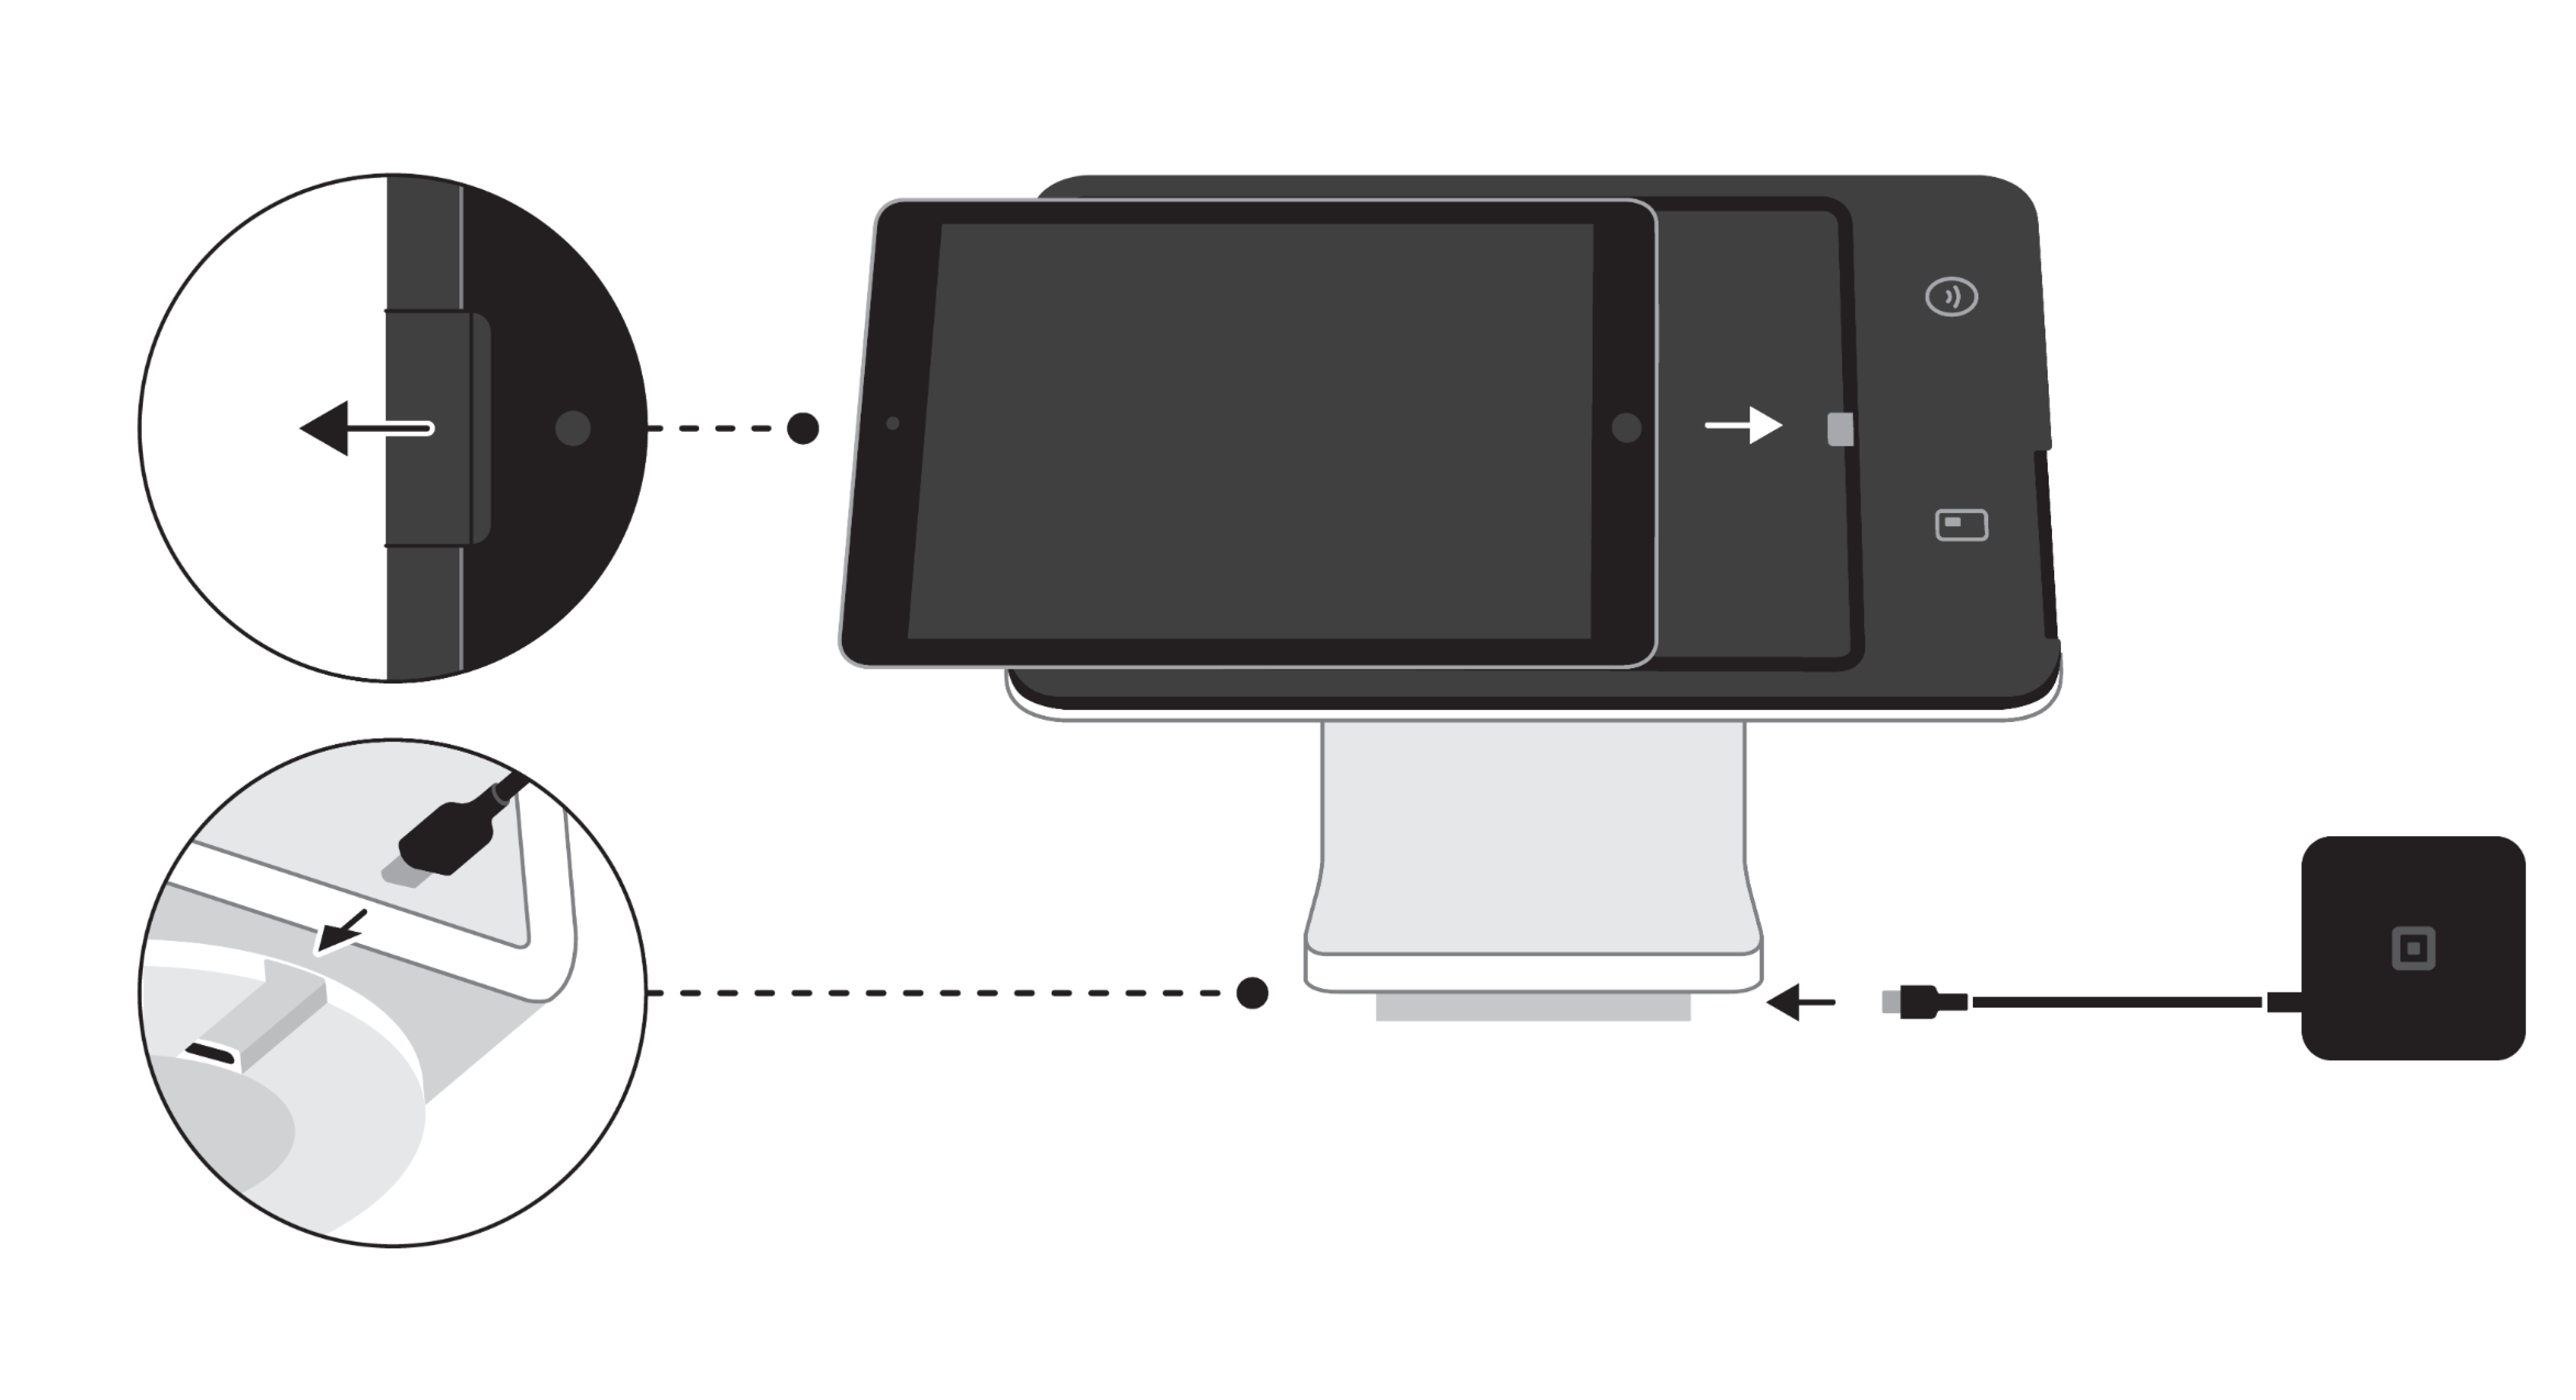
Step 1: Connect Square Stand
Start your Square Stand set up by removing the protective wrap and connecting all of your hardware components.
Connect Square Stand to the hardware hub. The hardware hub has two cables. Connect one cable to the bottom of Square Stand and the other to the power adapter.
Plug the hardware hub into the included power adapter, or a USB-C power adapter that can provide a minimum of 45W of power. Then connect the power adapter cable to the power adapter.
Plug the power adapter cable into a power outlet.
Step 2: Power up and connect your network
- Turn on the iPad for your Square Stand.
- Go to Settings > Wi-Fi, then toggle Wi-Fi ON.
- Tap your preferred network and enter its password, if required.
Square Stand automatically uses Ethernet connection over Wi-Fi when an Ethernet cable is connected.
- Plug your Ethernet adapter into the hardware hub.
- Plug your Ethernet cable into the Ethernet adapter.
- Make sure the hardware hub is connected to the power adapter and the power adapter is plugged into a power source.
- Your Square Stand will automatically connect to your network once the Ethernet adapter and cable is plugged into the hardware hub and the hub is connected to power.

To check your Ethernet connection:
- Open the Settings app on your iPad.
- Tap Ethernet > Square Stand.
- If you see an IP Address, you are connected via Ethernet.
Step 3: Connect your iPad to Square Stand
Insert and connect your iPad to the Square Stand frame.
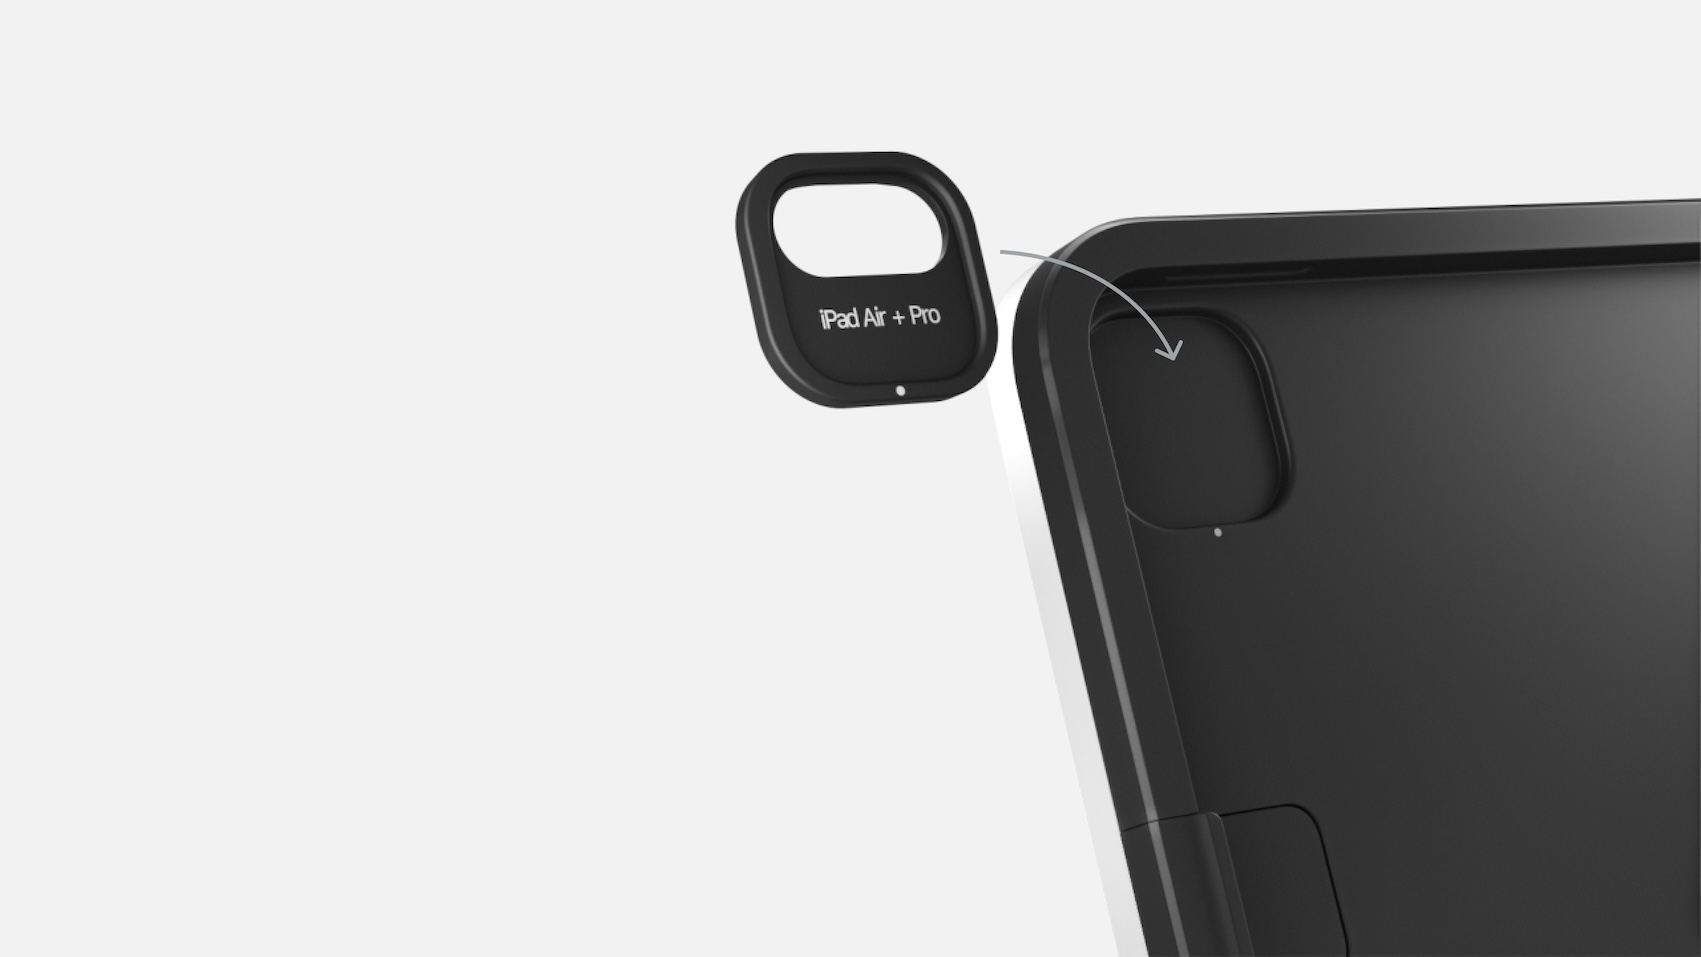
Note: If you are using a compatible iPad Air or an iPad Pro model with Square Stand (2nd generation, v2), insert the included adapter for iPad Air and Pro into the nest of the Stand prior to placing your iPad into the Stand.
Square Stand simply slides in and docks to the connector.
You’ll know it’s locked in place when you hear the security latch click.
To remove your iPad from Square Stand:
Locate the raised security latch next to the iPad’s camera on the left.
Pull the security latch outwards and then down to disconnect the iPad from the Square Stand.
Once unlatched, carefully remove the iPad by sliding it out towards the left. Be mindful of the iPad connector. Take care not to pull the iPad up from the Stand prior to disconnecting as this can damage the iPad connector.
Step 4: Download the Square Point of Sale app
Tap the App Store icon.
Tap the search icon (magnifying glass) in the navigation bar > search for Square Point of Sale.
Tap Get next to the Square POS app icon > tap Install > enter your Apple Account password or Touch ID.
Once downloaded, tap Open or tap the Square icon in your Home Screen to open.
Step 5: Sign in to your Square account on Square Stand
You can now sign in to your Square account on Square Stand.
Open the Square Point of Sale app, and tap Sign in.
Enter the email address and password associated with your account.
Tap Sign in.
Step 6: Select accessories for your Square Stand (optional)
You can view printers, cash drawers, barcode scanners, scales, and more accessories that are compatible with your Square Stand:
Go to our accessory compatibility page.
Click an accessory option. If applicable, select Filter > Compatibility > Stand > Apply.
View a list of accessories compatible with your Square Stand.
Under Compatible with, click the products drop-down menu to view other compatible Square hardware.