Set up Square Terminal
About Square Terminal
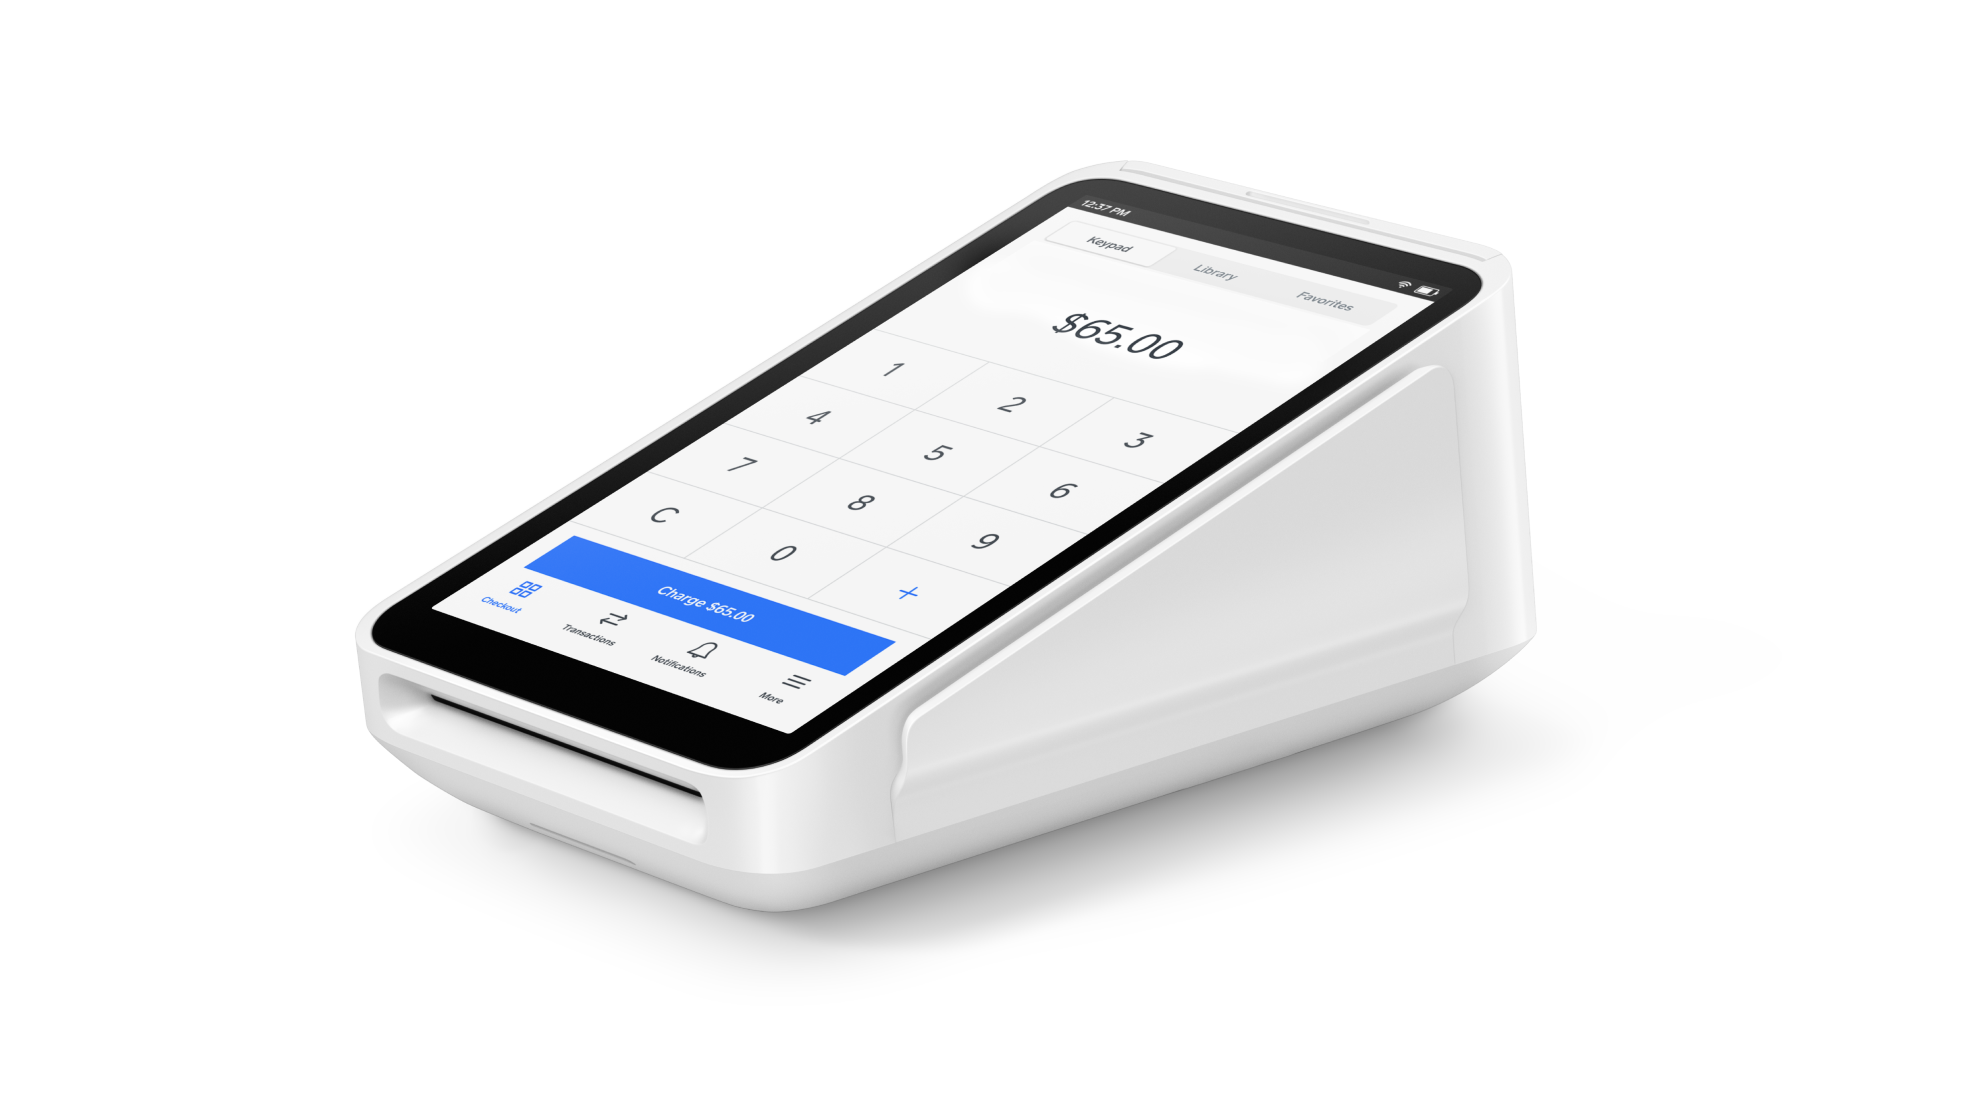
Square Terminal is a portable hand-held POS device with a built-in receipt printer and a powerful battery designed to last all day with no wires. Use Square Terminal to process card payments, manage orders and print receipts anywhere.
You can mount and secure your Square Terminal to your counter or wherever you plan to process payments at your business. The 1/4” mount receptacle on the bottom of your Square Terminal is designed to fit with many widely available camera-style mounting accessories.
Before you begin
To fully set up your Square Terminal, you need Wi-FI or Ethernet internet access. If you’re connecting with an Ethernet cable, you need the Hub for Square Terminal. Take a look at Square Terminal technical specifications to learn about what’s in the box, dimensions, connectivity and more.
To sign in to your Square account on your Square Terminal, you need your Square account login credentials. Learn how to create your Square account in the Square setup guide. After you sign in, you can adjust your date, time and language settings.
To print receipts from the built-in printer, you need load compatible receipt paper. If you need more receipt paper, visit the Square Shop.
Step 1: Power up and connect to your network
Grab your Square Terminal, turn it on and connect to Wi-Fi or Ethernet.
- Remove the protective wrap.
- Lift your Square Terminal out of the box and remove the plastic wrap.
- Press and hold the power button on the left side for three seconds to power on.
When you turn on Square Terminal for the first time, you will be asked to connect to a network. You can connect your Square Terminal to your network through either Wi-fi or Ethernet.
Connect through Wi-Fi:
- Select your preferred network from the list of available networks.
- Enter the password if necessary.
Connect through Ethernet:
- Plug the accessory hub into the port on the side of your Square Terminal.
- Plug the power adaptor cable into the power adaptor.
- Plug the other end of the power adaptor cable into a power outlet.
- Plug your Ethernet cable in the accessory hub.
- Your Square Terminal will automatically connect to your network once the Ethernet is plugged into the accessory hub and the hub is connected to power.

Step 2: Adjust your settings and update software
Set your language, date and time preferences and update your Square Terminal software.
To adjust the language or date and time settings:
- Tap ≡ More > Settings > Hardware > General.
- Tap Language and select your language of choice.
- For date and time, toggle Set Automatically ON and select your time zone.
- You can also set the date and time manually by toggling Set Automatically OFF and selecting the date, time and time zone.
To adjust the brightness and display settings:
- Tap ≡ More > Settings > Hardware > Display.
- Use the slider to control the brightness level.
- Select from the sleep timer options.
To adjust the volume settings:
- Tap ≡ More > Settings > Hardware > Sounds.
- Toggle Enable device sounds ON/OFF.
- Use the slider to control the volume level.
- Toggle Enable card network sounds ON/OFF.
You’ll be prompted to choose a software update option: Update Now or Update Later. The initial software update takes around 20 minutes to complete, but may take up to one hour in the future.
- Tap Update Now to start the software update immediately. You will not be able to accept card payments during a software update, but you can record cash payments and navigate within the app.
- Tap Update Later to defer the software update. The software update will start automatically overnight as long as Square Terminal is turned on and plugged in.
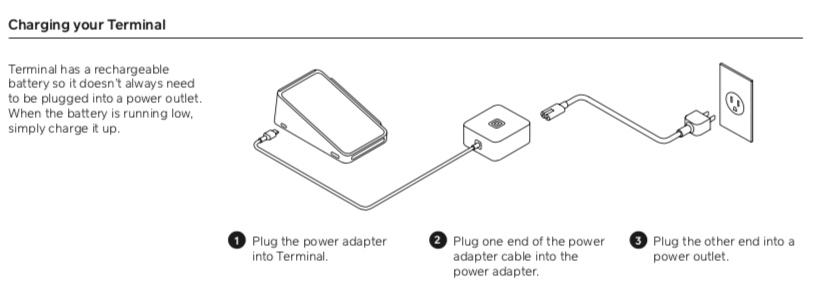
Step 3: Charge your Square Terminal
Square Terminal comes already charged and ready to use, but you can plug it into a power socket when the battery is running low.
Plug the power adaptor into the port on the side of the Square Terminal.
Plug the power adaptor cable into the power adaptor.
Plug the other end of the power adaptor cable into a power socket.
Step 4: Sign in to your Square account
You can now sign in to your Square account on Square Terminal. Once you sign in, you can also access the Setup Guide on your Square Terminal to help you finish setting up your Square account.
- Scan the QR code to create an account with a separate device.
- Select Continue to sign in to create an account on Square Terminal.
- Select Email a link to receive a sign up link to your email address.
If you already have an existing Square account, sign-in to your account using either your email address or by creating a new device code in your Square Dashboard. Learn how to set up device codes.
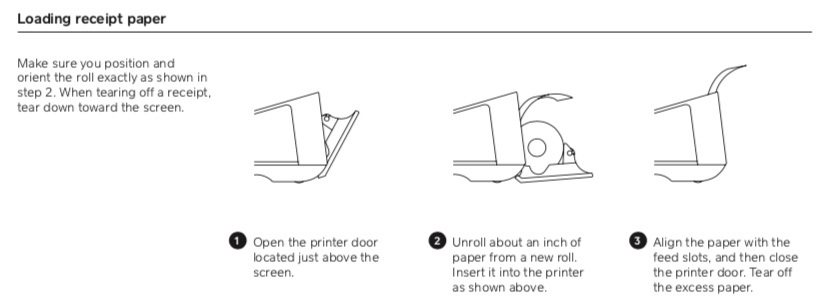
Step 5: Load receipt paper
To print receipts, load receipt paper into your Square Terminal.
Open the printer door, located above the screen on the top of your Terminal.
Unroll your new printer paper slightly, set it on the printer door with the unwound paper on top and the loose end facing out of the Terminal, away from your screen.
Make sure your paper follows the curve of the roll and it is not bent. Close your printer door and tear the excess paper towards the screen.
Test your receipt printer by tapping ≡ More > Settings > Hardware > Printer > Print test.
If your receipts don’t print, you may need to reorient the printer paper.
When tearing receipts for your customers, it’s best to tear the paper toward the bottom of Square Terminal. Pulling the paper away from the screen may cause the printer door to open.
Step 6: Mount your Square Terminal (optional)
To secure your Square Terminal, you can buy a mount on Square Shop or use Square Terminal with other commercially available camera mounts.
Step 7: Select accessories for your Square Terminal (optional)
You can view printers, cash drawers, barcode scanners, scales and more accessories that are compatible with your Square Terminal.
Click an accessory option.
Click the Select Square hardware drop-down menu and select Square Terminal.
View a list of accessories compatible with your Square Terminal.
Under Compatible with, click # products to view more information.