Set up Square Risk Manager
About Risk Manager
Risk Manager is a tool that helps you catch and manage online payments that pose a potential fraud risk. Creating a rule in Risk Manager allows you to select what actions can be taken on an online payment if certain conditions within that rule are met. Rules can either decline a payment from a specific payment card, trigger a risk alert, or invoke 3D Secure (3DS). Rules can be set based on payment card conditions as well.
Before you begin
Although this tool is designed to help prevent payment disputes, the risk of a payment dispute is present with all card payments. Sellers will continue to be liable for all payments they accept and the disputes they receive. Square is not assuming liability for payments, regardless of the risk evaluation that is delivered.
Risk Manager is not available on transactions processed via Afterpay.
Step 1: Enable Risk Manager
Sign in to Square Dashboard and go to Payments & invoices > Risk Manager.
Click Get Started.
Select the business location(s) you wish to activate with Risk Manager, then click Enroll in Risk Manager.
Once you have activated Risk Manager on your account, you can begin to create rules and set up alerts for your online payments.
Step 2: Create rules
A rule allows you to choose what happens to a payment if certain conditions are met. You can set a rule to either trigger a risk alert, invoke 3D Secure or to decline a payment. You can also set your rule to be based on factors such as Square’s own risk evaluation, AVS mismatch, invalid CVV, or suspicious transaction amounts.
When setting payment rules, if there are certain conditions of a payment that indicate suspicious behavior (i.e. a shipping address and billing address do not match), you can set a rule to take automatic action rather than manually reviewing each online payment.
Rule actions are ranked first by 3D Secure, Decline, and then Alert. If you have a payment that matches a 3D Secure rule and a decline rule, 3D Secure will take priority over the decline. And likewise, if you have a payment that hits both a decline rule and an alert rule, the decline will take priority over the alert.
You can create a rule that allows you to choose what actions can be taken on an online payment if certain conditions within that rule are met. For example, you can set a rule to either trigger a risk alert or to decline a payment depending on the rule settings. You can also set your rule to be based on factors such as Square’s own risk evaluation, AVS mismatch, invalid CVV, or suspicious transaction amounts.
To create a rule within Risk Manager:
- Sign in to Square Dashboard and go to Orders & payments (or Invoices & Payments or Payments) > Risk manager.
- Click Rules > Create rule.
- Enter a rule name, action, payment type, location, and condition(s).
- Review the rule summary, then click Activate rule.
- Once your rule is saved, payments that meet the requirements set by your rule conditions will either trigger a risk alert, invoke 3D Secure or the payment will be declined.
Step 3: Review rule conditions
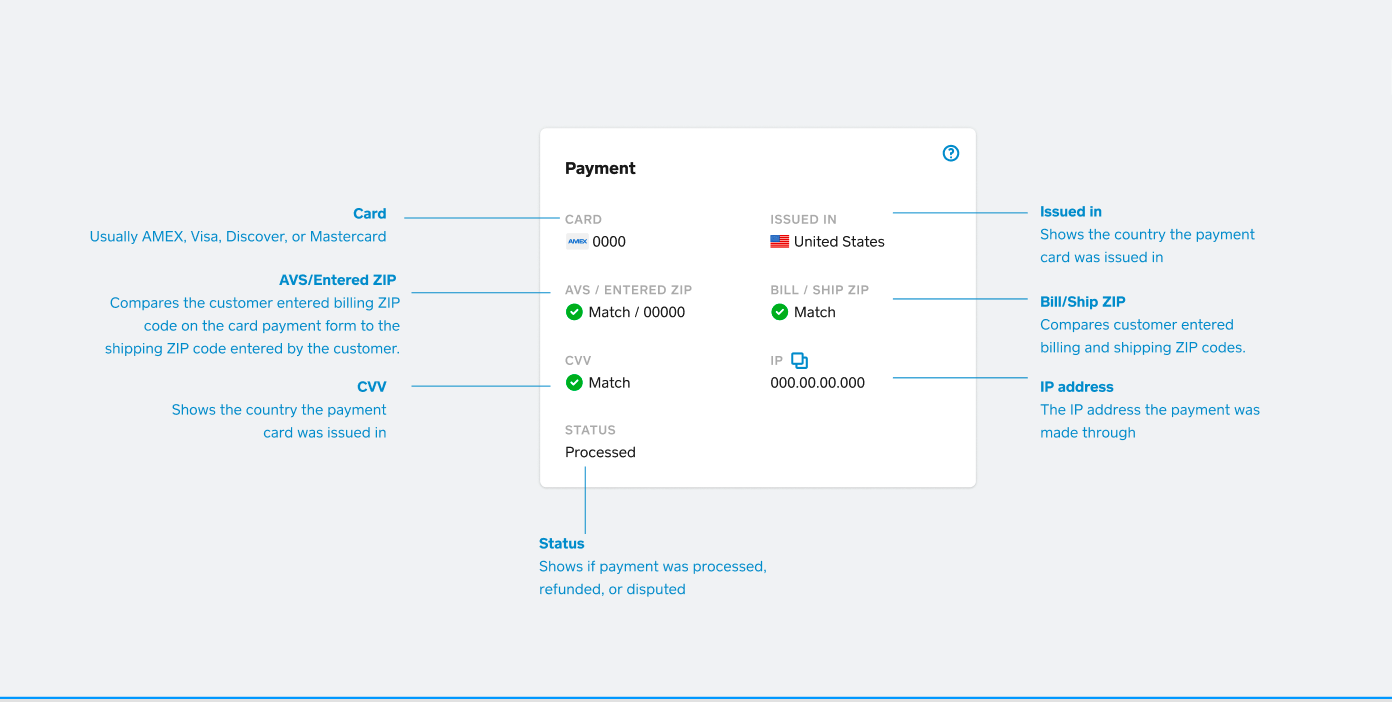
Here is the payment card info you will see displayed in Risk Manager.
3D Secure (3DS) in Risk Manager helps you authenticate online card transactions, reducing fraud by requiring additional customer verification steps, like SMS one time codes or biometrics at time of checkout. You can set 3DS rules from your Square Dashboard, protecting against chargeback liability if fraud occurs post-authentication. However, 3DS may decrease completed transactions due to issuer verification requirements, impacting customer experience.
Learn how to use Square 3D Secure with Risk Manager.
Address Verification System or AVS checks to see if the buyer’s provided billing address matches the address that is on file with the card issuer. If these match, a green tick will appear in this column in the Alerts tab. If the addresses don’t match, a red X will appear instead. You can select AVS that do not match as a condition for any rule action.
Triggers an alert: Yes
Triggers a payment decline: Yes
For AVS, If the card is issued in a country that doesn’t use AVS or if we’re unable to compare information due to technical error, AVS results will be unavailable. You have the option of selecting AVS unavailable as a condition to trigger an alert or decline a payment. Additionally, it is always possible that a cardholder has moved and hasn’t updated their billing information with the card issuer. However, sometimes this type of mismatch can indicate that a card has been stolen and used fraudulently, thus increasing the risk of a payment dispute.
Card Verification Value or CVV is the 3-digit verification code on the back of a Visa, Mastercard or Discover card. For American Express, this is the 4-digit verification code on the front of the card. You can select CVV invalid as a rule action for instances when this code is entered incorrectly.
Triggers an alert: Yes
Triggers a payment decline: Yes
Square uses its own payments data information to determine if an incoming payment has a high or moderate risk of fraud. You can select either of these risk evaluations as conditions for any rule action.
Triggers an alert: Yes
Triggers a payment decline: Yes
You can target your rules based on transaction amount. This can help identify riskier transaction sizes, if they’re related to certain items, or if the payment is outside of your normal business patterns. You can set rules to alert you about a payment that is above or below a threshold, or between a range; or alert you about a payment that is more than double the average payment size on your account.
Triggers an alert: Yes
Triggers a payment decline: Yes, but only in combination with at least one other rule condition
For the payment amount rule condition, it can be used to alert you on payments by itself, or to alert or decline in conjunction with another rule condition (e.g. payment amount is under $100 and risk evaluation is high).
Used for instances where repeat transactions are attempted on the same payment card. You can limit the number of times a customer can complete a purchase from you in a single day before you’re either alerted by Risk Manager or the payments will begin to decline, based on the action you choose. Choose between up to 3, 5 or 10 transactions in a 24-hour period.
Triggers an alert: Yes
Triggers a payment decline: Yes
Prepaid cards, such as Visa or American Express gift cards, are non-traceable funds and can present a higher risk to your business. If you are noticing a pattern of prepaid cards being used to defraud your business, you can be notified when there is a prepaid card used to make a purchase.
Triggers an alert: Yes
Triggers a payment decline: Yes, but only in combination with at least one other rule condition.
If the payment card’s country of origin differs from your business’ operating country or the country where you are processing payments, you can set an alert or decline the transaction.
Triggers an alert: Yes
Triggers a payment decline: Yes
Step 4: Set up your allow list
An Allow List in Risk Manager gives you more control and flexibility over the types of payments that can be processed at your business.
Adding a payment card to your Allow List lets that payment card process a transaction at any of your business locations. A card on your Allow List will override any attempted declines by your Risk Manager rules and settings, your Block List, as well as any Square standard payment protections. Learn how to Set up your Allow List with Risk Manager.
Step 5: Set up your block list
Blocking a card prevents that card from being used to make purchases with your business moving forward. If you identify what you believe to be a fraudulent transaction, you can take this action to prevent future payments being made with that card. Learn how to Set up your Block List with Risk Manager.
View risk alerts
Risk alerts allow you to view additional information regarding online payments that were flagged by risk rules that you created. In addition, default rules provided by Square will also trigger risk alerts. Risk alerts can help to determine whether flagged payments should be refunded to avoid disputes, as well as blocking a suspicious payment card from completing additional transactions with your business.
You can view payments that were flagged by alerts from your Square Dashboard by going to Payments & invoices > Risk Manager > Alerts.
You can view your declined payments from your Square Dashboard by going to Payments & invoices > Risk Manager > Blocked payments . You can also view which rule triggered a decline.
Once you select an alert, you will see additional details such as payment and buyer information, related transactions, shipping address, and more. From the alert’s detail page, you can decide to issue a refund, add to Block List, add to Allow List, or dismiss the payment.
Set up alert notifications
You can choose to receive email notifications when a payment has been flagged by a risk alert. If you have multiple locations, you can also select which locations are enrolled in Risk Manager.
Sign in to Square Dashboard and go to Payments & invoices > Risk Manager > Notifications.
Toggle on Alert notifications.
For locations, all locations will be enrolled by default. Toggle each location on/off.
Issue a refund for a flagged payment
If you decide to issue a refund for a payment that was flagged by a risk alert, the payment will be cancelled and the amount paid for the transaction will be refunded to the cardholder. The status of the transaction in the Alerts tab will be updated to Refunded. Learn how to manage customer refunds.
View risk manager analytics
Analytics provides an overview of online payments that are impacted by Risk Manager rules and alerts, as well as any disputes or blocked payments. Data from Analytics provides more information on the impact Risk Manager has on your payments and can help you to determine what actions can be taken to protect your business from fraud risk. You can filter and sort information to view the total dollar amount of online payments that are affected by your rules and blocks, the percentage of payments that are alerted by your rules, as well as seeing what portion of payments result in a dispute.
To export and download your Risk Manager payments information into a report:
Sign in to Square Dashboard and go to Payments & invoices > Risk Manager > Analytics > Key metrics.
Choose a Risk Manager filter, such as Alerts, Blocks, or Disputes. Apply additional filters such as location(s) and date range.
Click Export data to download a spreadsheet containing your requested details. You can use Microsoft Excel, Apple Numbers, or Google Sheets to open and view this report.
Disclaimer: Although this tool is designed to help prevent payment disputes, the risk of a payment dispute is present with all card payments. Sellers will continue to be liable for all payments they accept and the disputes they receive. Square is not assuming liability for payments, regardless of the risk evaluation that is delivered.