Set up your Square Kiosk mount
About Square Kiosk mounts
Square Kiosk supports four mounting options to fit your space and business needs. You can choose the option that works best for your location:
Countertop mount: For use on existing countertop up to 38 inches.
Floor stand: For use in spaces without existing counters.
Wall mount: Secures the Square Kiosk directly to a wall, saving floor and counter space.
VESA mount: Attaches the Square Kiosk to any VESA-compatible arm, bracket, or pedestal.
Square Kiosk is equipped with an accessibility software feature designed to ensure that the user interface can be used even if someone can not reach the full height of the screen. Proper performance of this feature requires the top edge of the device to be mounted at 58 inches (147.5cm) or lower. Learn how to use accessibility features on Square Kiosk.
If you’re looking for information about the iPad-based self-service kiosk, this has been renamed to Square Stand with the Square Kiosk Lite app. Learn how to set up Square Kiosk Lite.
Before you begin
Take note of the following details for each mount option:
- Confirm your countertop surface is flat, stable, no more than 38 inches in height, and can support the weight of the Square Kiosk device.
- Wall mounting requires drilling into your wall. If you are unsure about your wall’s load-bearing capacity or the location of electrical wiring and plumbing, consult a professional installer.
- Confirm your wall can support the weight of the Square Kiosk device, such as drywall with studs, concrete, or solid wood.
- A stud finder is recommended for drywall installations.
- A drill with appropriate bits for your wall material is required.
- Verify your existing VESA mount’s weight rating before installation. Square Kiosk with its 21.5 inch display is heavier than iPad-based kiosk hardware. Using an under-rated mount may result in device damage or injury.
- Square Kiosk VESA specifications are 100 mm × 100 mm.
- Ensure your VESA mount is rated for the Square Kiosk’s weight. This allows you to attach the kiosk to third-party arms, brackets, or pedestals that support the VESA standard.
- Square does not provide the VESA bracket or third-party mount hardware, sellers are responsible for sourcing compatible mounts.
Purchase and use of the new Square Kiosk requires an active Square Plus or Premium subscription. Subscribers on other plans will be able to continue to use their existing Square Stand models with their existing plan. While Square Kiosk is not currently available with legacy pricing plans, such as Restaurants POS Plus or Premium, please reach out to your Account Manager for help with Square Kiosk order and setup.
Set up a Square Kiosk countertop mount
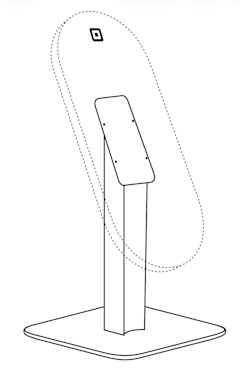
- Place the countertop mount base on your desired surface.
- Position it where customers can comfortably reach the 21.5 inch touchscreen.
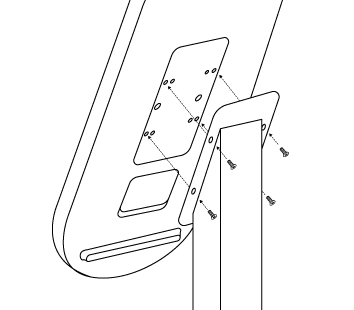
- Place the Square Kiosk on the mounting plate.
- Use the four M4 screws to attach the Square Kiosk to the top post using the 2.5mm size hex wrench.
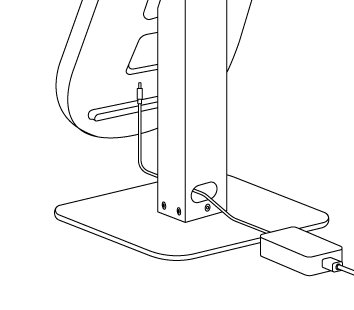
- Route the power cable through the post and plug it into the power port on the back of the Square Kiosk.
- Plug the power adapter into an available power outlet.
- Ensure Square Kiosks have at least 24 inches between them (edge-to-edge) to avoid audio interference.
- More spacing between Square Kiosk devices can be used to accommodate small groups approaching a single Square Kiosk.
You can securely mount the base to the countertop with the included screws. The included screws can be used in countertops up to 1.75 inches deep. If the countertop depth is thicker, a longer M6 countersunk screw (not included) should be used.
- Mark the screw hole positions on your countertop using the base as a template.
- Drill 0.25 inch diameter holes into the countertop.
- Insert the four included long M6 screws through the stand base and through the countertop holes.
- From below the countertop, secure with the included washers and nuts. Tighten until firm.
- For countertops thicker than 1.75 inches, longer M6-style flat-head screws can be substituted. These aren’t provided from Square and need to be obtained separately.
Set up a Square Kiosk floor stand
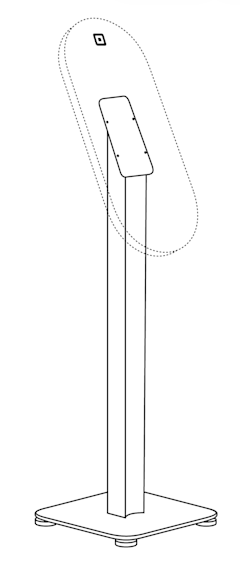
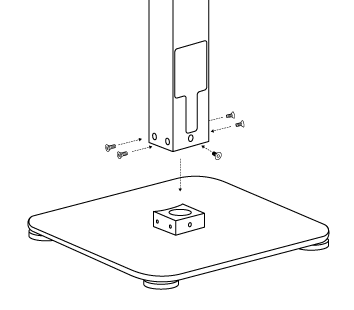
- Place the base plate on the floor at your chosen location.
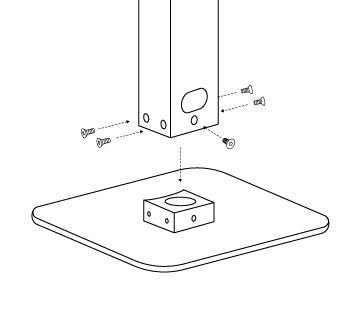
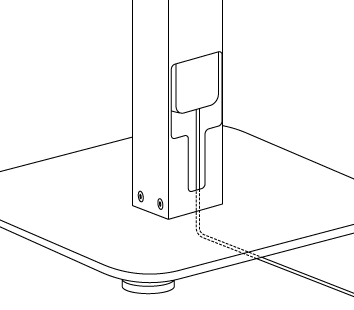
- Attach the main post section to the base plate using the five included M6 screws. The large opening in the back for the power adapter is at the bottom of the post.
- Tighten securely with the included M4 hex wrench.
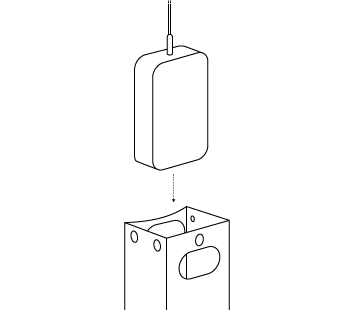
- Insert the power adapter into the opening at the top of the post with the captive cable pointing up. Hold on to the power cable as you lower the power adapter into the post.
- Route the cable with barrel jack connector through the opening on the front of the main post.
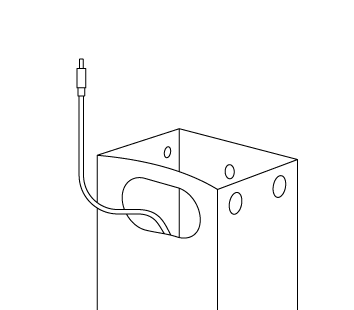
- Plug in the cable that connects to the outlet into the power adapter.
- Route the cable out of the bottom of the stand or out the back of the stand.
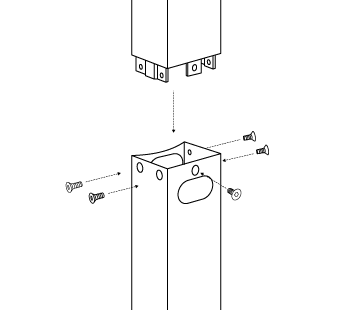
- Connect the top post with the mounting plate to the main post.
- Secure the top post with five M6 screws.
- Place the Square Kiosk on the mounting plate.
- Use the four M4 screws to attach the Square Kiosk to the top post mounting plate using the corresponding sized 2.5mm hex wrench.
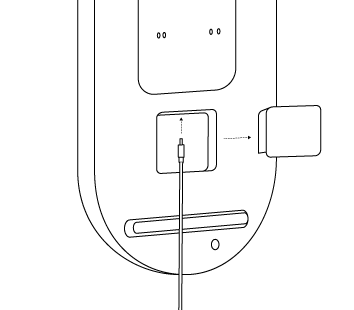
- Plug the power cable into the power port on the back of the Square Kiosk.
- Plug the power adapter into a power outlet.
Set up a Square Kiosk wall mount
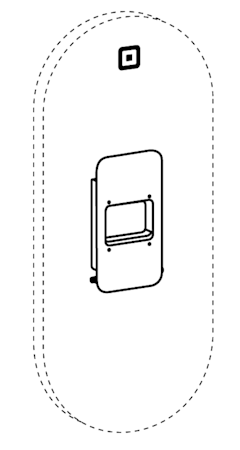
Square Kiosk includes a software feature for those with accessibility needs who may not be able to reach the full height of the display. To use this feature as intended, it’s recommended that the top edge of the Square Kiosk is mounted on the wall at 58 inches, the same height as the floor stand.
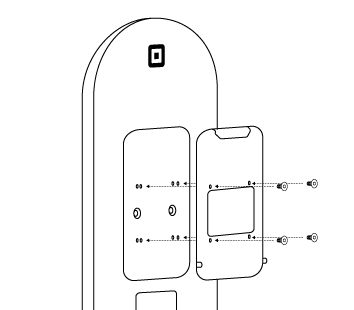
Attach the mounting plate to the back of the Square Kiosk using the included four M4 screws with the 2.5mm hex wrench.
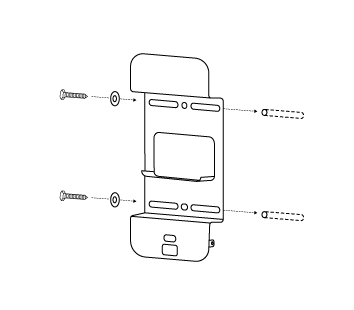
- Locate wall studs using a stud finder. Drill a ¼ inch pilot hole 47 inches from the floor for the top hole (or slot) in the bracket to match the height of the floor stand.
- To enable customers to use the accessibility software feature on Square Kiosk, it’s recommended to mount the top hole height at 47 inches.
- Fasten and level the wall bracket using the included M8 wall screw and washer with a 13mm wrench or socket wrench. Note that the level should be at the bottom of the bracket.
- Drill a second ¼ inch pilot hole for the bottom hole or slot in the bracket.
- Insert the second screw and washer to secure the bracket.
For mounting on solid wall material, such as brick or concrete:
- Drill a ⅜ inch size pilot hole with a masonry drill bit 47 inches from the floor for the top hole or slot in the bracket to match the height of the floor stand.
- To enable customers to use the accessibility software feature on Square Kiosk, it’s recommended to mount the top hole height at 47 inches.
- Insert the included plastic wall anchors, gently tap them flush to the wall with a hammer.
- Fasten and level the wall bracket using the included M8 wall screw and washer with a 13mm wrench or socket wrench. Note that the level should be at the bottom of the bracket.
- Drill a second ⅜ inch size pilot hole for the bottom hole or slot in the bracket.
- Insert the included plastic wall anchor, gently tap them flush to the wall with a hammer.
- Insert and tighten the second screw and washer to secure the bracket.
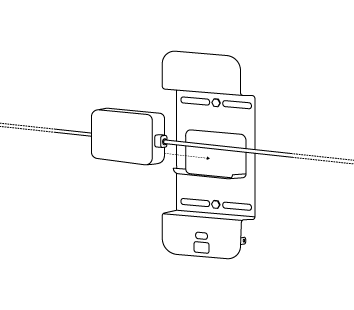
- Connect the cable that connects the outlet to the power adapter.
- Insert the power adapter into the integrated holder in the wall bracket.
- Wrap the excess cable around the mount.
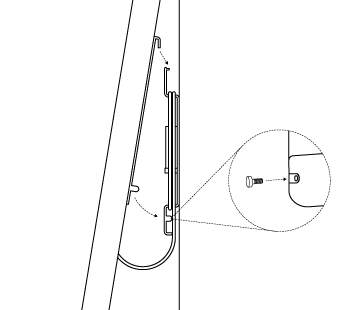
- Align and place the Square Kiosk with the attached mounting plate to the wall bracket.
- Plug the barrel jack connector from the power adapter to the back of the Square Kiosk. Square Kiosk can be tilted on the bracket to improve access to the power port.
- Secure the Square Kiosk to the mounting plate with the two included M6 screws using a 5mm hex wrench.
Set up a VESA mount
VESA mounts are third-party hardware mounts that aren’t developed by Square. Follow the set up instructions that come with the VESA mount to install and attach the hardware to your Square Kiosk.
VESA mounts should only be used that meet the size and weight requirements of Square Kiosk.