Set up Square Kiosk
About Square Kiosk
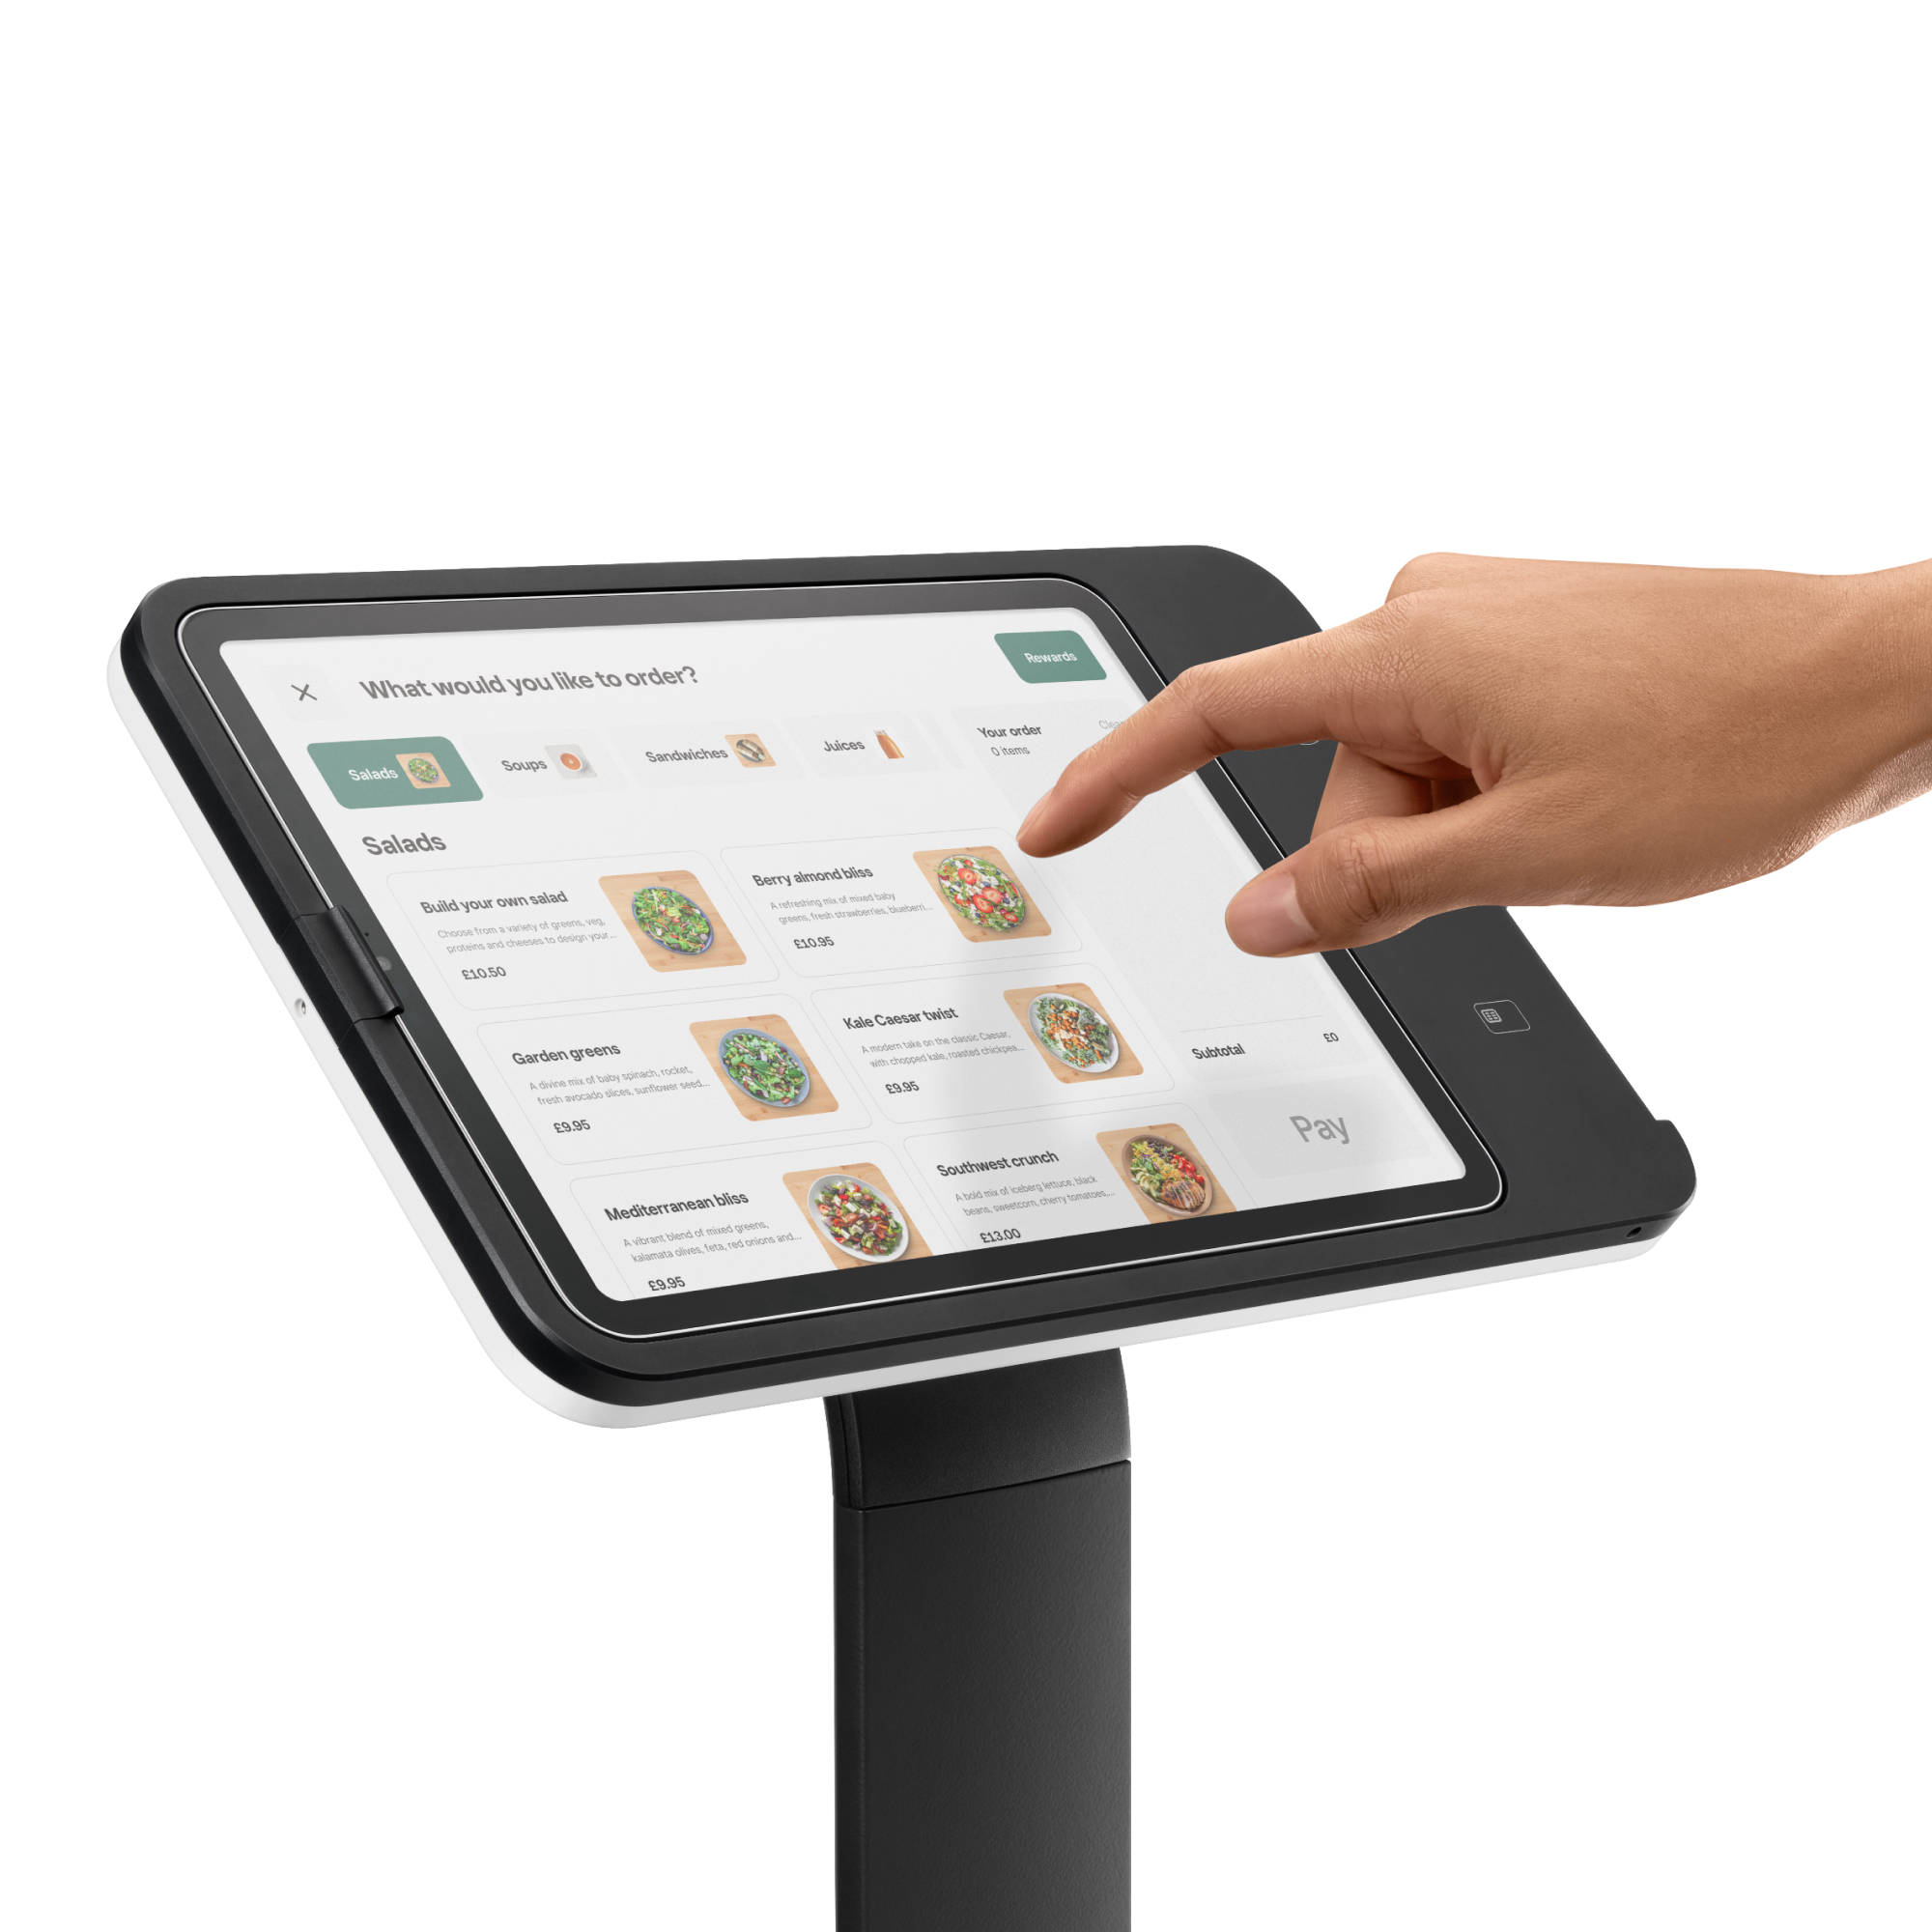
Square Kiosk hardware is a versatile iPad-driven unit that can be easily attached to a wall, secured to a countertop or fixed to a VESA-compatible floor stand anywhere in your venue. With built-in card readers, you can process card payments either by tapping or inserting a card, as well as accepting mobile contactless payments such as Apple Pay and Google Pay.
When Square Kiosk hardware is paired with the Square Kiosk app, it creates a self-service station that empowers customers to place orders and complete the checkout flow independently.
As a different use case, Square Kiosk hardware can also function as a space-saving point of sale device that can run any Square point of sale app, not just the Square Kiosk app. This option is ideal for businesses that operate out of small or narrow spaces and need to mount their point of sale device to a wall.
Before you begin
You can set up your Square Kiosk by installing your Square Kiosk hardware, creating a device code from your Square Dashboard and signing in to the Square Kiosk app. Learn more about Square Kiosk as an overall solution.
Before you can use Square Kiosk as a self-service order station to accept orders, print order tickets and accept cash sales, you need a compatible iPad with the Square Kiosk app installed. You also need at least one active point-of-sale device (phone, iPad or Square hardware) using the Square Point of Sale app.
To check if your iPad is compatible with Square Kiosk, go to our device compatibility page.
Step 1: Install Square Kiosk hardware
Square Kiosk hardware has four different installation options to suit your business:
Angled-wall mount
Flat-wall mount
Countertop mount
VESA mount
Learn more about Square Kiosk technical specifications, like what’s in the box, dimensions, connectivity and more.
For increased security and further customisation, you can purchase a 14 cm USB-C extension cable for Square Kiosk. This cable plugs directly into Square Kiosk so you can unplug and store your device without removing the mounting bracket.
 The angled wall mount positions the screen at an upward angle towards staff and customers. Download the visual guide here.
- Pick a spot on your wall: hold up Square Kiosk against the wall to find your preferred height. Avoid placing over studs.
- Position the angled bracket: level the bracket on the wall, then mark the position of the screw holes with a pencil.
- Drill the holes where you just marked: for drywall installation, use the included drywall drill bit.
- Screw the angled bracket into the wall: insert the wall anchors into the drill holes. Position the angled bracket, then insert the wall screws into the front and screw in, making sure the bracket is level as you fully tighten.
- Plug the hub into Square Kiosk: starting from the bottom of the bracket, thread the hub’s USB-C cable through the pass-through hole and into the connector on the back of Square Kiosk.
- Place Square Kiosk into the bracket: tighten the centre mounting screw until you cannot see any of the red sidewall on the screw. Make sure it is secure and does not wiggle.
- Plug in Square Kiosk: plug the power adapter’s USB-C cable into the hub, then plug one end of the power adapter cable into the power adapter and the other into a socket.
- Slide your iPad in and secure it: dock your iPad to the connector and make sure the security latch clicks. Optional: to further secure your iPad, use a small Phillips screwdriver to attach the security screw to the side of Square Kiosk.

The flat wall mount has a slim, space-saving profile that sits flat against the wall. Download the visual guide here.
- Pick a spot on your wall: hold up Square Kiosk against the wall to find your preferred height. Avoid placing over studs.
- Position the flat bracket: level the bracket on the wall, then mark the position of the screw holes with a pencil.
- Drill the holes where you just marked: for drywall installation, use the included drywall drill bit.
- Screw the flat bracket into the wall: insert the wall anchors into the drill holes. Position the flat bracket, then insert the wall screws into the front and screw in, making sure the bracket is level as you fully tighten.
- Plug the hub into Square Kiosk: press the hub’s USB-C cable into the cable channel on the back of Square Kiosk. Check that there is no interference between the cable and the mount screw.
- Place Square Kiosk into the bracket: tighten the centre mounting screw until you cannot see any of the red sidewall on the screw. Make sure it is secure and does not wiggle.
- Plug in Square Kiosk: plug the power adapter’s USB-C cable into the hub, then plug one end of the power adapter cable into the power adapter and the other into a socket.
- Slide your iPad in and secure it: dock your iPad to the connector and make sure the security latch clicks. Optional: to further secure your iPad, use a small Phillips screwdriver to attach the security screw to the side of Square Kiosk.

The countertop mount creates a low-profile countertop setup that angles the screen upwards. Download the visual guide here.
- Pick a spot on your counter: with the angled bracket facing you, pass the power adapter cable through the hole.
- Plug the hub into Square Kiosk: make sure the hub’s USB-C cable is firmly pushed in.
- Place Square Kiosk into the bracket: tighten the centre mounting screw until you cannot see any of the red sidewall on the screw. Make sure it is secure and does not wiggle.
- Plug in Square Kiosk: plug the power adapter’s USB-C cable into the hub, then plug one end of the power adapter cable into the power adapter and the other into a socket.
- Slide your iPad in: dock your iPad to the connector and make sure the security latch clicks.
- Optional: Secure your iPad: using a small Phillips screwdriver, attach the security screw to the side of Square Kiosk to further secure your iPad.

The VESA mount uses any 100 mm x 100 mm VESA mount to attach a standalone pedestal, swing arm or other setup option. Download the visual guide here.
- Plug the hub into Square Kiosk: decide which side you want the hub’s USB-C cable to exit, then slot it into the cable channel, or if VESA mount allows, run the cable through the VESA mount.
- Screw Square Kiosk onto the VESA plate: align the 100 mm x 100 mm VESA plate screw holes with the threads on the back of Square Kiosk and screw on.
- Plug in Square Kiosk: plug the power adapter’s USB-C cable into the hub, then plug one end of the power adapter cable into the power adapter and the other into a socket.
- Slide your iPad in and secure it: dock your iPad to the connector and make sure the security latch clicks.
- Optional: secure your iPad Using a small Phillips screwdriver, attach the security screw to the side of Square Kiosk to further secure your iPad.
Step 2: Set up Square Kiosk app
To sign in to the Square Kiosk app for the first time, you need to first go through initial setup and create a device code from your Square Dashboard on a computer or iPad.
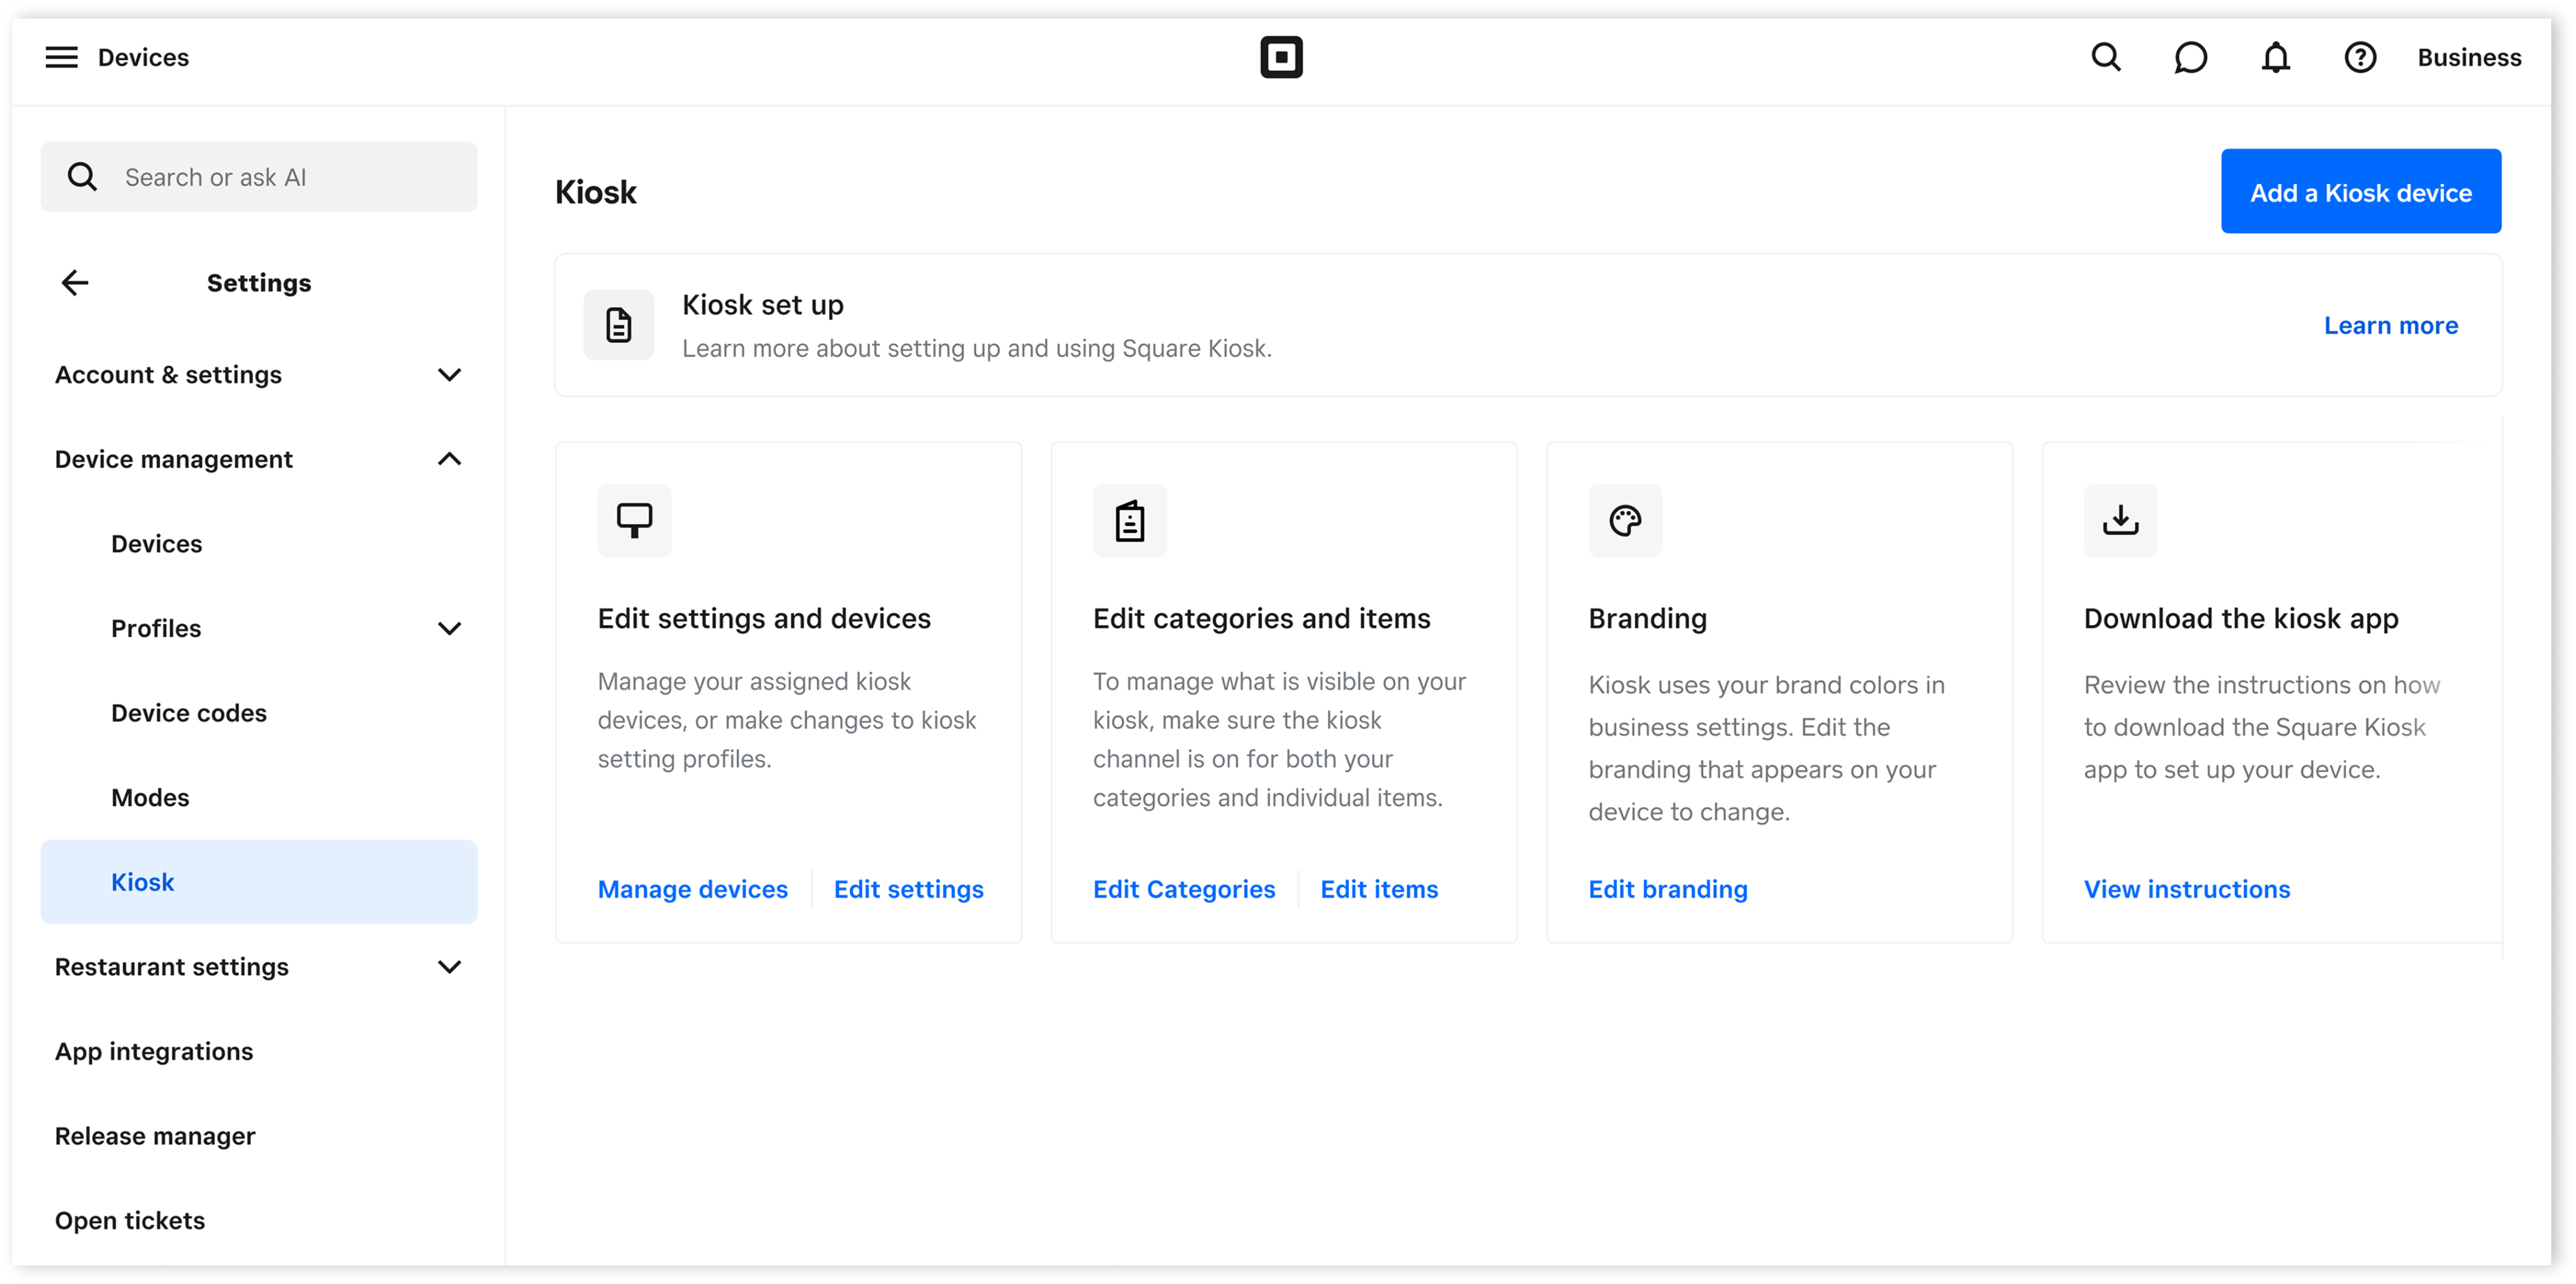
Sign in to Square Dashboard and go to Settings > Device management > Kiosk.
Select Get kiosk.
If applicable, confirm the new device costs associated with your plan.
Select the location where you’ll use the kiosk.
Enter a name for the kiosk and click Next.
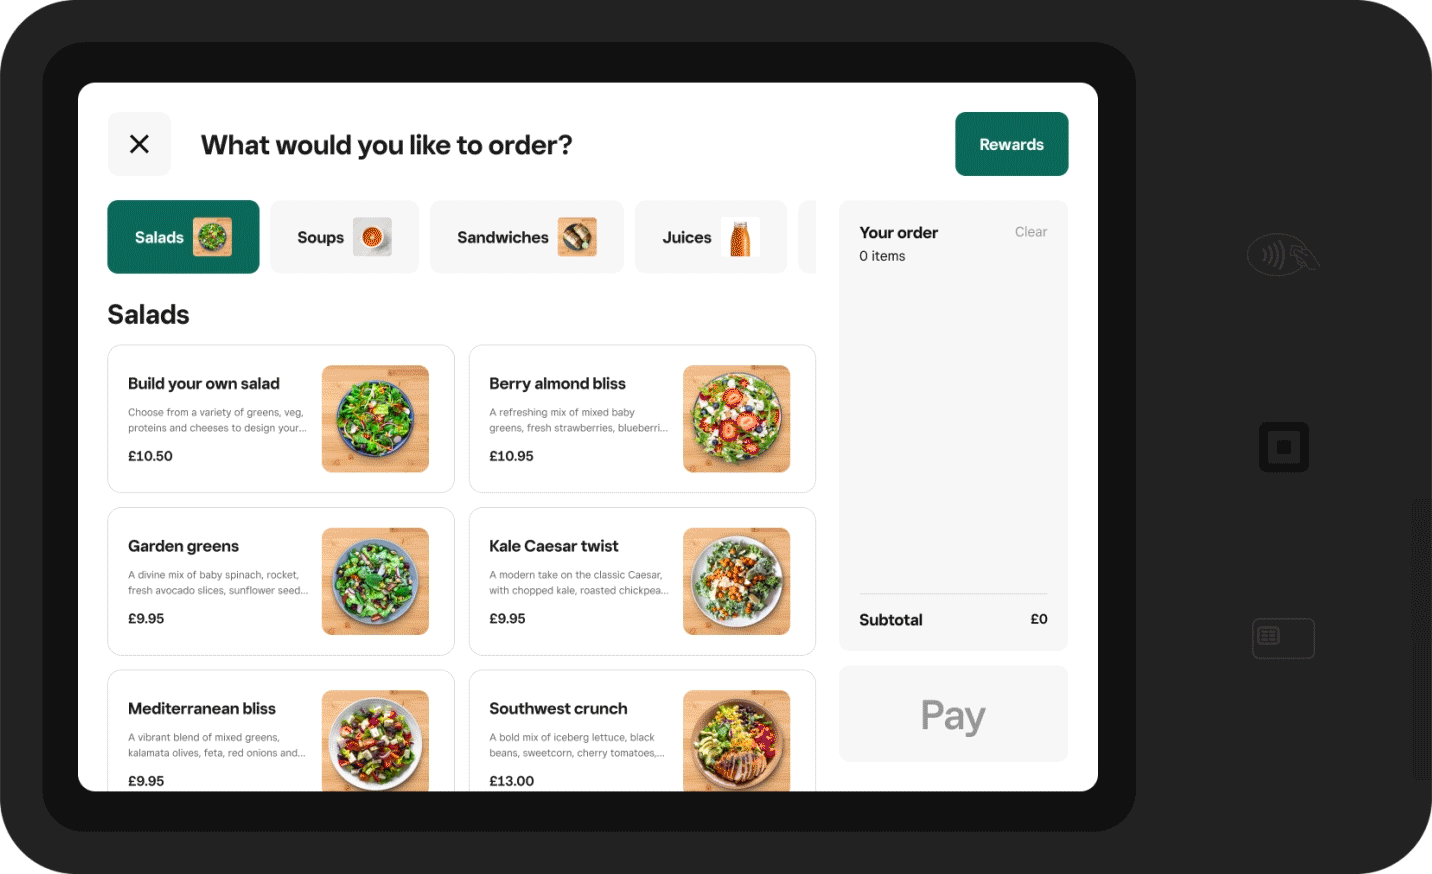
Select what item categories you want to show on your Kiosk menu. You can edit these later. Learn how to edit Square Kiosk menu items and categories.
-
Associate images with each category that will display on your kiosk by using existing images from your image library or uploading new images:
Click the grey image icon next to the category > select images or click Upload new images > Done. If you don’t have category images, the kiosk will automatically use an available image from one of the category’s items.
Click Next.
Click I have hardware if you’ve already purchased your Square Kiosk. If you haven’t, click Shop hardware to buy now or Skip to do this later.
Download the Square Kiosk app to your iPad and make a note of your 12-digit device code. You can also click Copy to copy or Send device code to send by email or text message.
Click Done.
You’re now on the Kiosk Settings page where you can manage all aspects of your kiosk experience:
Manage Kiosk devices and settings
Edit Categories and Items
Edit branding
Create new Kiosk devices
Step 3: Sign in to the Square Kiosk app
Make sure a compatible iPad is plugged into the Square Kiosk hardware. If the iPad is disconnected from the Square Kiosk hardware, you will not be able to use the Square Kiosk app.
Open the Square Kiosk app on your compatible iPad and tap Sign in.
Enter the device code you generated on Square Dashboard to sign in to the Square Kiosk app.
If the new device code is not used within 48 hours, the device code will expire and you’ll need to reset it to sign in to your Square Kiosk app.
After you set up your first kiosk, you can set up device codes for additional kiosk devices. Learn how to set up device codes.
Step 4: Print kitchen tickets for Square Kiosk orders (optional)
Square Kiosk, when used as a self-service ordering station with the Square Kiosk app, cannot directly connect to accessories like barcode scanners and receipt printers via USB, Wi-Fi/Ethernet or Bluetooth.
You can print kiosk order tickets from your companion point-of-sale devices if they are connected to your kitchen printers. Learn how to Set up printer profiles and connect a printer to your point of sale.
To send your kiosk orders to your kitchen printer through your companion Point of Sale device from the Square POS apps:
On your point of sale app on your companion point-of-sale device.
Tap ≡ More > Settings > Hardware > Printers.
Tap Profiles and select a printer profile.
Tap Edit next to Profile details and toggle ON Online & Kiosk order tickets.
Tap Save.
If you are printing by category, make sure that the categories enabled for Square Kiosk are selected in the printer profile as well.
These kitchen tickets will print through the printer setup via your point-of-sale device, along with any other kitchen ticket created from a point of sale order.
Learn how to print order tickets from your point of sale.
Step 5: Lock the Square Kiosk app (recommended)
You can set up Guided Access to prevent customers from tampering with your kiosk or closing the Square Kiosk app. Guided Access limits your iPad to only allowing use of the Square Kiosk app.
Open your iPad’s Settings app and go to Accessibility > Guided Access.
Toggle Guided Access ON.
Set a Guided Access passcode.
Open the Square Kiosk app on your iPad.
Triple-click the side button or the Home button.
Tap Guided Access > Start.
Learn more about Guided Access in Apple’s Guided Access support article.
Sign out of the Square Kiosk app
Tap the three lines (≡) in the top-right corner of the Get Started screen to open settings.
Enter your passcode for access to Device settings.
Tap Sign Out.
Use Square Kiosk hardware as a point of sale
Since Square Kiosk is powered by an iPad, you can also access the Square POS app through your Square Kiosk hardware. Using Square Kiosk hardware as a point of sale functions the same as Square Stand (2nd generation), but without the built in swivel.
Learn how to set up Square Stand (2nd generation) and accept payments with Square Stand.