Manage Square Appointments
Set Staff Locations and Hours
Staff member hours and time zones are initially set by the business’ settings.
To customise the location, hours, and time zone for a particular staff member:
Select your staff member.
Under Location and Hours, toggle on their locations and set hours for each.
Click Save.
Once set, that staff member will have custom hours. Any updates made to your business hours will not affect that staff member’s bookable hours.
If no custom hours are set, updates to the business’ hours or time zone will apply to that staff member’s bookable hours and time zone as well.
The hours set on the staff member’s page are reflected on the account’s bookable calendar as well as the staff member’s calendar.
Manage Staff Schedules
You can set staff availability on a per-week basis, giving you even more control over your staff’s schedule. This helps you schedule multi-day outages like vacations, make one-off changes to hours as needed, and manage shifts across your employees without affecting your business or staff hours.
To do so:
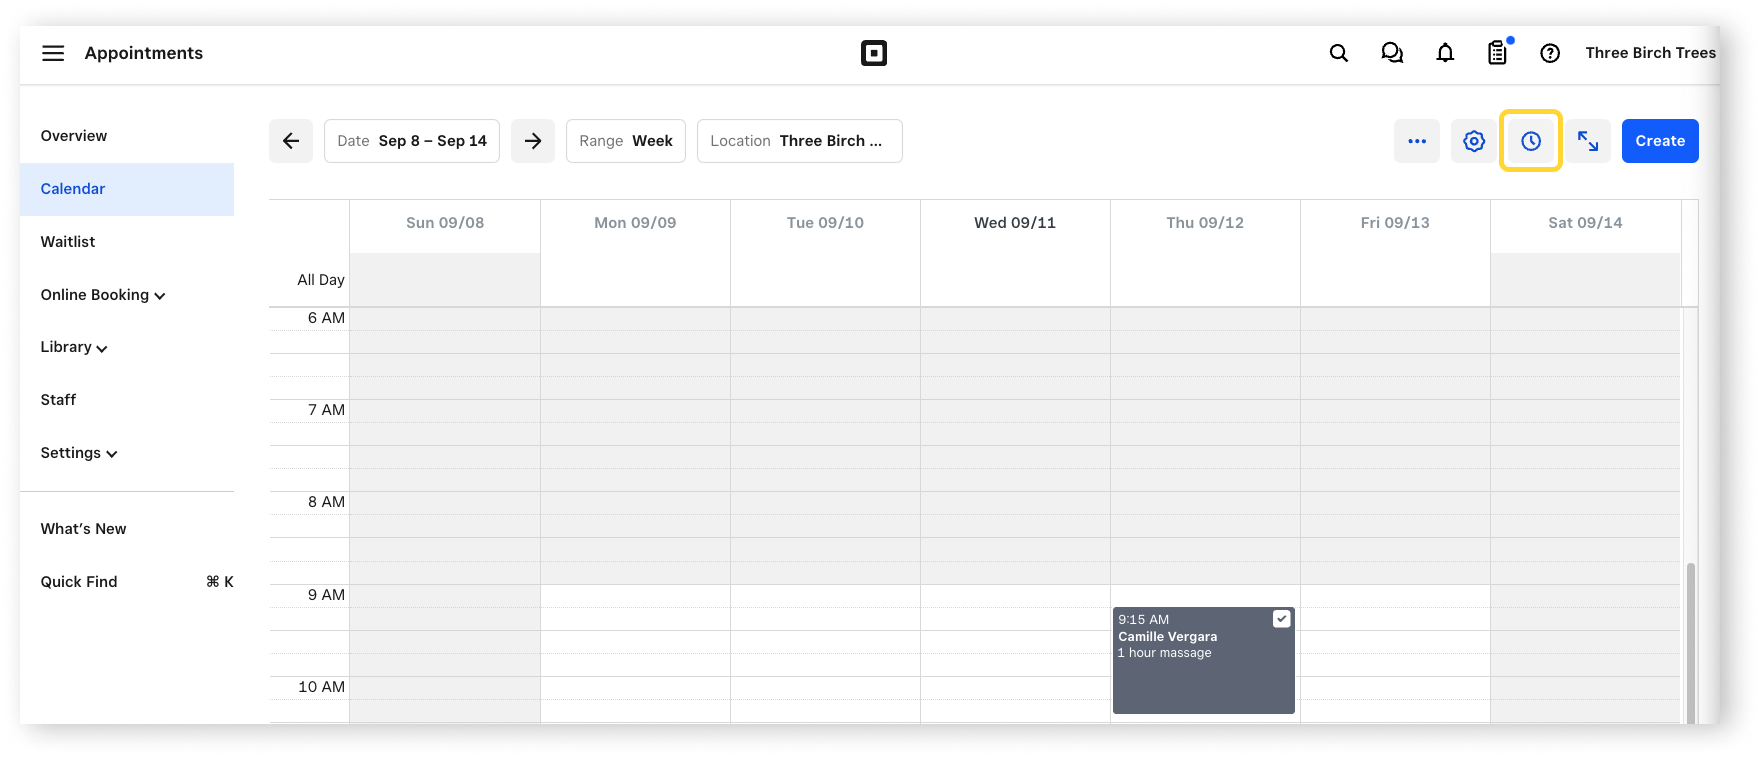
Navigate to the Calendar tab of your Square Appointments dashboard.
Select the Clock icon.
Select which week and employee you’d like to customise hours for.
Set hours > click Done.
If you’re the sole staff member, you’ll see the Customise Availability option next to the Create Appointment button in the Calendar tab.
Your new availability will be reflected on both your browser and iOS calendars, and your updated availability will be reflected in your online booking site for the selected week.
Note: Custom Availability must be set per-location by selecting a location from the drop down in the Calendar tab of the Square Appointments dashboard.
Services Offered
Once you’ve created services, select which services each staff member can offer.
You will also be able to apply unique cancellation fees per employee & unique duration times per service type.
Staff Member Biography
Scroll to Biography near the bottom of the page to include your staff member’s biography, including specialties and services. Be sure to save your changes.
Manage Staff’s appointments
As the Square Appointments account owner, view and edit appointments made by your staff.
From your Calendar, select the drop-down menu at the top left of the screen to choose the Side-by-Side view to see upcoming activity of each staff member simultaneously.
Disable or Remove Staff
You can turn off booking for particular staff members or delete staff from your account.
Disable Booking for Staff
Toggle off Online Booking Visibility to change booking eligibility. Toggling a staff member off will remove that staff member from your public booking site. It will not remove that staff member from any pre-existing appointments. Staff with Full Access can still schedule that staff member for future appointments.
Delete Staff
To delete staff from your account:
From the Staff tab of your Square Appointments Dashboard, click the staff member you’d like to delete.
Click the trashcan icon at the bottom of the screen.
Click Delete Staff.
Note: If you delete a staff member, all of that staff member’s information is removed from your account.
Once you delete a staff member, if you’d like to disable their ability to process payments or access their online calendar, head to their employee profile.
To disable staff from accessing the Square Appointments app:
On your Square Dashboard, click Team.
Click on the name of the staff you would like to deactivate.
Select Deactivate on the top right hand corner.
Note: There isn’t a way to delete an employee profile at this time. To hide inactive staff from your employee list, select Status > Active on the top left to filter your list to reflect active employees only.
Manage Recurring Appointments
Schedule recurring appointments from your Square Appointments Calendar, or from your Appointments app.
From your Square Appointments dashboard:
Click Create Appointment.
Enter client details and appointment information.
Under Appointment Details, set the repeating schedule.
Click Save.
From the Appointments app:
Open the app > create a new appointment.
Tap Recurs > toggle on Appointment recurs.
Under Repeats every, use the date selector to choose the repetition schedule.
If you want this appointment to repeat on a specific day of the month:
-
On iOS, under Interval, select the day you want this appointment to repeat.
On Android, under Repeats on, select the day you want this appointment to repeat.
Select Okay.
Cancel Recurring Appointments
You can cancel recurring appointments from your Square Appointments dashboard, or from the Appointments app.
From your Square Appointments dashboard:
Navigate to the Appointments page of your online Square Dashboard.
Select the appointment you’d like to cancel > Cancel Appointment.
You can choose whether you want to only cancel this appointment, this and future appointments in series, or all appointments in series.
Make your changes, and select Save.
From the Appointments app on iOS:
Open the app and select the appointment you want to cancel.
Click Cancel Appointment.
You can choose whether you want to only cancel this appointment, this and following appointments in series, or cancel the entire series.
Select your option and click Save.
From the Appointments app on Android:
Open the app and select the appointment you want to cancel.
Click Cancel Appointment.
You can choose whether you want to only cancel this appointment or cancel the entire series.
Select your option and click Save.
View Your Calendar Color Coded by Service
You can view your calendar by service instead of by the staff member assigned to each appointment. If there are multiple services for an appointment, the appointment will show multiple colors on your calendar. You can toggle between viewing your calendar by service or by staff member at any time from your calendar settings.
To assign colors to each service:
From the Appointments Dashboard:
Log in to your online Square Dashboard, and go to Items > Service library
Select one of your services.
Click the item tile and select the color you want to assign to this service.
Click Save.
Repeat for your other services.
From the Appointments App:
Go to Items & Services from the menu.
Tap Services.
Select one of your services.
Tap the item tile and select the color you want to assign to the service.
Tap Save.
Repeat for your other services.
Note: If the service has an image added, you must remove the image to access the color picker. After setting the preferred color, you can re-add the image to that service.
To view your calendar by service:
From the Appointments Dashboard:
Log in to your online Square Dashboard and go to Appointments > Calendar.
Click the gear icon to open your calendar settings.
Toggle on View calendar by service.
Click Save.
From the Appointments App:
From the calendar screen, open your Calendar settings.
Scroll to Color code and select By service.
Tap Save.
Note: The option to view your calendar by service is only available in your online Square Dashboard and on Android devices. This option is not available on iOS devices.