Home>Square Stand

Square Stand (2nd Generation) Guide

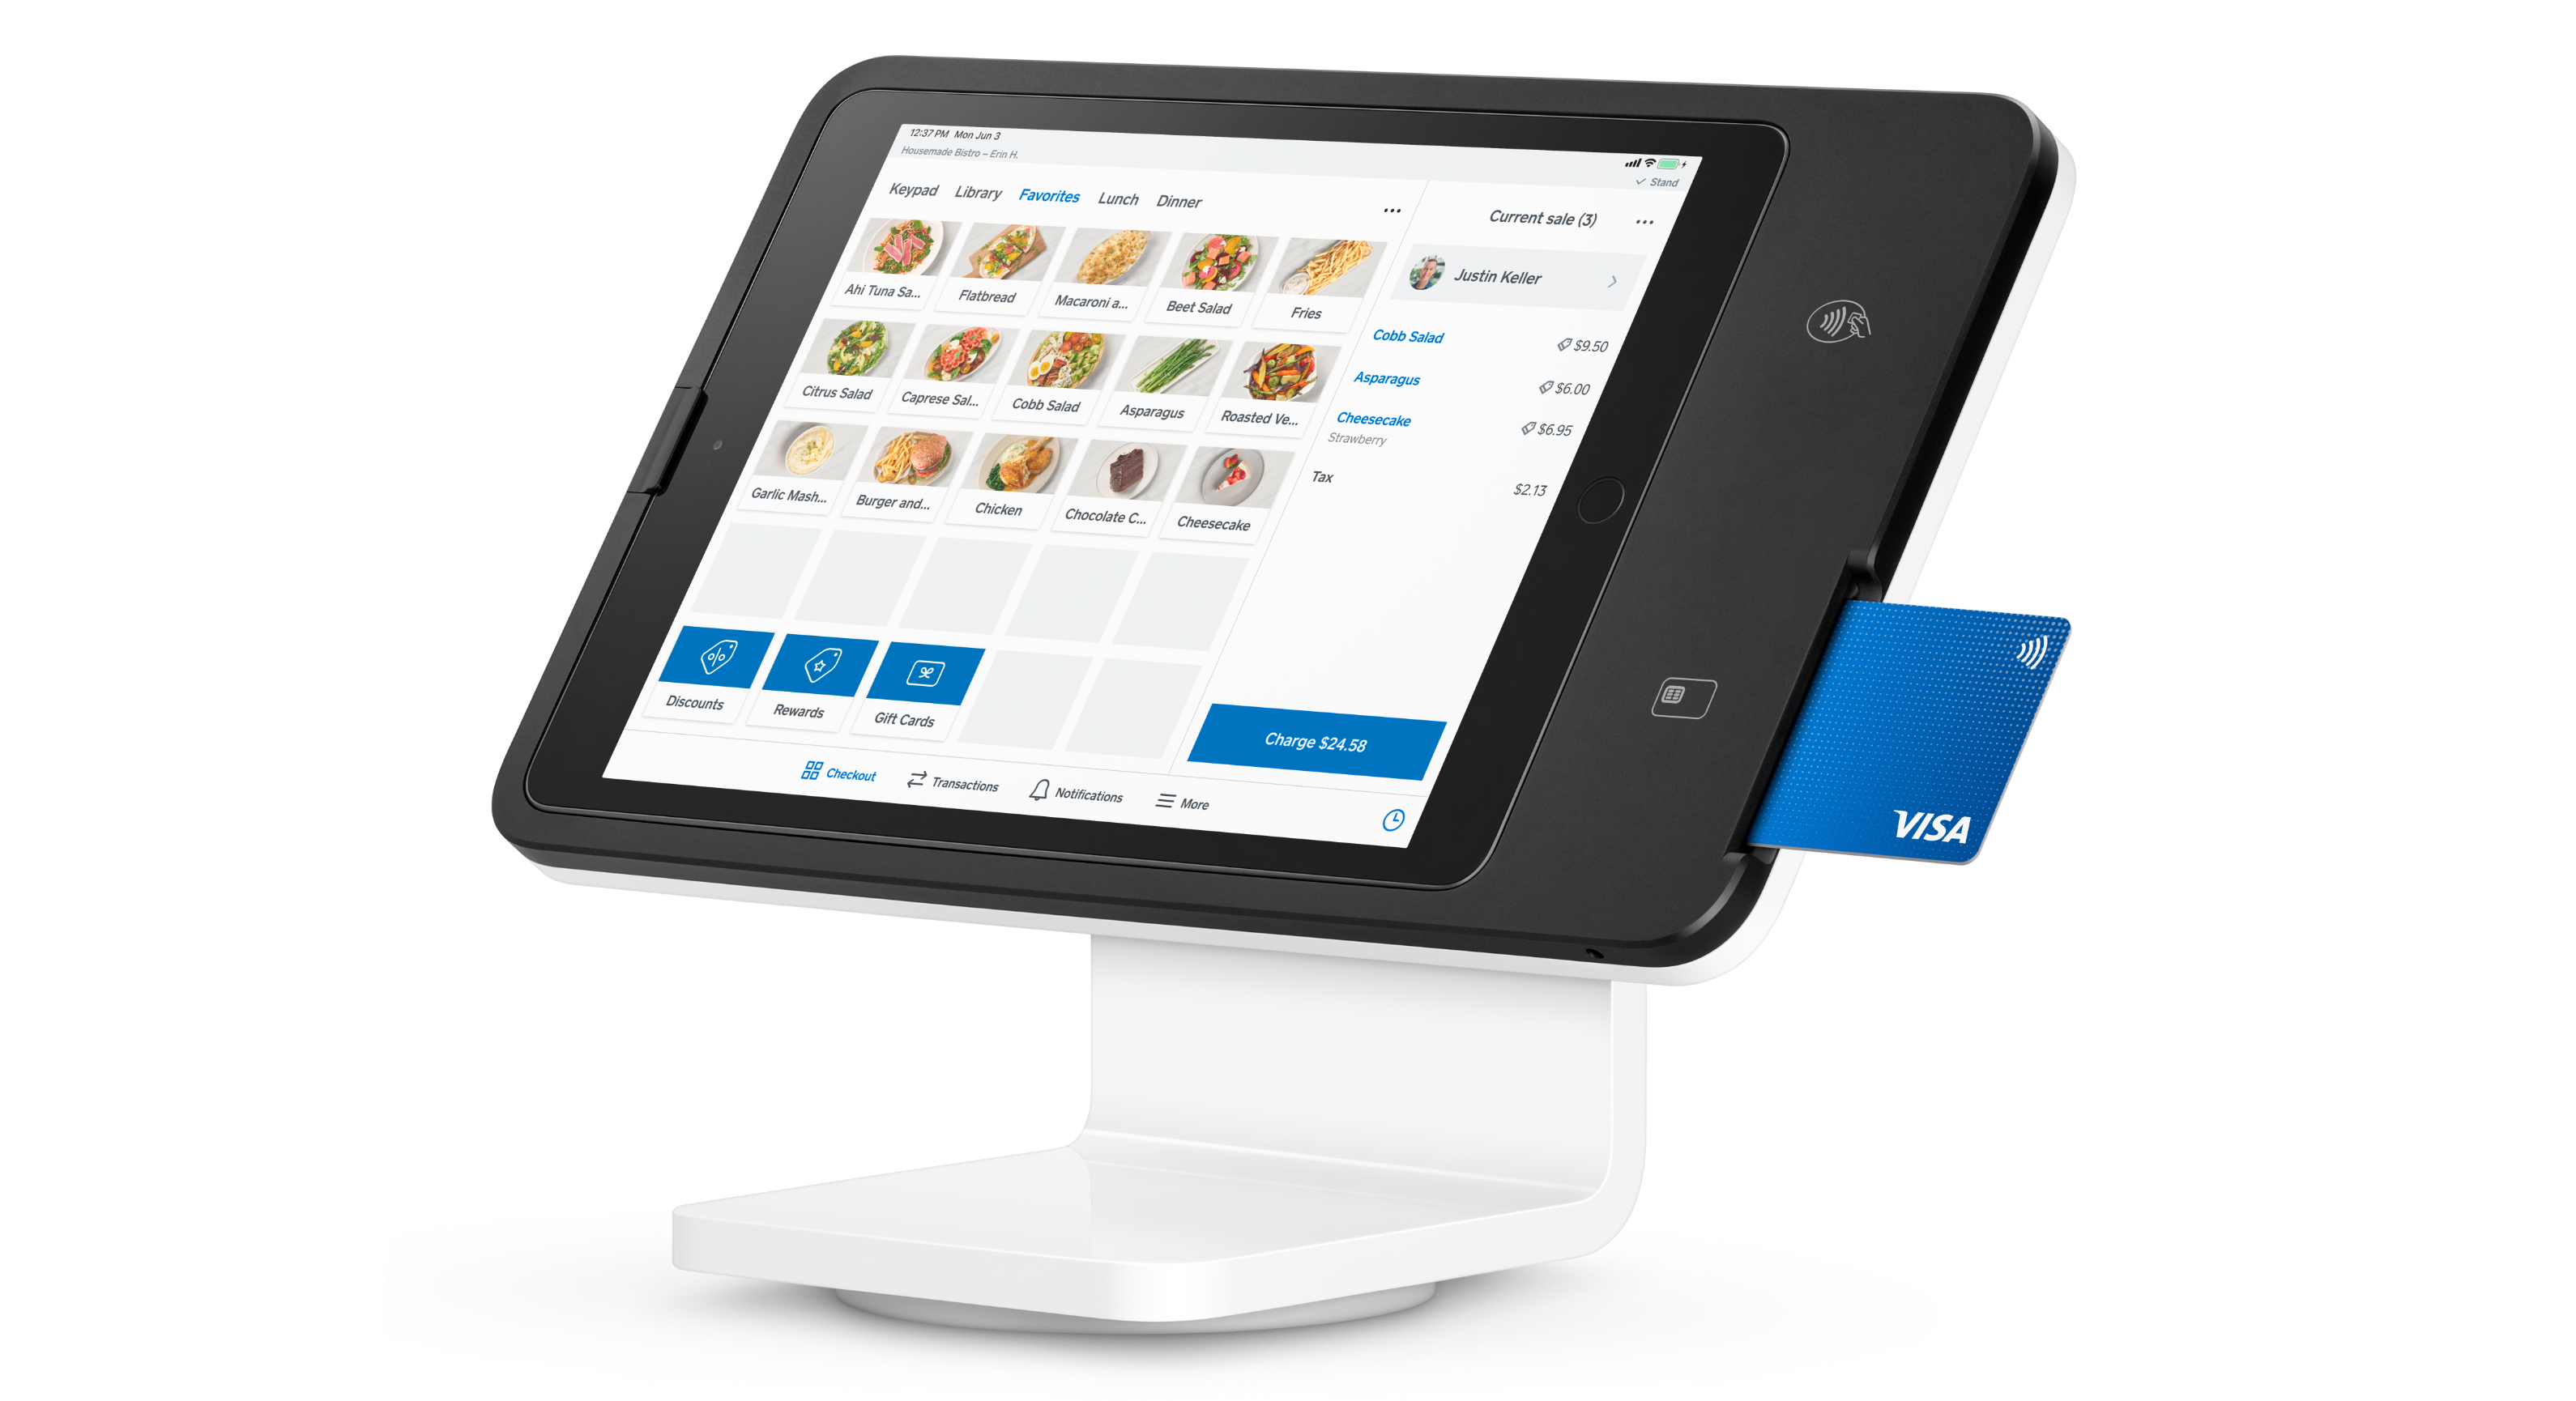
The Square Stand (2nd generation) seamlessly turns your compatible iPad into a powerful point of sale with an intuitive, customer-driven checkout and integrated payments. Whether you’re a full-service restaurant or a retailer, this countertop device will accept every way your customers want to pay, including contactless options like Apple Pay, Google Pay and Samsung Pay.

Square Stand (2nd generation) has two versions: Square Stand (2nd generation, v1) features a Lightning iPad connector and Square Stand (2nd generation, v2) features a USB-C iPad connector. This article will show you how to set up both versions of Square Stand (2nd generation), accept payments, and connect supported hardware and accessories.

Set Up Hardware

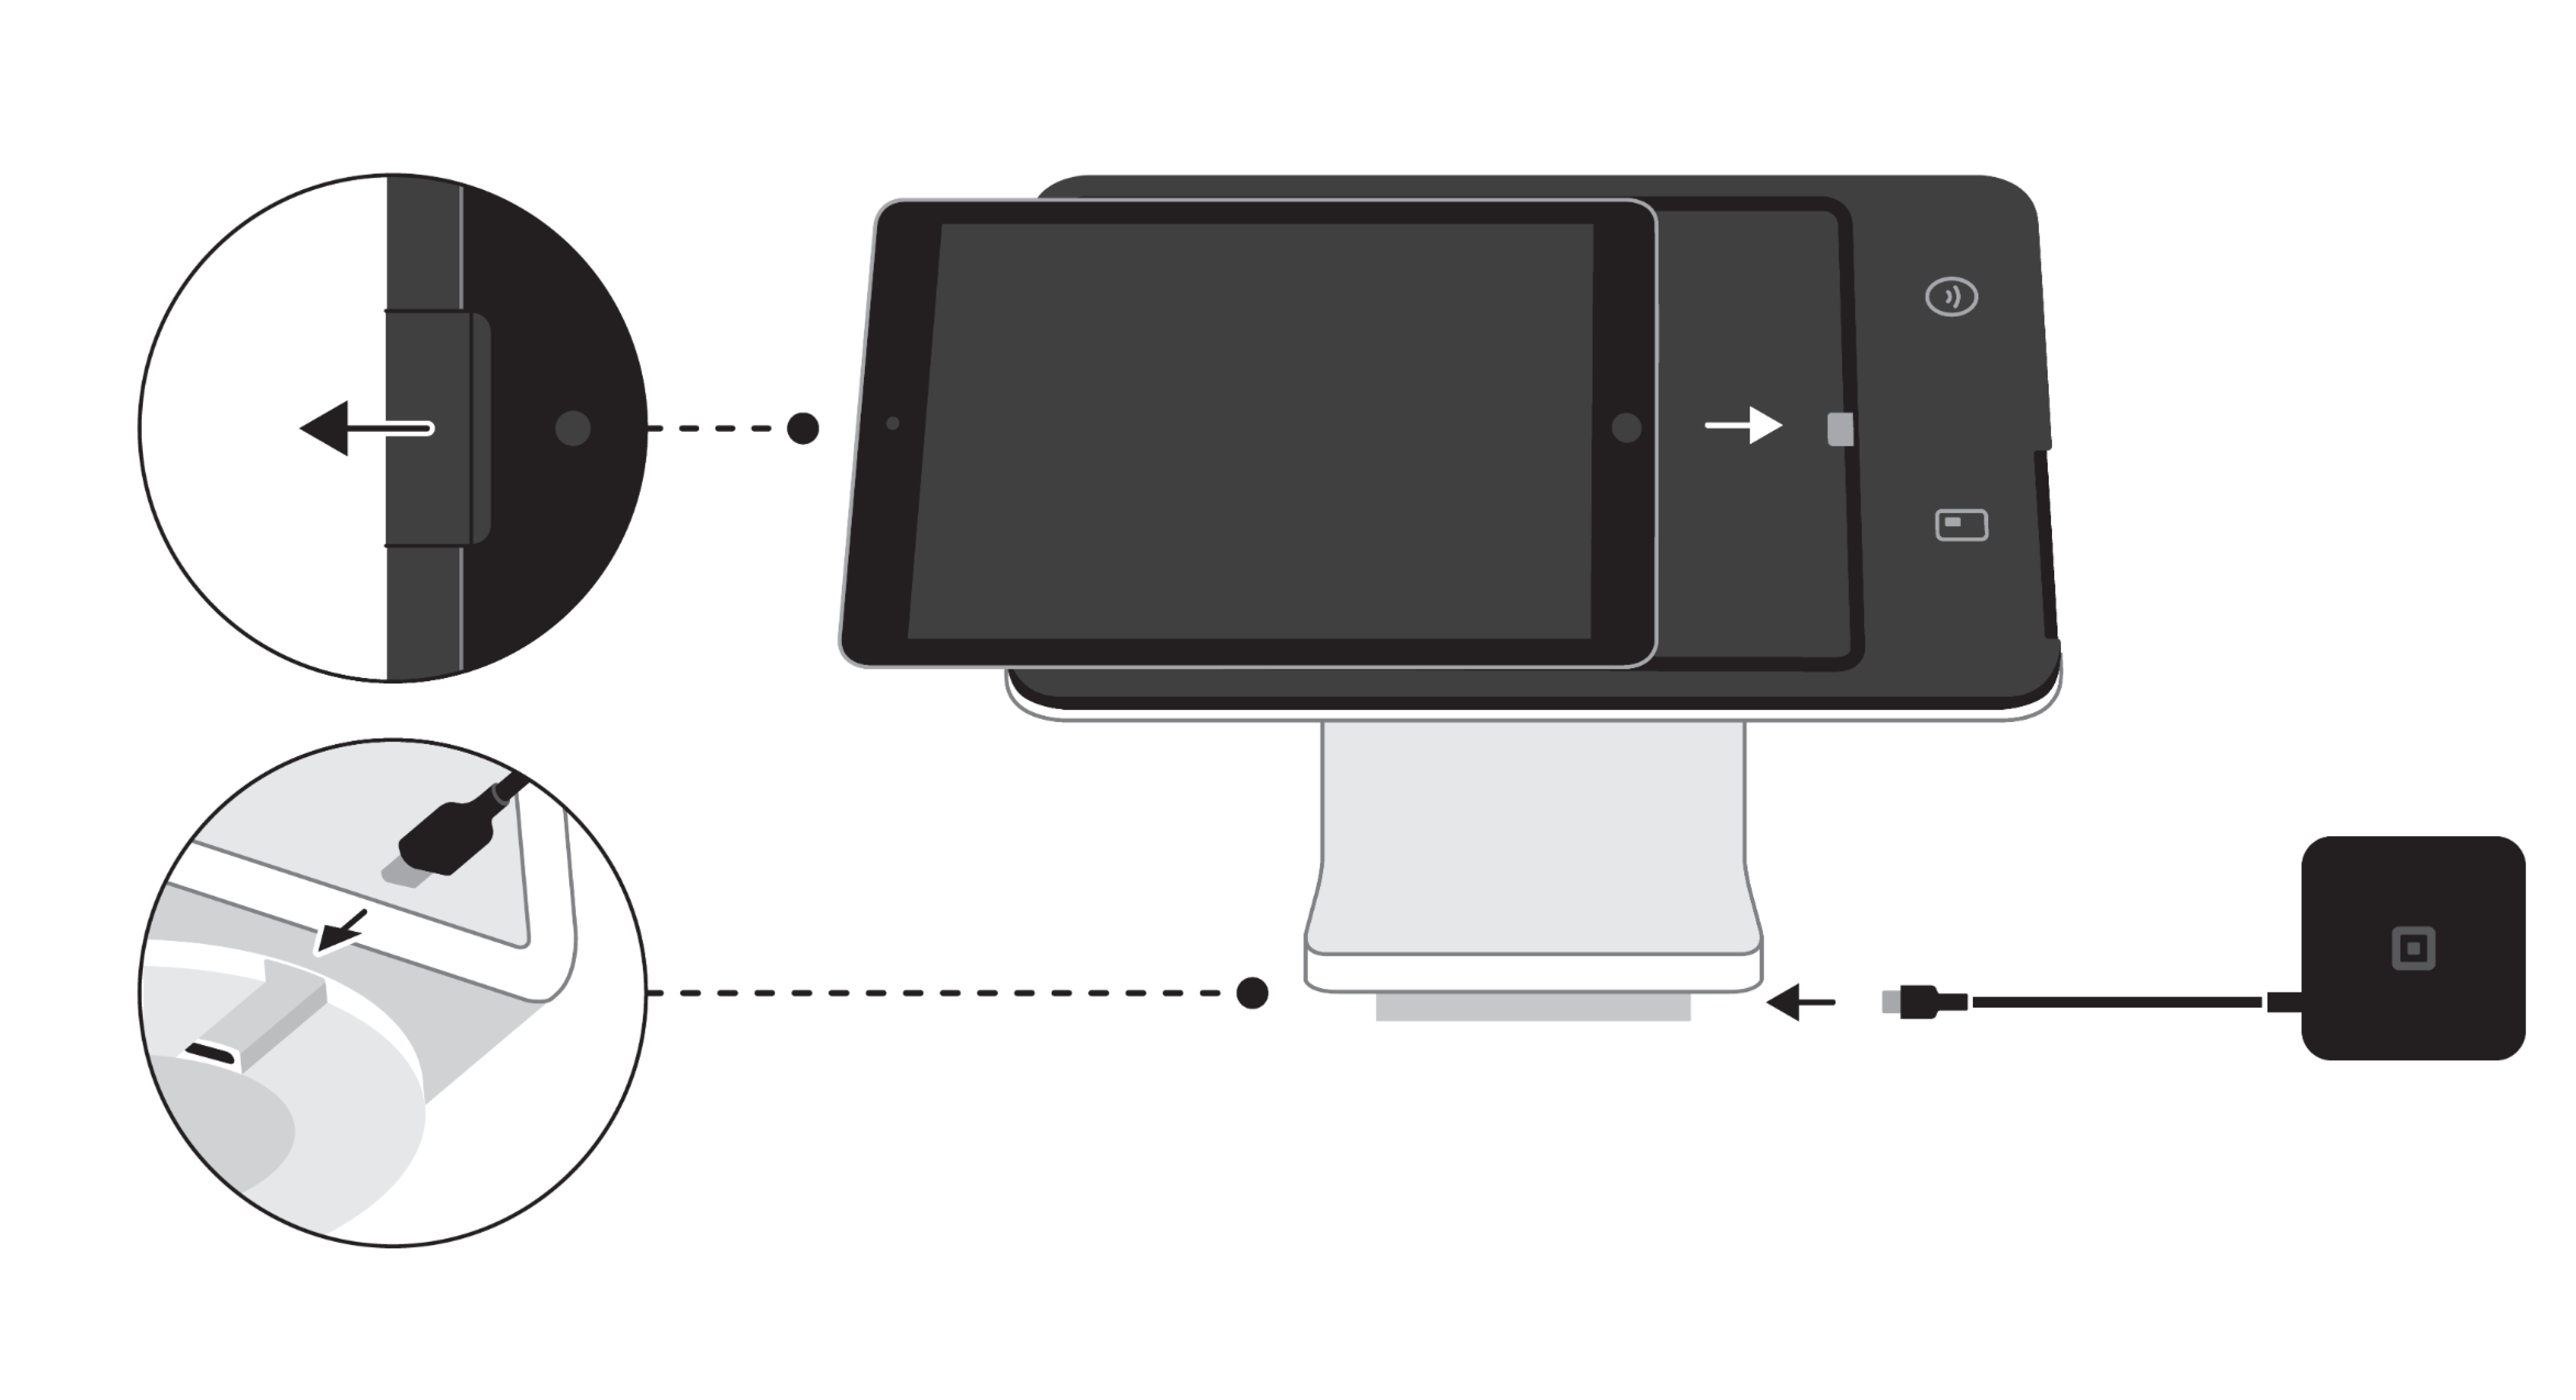
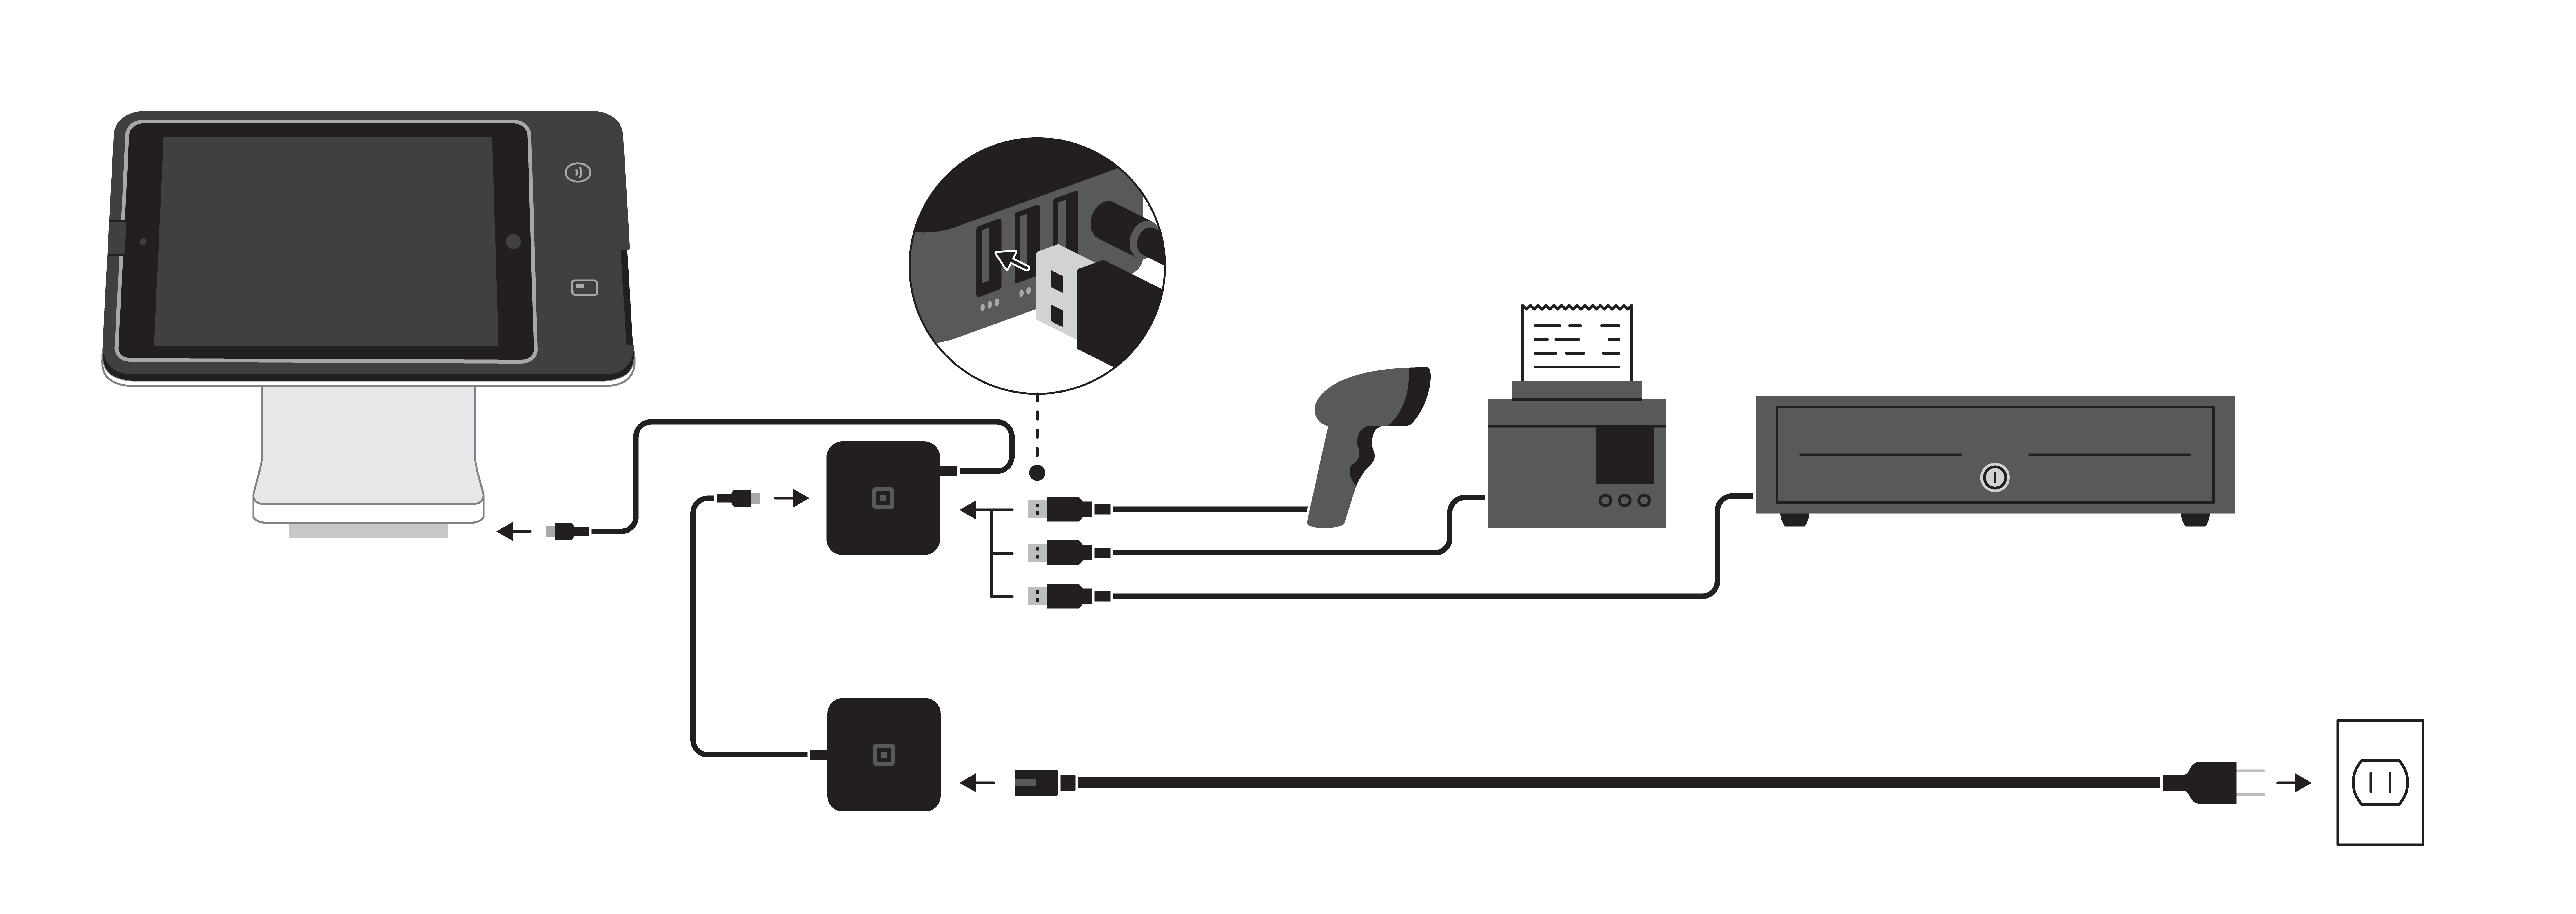
A. Connect the optional hub to the base of Stand using the attached USB-C cable. Using the hub allows you to connect additional USB accessories.

B. Connect the hub into the power adapter by plugging in the USB-C cable attached to the power adapter. If you’re not using the hub, plug the power adapter directly into Stand.

C. Plug the power adapter cable into the power adapter, then plug the power adapter cable into a power socket.

D. Slide your iPad into Stand and connect your iPad to the Lightning connector. You’ll know it’s secure when the security latch clicks. Note: if you are using a compatible iPad Air or an iPad Pro model with Square Stand (2nd generation, v2), insert the included adapter for iPad Air and Pro into the nest of the Stand prior to placing your iPad into the Stand.
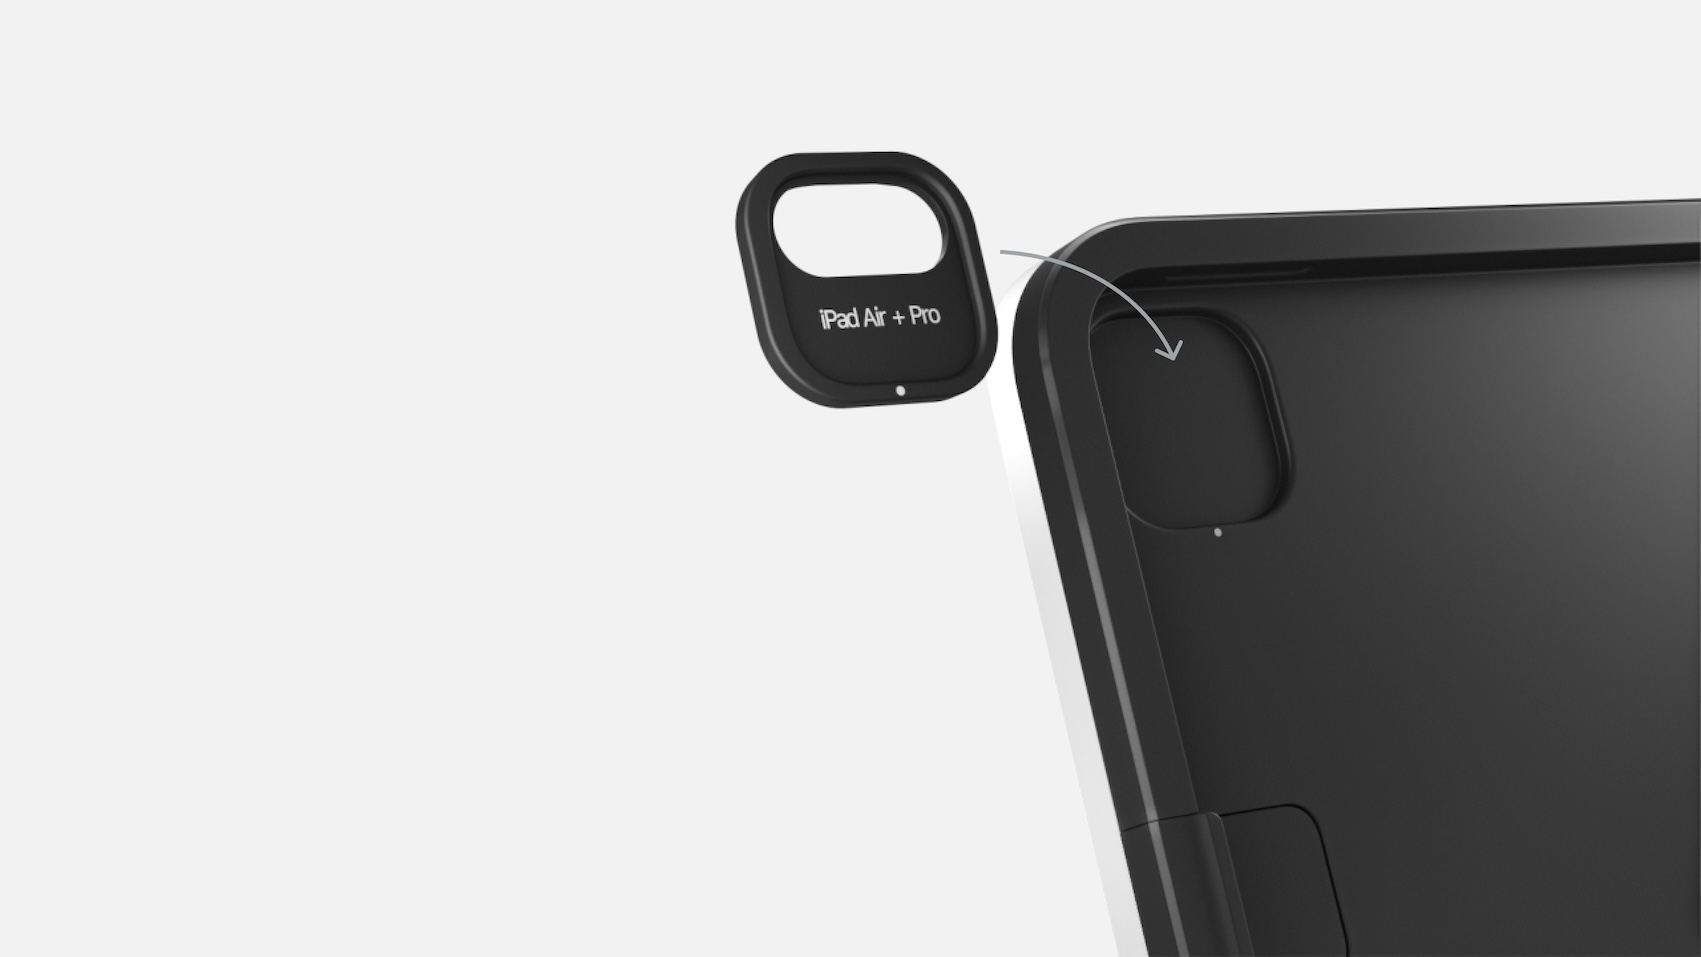
You can also Mount and Secure Your Square Stand to your countertop as an optional setup step.

Insert or Remove Your iPad from Square Stand

Inserting or removing your iPad from the Square Stand should be done with care. Read the following instructions carefully to prevent damage to the iPad or Stand.

To remove your iPad from Square Stand:

  1. locate the raised security latch next to the iPad’s camera on the left. 

  2. Pull the security latch outwards and then down to disconnect the iPad.

  3. Once unlatched, carefully slide the iPad out to the left. Take care not to pull the iPad up from Stand prior to disconnecting as this can damage the iPad connector.

Set Up Software

First, download one of Square’s Point of Sale apps on your iPad. You can get started with the free Square Point of Sale app, or one of our specialised apps including Square for Restaurants, Square for Retail or Square Appointments.

Once you’ve downloaded the Square app best suited for your business, you can create a new account or simply log in with your email address and password to get started. Refer to the instructions below to learn more about common actions like creating items, setting up taxes, creating discounts and more.

Creating Items and Modifiers

To create an item:

  1. From the Square app, tap More > Items > All Items.
  2. Tap Create Item > enter the appropriate information like Name, Price, SKU, etc.
  3. Tap Save.

Note: To change the appearance of how your items show on the Favourites screen, from the Checkout screen, hold down one of the grey squares and tap the + button to create an item or discount or select from the existing list.

Learn more about creating items on Square Stand.

To create modifier sets:

  1. From the Square app, tap More > Items > Modifiers.
  2. Tap Create Modifier Set.
  3. From the New Modifier Set screen, provide a name, select the item(s) you want to assign the modifier set to under Apply Set, and input your modifier names and prices under the Modifiers section.
  4. Tap Save.

Note: If you’re editing or adding multiple items and/or modifiers, we suggest doing so through the online Square Dashboard by visiting Items. Changes made through the Dashboard will appear on your Square Stand immediately.
Learn more about creating modifier sets for Square Stand.

Setting Up Taxes

To create a new tax:

  1. From the Square app, tap More > Settings > Checkout.
  2. Tap Taxes > Add a New Tax to add a new tax.
  3. From the New Tax screen, provide a name and percentage, configure the Item Pricing, and select which item(s) and/or service(s) you’d like the tax applied to during checkout.
  4. Tap Save.

Creating Discounts

To create a new discount:

  1. From the Square app, tap More > Items > Discounts.
  2. Tap Create Discount.
  3. From the Create Discount screen, provide a name and specify the percentage or pound amount you’d like the discount to be worth. You also have the option to apply discounts after taxes.
  4. Tap Save.
    Learn more about creating discounts for Square Stand.

Choosing your Checkout Options

You can customise your customers’ checkout experience by choosing whether to enable the buyer-facing screen with itemised order summary, tipping, signature or receipt selection.

Note: Checkout options for Retail Point of Sale and Restaurants Point of sale can be found in your online Square Dashboard under Devices.

To enable or disable the buyer-facing screen: (Note: this will be enabled by default)

  1. From the Square app, tap More > Settings > Checkout > Payment.
  2. To enable the buyer-facing screen, make sure it is selected under the Defaults section at the top. If you choose to disable it, checkout will instead begin with a seller-facing menu of payment types.
  3. To provide an itemised summary of the customer’s basket on the buyer-facing screen, find the Show order summary option and toggle on to enable.

To enable tipping during checkout:

  1. From the Square app, tap More > Checkout > Tipping
  2. Toggle Collect Tips to on and select between showing your tip options on the signature screen or on a separate screen.
    Learn more about accepting tips with the Square App

To enable receipt selection during checkout:

  1. From the Square app, tap More > Settings > Checkout > Receipt.
  2. Toggle Skip Receipt Screen to choose whether customers see the option to receive a digital receipt after entering their email or phone number. Square Point of Sale will skip this screen by default for the fastest checkout experience possible.

To enable passcode requirements for certain checkout options:

If you are interested in using additional security features on your Square Stand (2nd generation), you can enable free Team Permissions. Team Permissions requires a passcode to take certain actions, such as cancelling a sale or changing the payment method displayed on the customer-facing screen.

This feature can be enabled directly on the Square Point of Sale app and Square Appointments app. Square for Retail will automatically apply the permissions that are set in your Square Point of Sale app. To apply this feature for Square for Retail, download the Square Point of Sale app and follow these steps:

  1. Sign in to your Square Dashboard and enable Team Permissions.
  2. On Square Point of Sale or Square Appointments app: Tap More > Settings > Security > Passcodes.
  3. Toggle on Passcodes.
  4. Under Require passcode, toggle on any that apply: After each sale, To back out of a sale, To back out of customer-facing payment screen.

To enable for Square for Restaurants:

  1. Sign in to your Square Dashboard and enable Team Permissions.
  2. Click Settings > Device Management > Points of sale > POS devices.
  3. Select Square Stand.
  4. Scroll to Team Management and enable Lock POS backing out of customer-facing payment screen under Passcode Options.
  5. Click Save.

Once enabled, a passcode will be required to change the payment method after you’ve begun a credit card transaction and are ready to swivel your Square Stand.

Managing Locations

To create a new location:

  1. From your online Square Dashboard, navigate to Account & Settings > Business > Locations.
  2. Click Create Location and enter the appropriate information, such as location name, address, business logo, working hours, etc. > Save.

You can access your new location by logging out of your Square Point of Sale account and logging back in with the same email address and password. From here, you should see the option to select your new location. Learn more about managing multiple locations with Square Point of Sale.

To manage locations with device codes:

  1. From your online Square Dashboard, navigate to Account & Settings > Business > Devices.
  2. Click Create Device, enter a nickname for your Square Stand and select the appropriate location.
  3. Click Create.

You can send your device code by text message or email. This device code will be associated with the corresponding location and can be used to log in to the account associated with your location instead of using an email address and password. Learn more about device codes and how they work with your business locations.

Viewing and Customising Reports

Learn more about viewing and customising reports from the online Square Dashboard and from the Square Point of Sale app.

Accessing Stand Details

The Stand details page provides a helpful summary of the current device status as well as information on USB accessories like printers, barcode scanners, card readers, printers, and any other USB-connected accessories.

With an additional tap, you can view important hardware information like serial number and software version, which is useful if you need to contact customer support. You can also use this page to restart your Square Stand.

To get started:

  1. Once your iPad is docked into the Stand go to the Settings of the Point of sale app on your iPad.
  2. Tap Hardware > Square Stand under My Hardware. This page provides your summary of connected devices and allows you to restart the device.
  3. Tap Get Help and then Device details to view detailed information like serial number and software version.

Hardware Accessories

Square Stand is compatible with USB, Bluetooth and network hardware accessories, including: cash drawers, receipt printers, barcode scanners and scales. Learn how to Connect Recommended Hardware to Square Stand.

Pair Stand with other Square Hardware

Square Stand’s built-in contactless and chip and PIN reader will work perfectly for most businesses. However, if you’d like to take payments at a greater distance or add a dedicated display, you can customise your setup by pairing Stand with one of the following.

Square Reader

Square Reader Left: Square Reader (1st generation) with Dock for Square Reader (sold separately).
Right: Square Reader (2nd generation) with Bosstab Dock for Square Reader (sold separately).

Connecting a Square Reader to take payments at a distance is simple. Just plug the included USB cable (or optional Dock for Square Reader) to the USB hub on the Square Stand. You can also pair the Square Reader wirelessly using a BLE connection. Once the reader connects with your Square Stand, it will automatically activate during the checkout process of your next sale.

Features:

  • Chip and PIN cards
  • Contactless cards
  • Apple Pay, Google Pay
  • Wireless
  • Rechargeable battery
  • Optional dock

Square Terminal

Square Terminal

Square Terminal is an all-in-one standalone product that can pair as a second customer-facing screen for the Square Stand. Square Terminal accepts all payment types: magstripe cards, chip and PIN cards, contactless cards, Apple Pay and Google Pay. Simply pair the Terminal with the Stand via wireless connection, send a sale to the terminal, and allow your customer to complete the payment.

Features:

  • Magstripe cards
  • Chip and PIN cards
  • Contactless cards
  • Apple Pay, Google Pay
  • Wireless or Ethernet connection
  • Rechargeable battery
  • Second screen for distance customer use
  • Standalone point of sale when not paired with Stand
  • Receipt printer

Watch this video to learn more about connecting Square Terminal to your Stand.

Note: If using Square Terminal with Square Stand (2nd generation), we recommend disabling the Buyer-facing screen to make it easier to push payment to the Terminal. Do this by tapping More > Settings > Payment and toggling the default view to ‘All payment types.’ Learn more about identifying your Square Stand.

Use Your Square Stand

After you’ve set up your new Square Stand, you’ll be ready to start accepting payments! 

Whether you need to quickly process a sale for one of your customers or review your transaction reporting for a specific time frame, Square Stand allows you to do it all.

Accepting Payments

S3 Stand Tap and Dip Payments

  1. From the Checkout screen, enter a custom amount, add an item from your Library or Favourites page or use a barcode scanner to scan the item’s UPC/SKU.
  2. Tap Charge and swivel the Square Stand to face your customer.
  3. Your customer can either tap or insert their card into the Square Stand or use their smart device to complete a contactless payment. They can also choose to enter their information after the sale to receive an email or text message receipt.

Learn more about accepting payments with Square Stand and Fees and Payments FAQ.

Adding Customers to a Sale

  1. From the Checkout screen, tap Add customer when reviewing your sale.
  2. Select an existing customer from your directory or tap Create Customer to add a new customer.
  3. From the existing customer’s directory profile or from the newly created customer’s directory profile, tap Add to Sale.
  4. Tap Charge to complete the sale as normal.

Learn more about managing your Customer Directory through the online Square Dashboard.

Reviewing Transaction History

  1. From the Square app, tap More and then tap Transactions.
  2. Review your transaction history in chronological order or use the search bar to locate transactions based on card number, phone number, customer name, receipt number, notes and/or item name.

Once you’ve located the transaction in question, you can take actions such as issuing a refund or resending a receipt. You’ll also have insights into the transaction as a whole, including items sold, payment method used and customers associated with the transaction.

Learn more about reviewing your transaction history through the online Square Dashboard.

Troubleshooting

If you have any trouble with your Square Stand, check out the following articles for help.

Can't find what you need?