Schedule and Accept Appointments
Spend more time on your business and less time organising your schedule by managing your calendar, client appointments, and your time from your Square Appointments Plus or Premium account.
New to Square Appointments? Activate your account and get started with a free 30-day trial.
Business Hours and Locations
Once you’ve activated your account, set your business locations, hours, and public profiles from the Business information tab of your online Square Dashboard. Your designated business hours will automatically be bookable hours.
Note: The business hours you set for Square Appointments initially set staff availability. You can customise these hours at any time from Staff. If you update staff hours, these changes will not update the business hours you set. You can also Customize Availability on a weekly basis for one-off schedule changes.
Schedule Client Appointments Online
To schedule client appointments from your Square Appointments dashboard:
Go to Appointments > Calendar.
Click and drag the block of time you’d like to book or click Create Appointment. The pop-up window allows you to schedule your appointments. Selecting Find availability opens a side window for selecting date and time slots where you have open availability.
Note: To optimise the Find availability feature, check that your staff availability and service duration are accurate and up to date.-
Schedule an appointment and include details such as client contact information, appointment location, notes, or add a Card on File for your client. All client information is saved to your Client List. Learn more about client management.
Note: For repeat appointments, the price will initially reflect the price at the time of the first booked appointment but can be updated at any time.
You can add an additional service by clicking the Add a service drop-down menu.
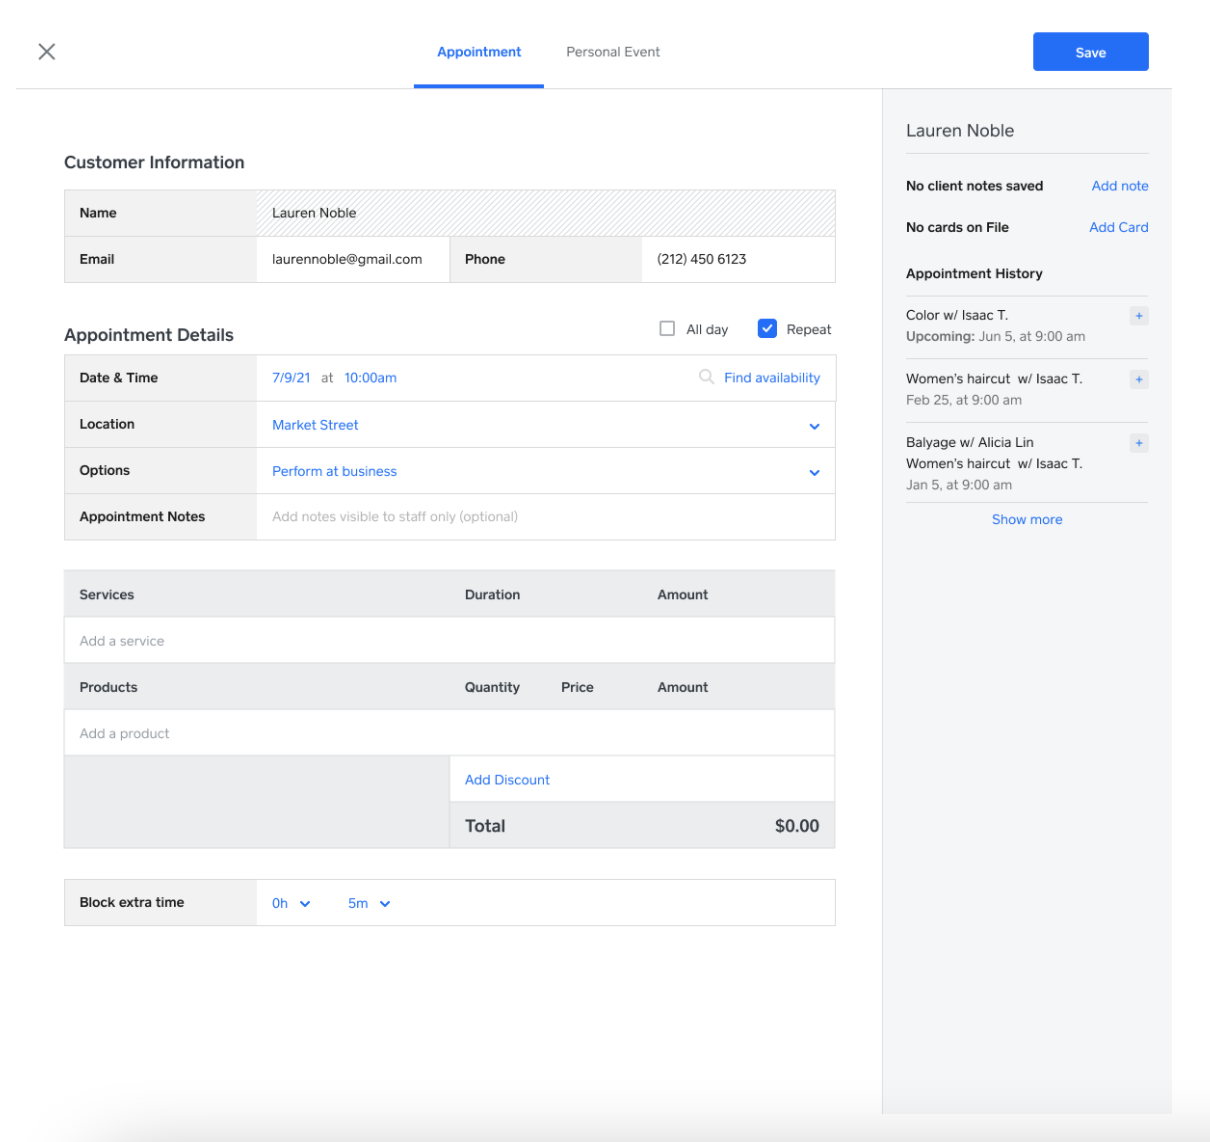
When adding a service, you will see a Recently Booked option that makes it easier to find and select recently booked services at your business location. This option allows you to quickly create new appointments based on previous bookings.
In the example shown above, the service has 15 minutes blocked off to allow for cleanup. If any service that’s part of a multiple service appointment has blocked off time configured, that will appear as the last step in the appointment. You can adjust the blocked off time as needed or set it to None to remove it completely. If you try to book over an existing appointment, you’ll see a notification warning you before you double-book.
The total appointment time and cost is auto-calculated and displayed at the bottom.
Online Scheduling
Available time slots will show according to your setting in the Appointments > Settings > Calendar and Booking > Online Schedule > Appointments are scheduled.
Set online scheduling settings to manage the following:
According to service duration: Splits your availability into time slots that match the duration of the service. For example, 20 minute services will split your available time into 20-minute slots.
On the quarter hour: Displays available slots on the quarter hour. For example: 3:00, 3:15, 3:30, 3:45.
On the half hour: Displays available slots on the half hour. For example: 3:00, 3:30, 4:00.
On the hour: Displays available slots at the top of the hour. For example: 3:00, 4:00, 5:00.
Note: These are the same settings that apply to how time slots display on your Online Booking Site.
Schedule Client Appointments In-App
You can schedule appointments via the free Square Appointments app on compatible iOS or Android devices or Square Register. To do so:
iOS or Android Device
- Tap Calendar.
- Tap + or press and hold the desired time slot > tap Create Appointment.
- Add a customer, staff member, and services.
- Add an optional contract or appointment notes.
- Tap Save.
- Tap Customer Notifications to select if and how you’d like to notify your customer. You can add an optional message to your client.
- Tap Book Appointment.
Square Register
- Tap Calendar.
- Tap + or press and hold the desired time slot > tap Appointment.
- Add an existing customer by searching for their name, email or phone number or create a new Customer Profile.
- Add the services and optional items.
- Tap the service/item to select the staff performing the service.
- Add an optional contract or internal note for your staff.
- Tap Save.
- Tap Notification Type to select if and how you’d like to notify your customer. You can add an optional message to your client.
- Tap Create Appointment.
You can also press and hold a nonrecurring appointment to drag and drop it to a new time or day.
Allow Clients to Book Appointments Online with Multiple Services
By default, clients will not be able to book appointments with multiple services online. To enable your online booking site to support booking multiple services from your Appointments Dashboard:
Click Appointments > Settings > Calendar & Booking.
Under "Online Scheduling," toggle on Allow multiple services to be booked online.
Once enabled, clients will be able to select more than one service for a single appointment from your online booking site.
Note: Clients will only be able to select a combination of services that a single staff member can provide, so there’s no need to worry that clients will book an appointment that you can’t handle.
Schedule Personal Events
Create a personal event to schedule a block of time on the calendar as busy or available.
This will ensure your clients can view an up to date calendar and can book appointments directly from your website and your Square booking site using the website booking tools.
Create and Schedule Appointments with Square Messages
You can create and send appointments to your customers with Square Messages in your online Square Dashboardor your Square Appointments app for iOS and Android. Reply to your customers via email or text after they send you an initial message with Square Messages or initiate new conversations with your customer via email or text with Square Messages Plus.
Note: Creating a new appointment through Square Messages is only available through the Square Appointments POS app or on your Square Dashboard.
To do so:
Log in to your online Square Dashboard and click the Messages icon from the top navigation bar. From your Square Point of Sale app, tap ≡ More > Messages.
Select an existing conversation from your inbox or select the pencil icon to create a new message.
Select (+) and choose Appointment.
Add the appointment information then select Save.
Enter the notification information then select Send.
The appointment will appear on your calendar.
Note: If your customer is not in your Square Customer Directory, you can add them as a new customer and add their email and phone number for future appointments and purchases.
Manage Square Appointments
From Overview in your Appointments dashboard, you can see your pending and upcoming appointments as well as client messages at a glance.
To confirm a pending appointment, click Decline or Accept. Your client will be notified of your response.
If declined, the pending appointment will drop off the Overview page and your calendar.
If accepted, the appointment moves to your Upcoming Appointments and is confirmed and reflected on your calendar.
Click any upcoming appointment to view the appointment details, make changes, or cancel the appointment.
You can also accept appointments directly from Calendar. Pending appointments appear on your calendar. Click any pending appointment and click Accept or Decline.
Staff Appointments
From Calendar, you can also manage each added staff members’ calendar. Add vacation or time off so clients know when you and your staff are away.
Choose the combined schedule view to see all booked time or the side-by-side view to simultaneously see upcoming appointments for each staff member.
Learn more about managing your staff with Square Appointments.
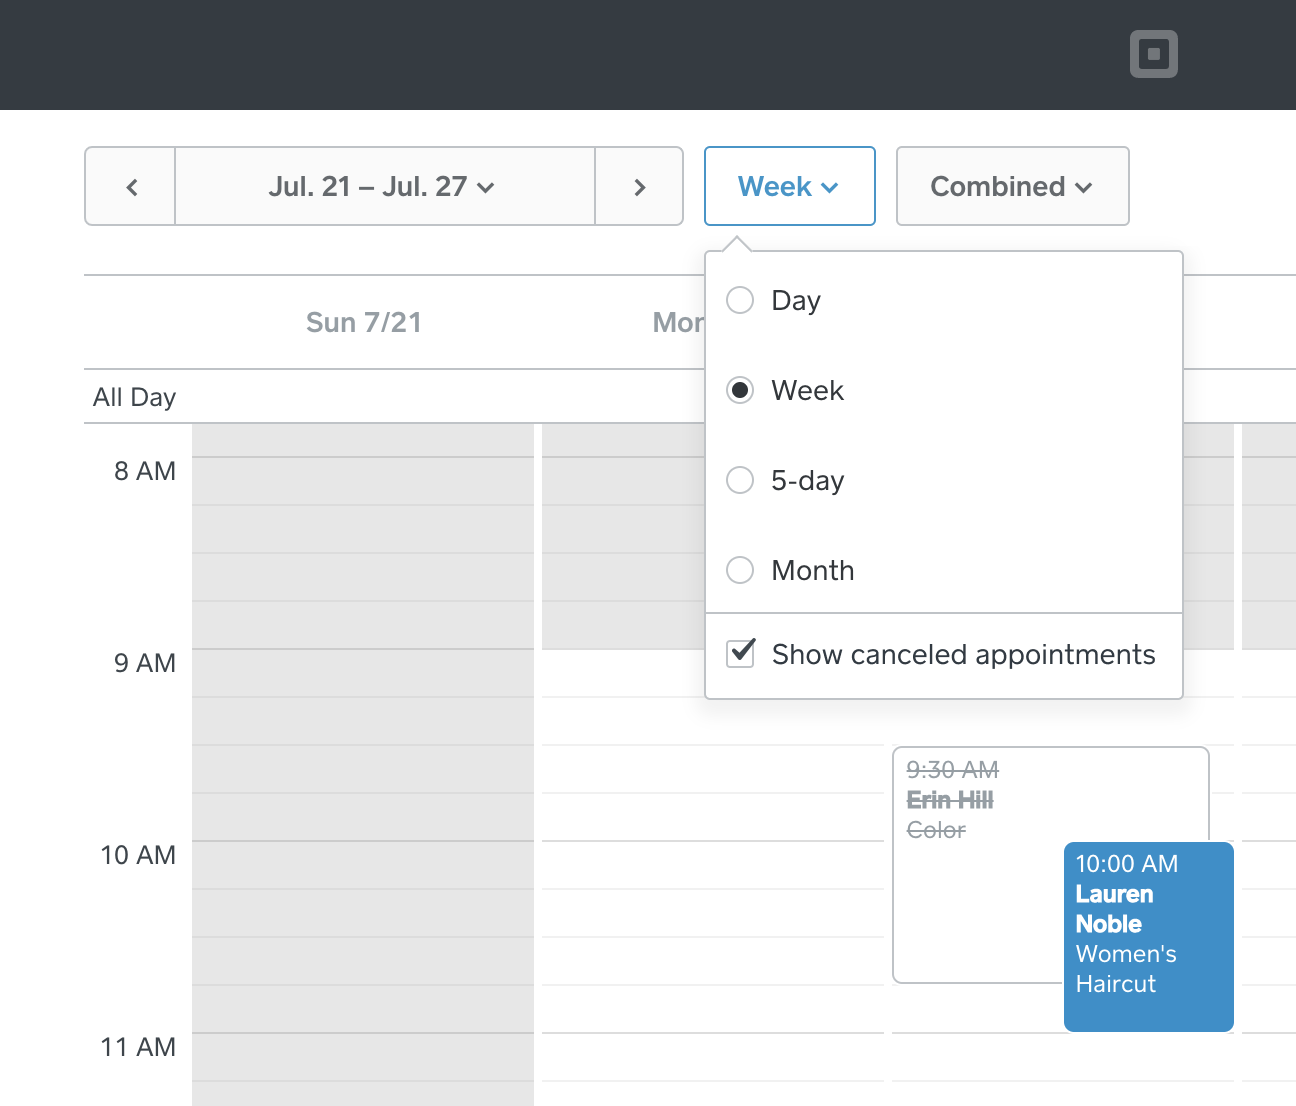
View Canceled Appointments
You can view canceled appointments on your calendar from your Square Appointments Dashboard.
To do so:
Go to Appointments > Calendar from your online Square Dashboard.
Click on your calendar view.
Click on either Day, Week, 5-Day, or Month.
Select Show canceled appointments.
Note: Clients have the option to cancel an appointment at anytime while the appointment is still pending.
Manage Your Appointment Notifications
You and your staff can receive email and text message appointment notifications. From Staff, click any staff member to edit their notification settings. Click “Owner sent a copy” for each staff member to receive copies of all appointment notifications.
Action-based notifications are sent to specific recipients when an appointment is created or changed. Notifications are sent based on who takes action.
A client books (or requests to book) an appointment: The client, staff assigned to the appointment, and the owner will receive notifications.
A staff member schedules or edits their own appointment: The staff member can send the client a customised email or text notification. The staff taking the action and the owner will not receive notification of the appointment.
A staff member schedules or edits an appointment for a different staff member: The staff taking the action can send the client a notification via email or text. Both the staff member assigned to the reservation (not taking action on the appointment) and the owner will get notifications.
Learn how to manage your calendar from the Square Appointments App.
Manage Appointment Communications
Under the Communications tab of your Appointments dashboard, you can configure confirmations, reminders, digital contracts, or email notifications.
Choose when and how your clients receive confirmations and reminders regarding their appointments. If a client hasn‘t confirmed by the time a reminder is scheduled, we will resend the confirmation request within the reminder message.
If toggled on, choose between text message, email, or both as the confirmation method.
Choose when to send the confirmation request between 2 hours prior to up to 1 week prior to the appointment.
Tip: Confirm your client's email or phone number — particularly for new clients — to ensure your client receives the appointment confirmation request or reminder.