Connect Hardware to iPads
Connect supported receipt printers, cash drawers, barcode scanners, and scales to the Square app on the iPad. If you have any connectivity issues after following the steps below, learn how to troubleshoot your hardware.
Create a Printer Profile and Connect a Printer to Your iPad
Use printer profiles to save your settings to your device and easily swap between connected printers.
Ethernet Receipt Printer
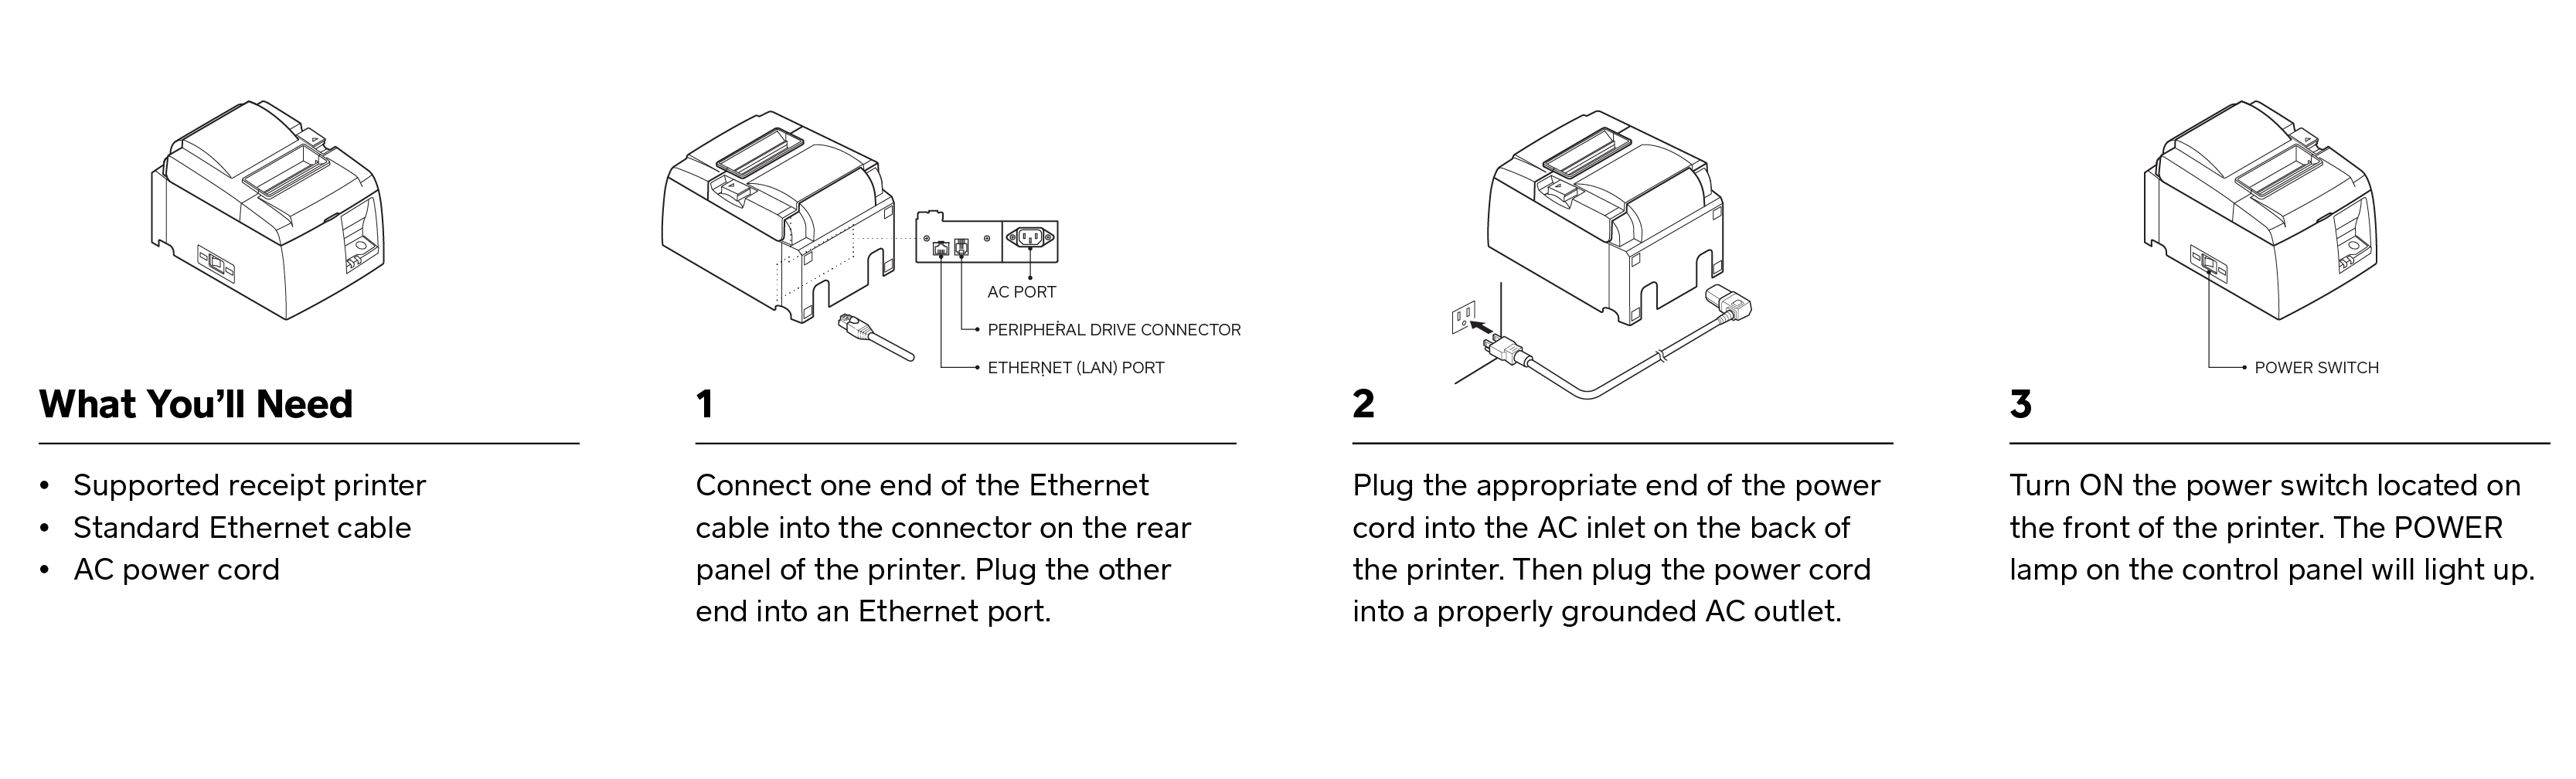
To get started:
Make sure your printer has an Ethernet Interface. You can order swappable interfaces, but be sure to request the Ethernet connection type on your printer.
Locate your Wireless router with an Ethernet Port.
Make sure you have a strong Wi-Fi signal.
Check that your receipt printer and iOS device are connected to the same Wi-Fi network.
Check your device permissions that Square can access your local network. Toggle ON for Local Network in your device Settings > Square > Local Network to enable access, then relaunch the Square app.
To connect your Ethernet Interface printer:
Connect one end of the Ethernet cable into the rear panel of the printer, and plug the other end of the cable into the wireless router’s Ethernet port.
From the Square app, tap More > Settings > Hardware.
Select the printer from the hardware list and tap assign to profile. You can create a new printer profile or assign the printer to an existing profile.
To create a new printer profile:
Enter a name for your printer profile and specify what the printer profile will be used for, such as Receipts, In-person order tickets, Online order tickets, Order ticket stubs and Void tickets.
Review your printer settings - including the option to Automatically Print Receipt, Enter Custom Name or Number, Auto-Assign Ticket Numbers or selecting the specific categories to print on the ticket.
Tap Save.
To connect multiple iPads to the same Ethernet printer, assign each device to the same printer profile.
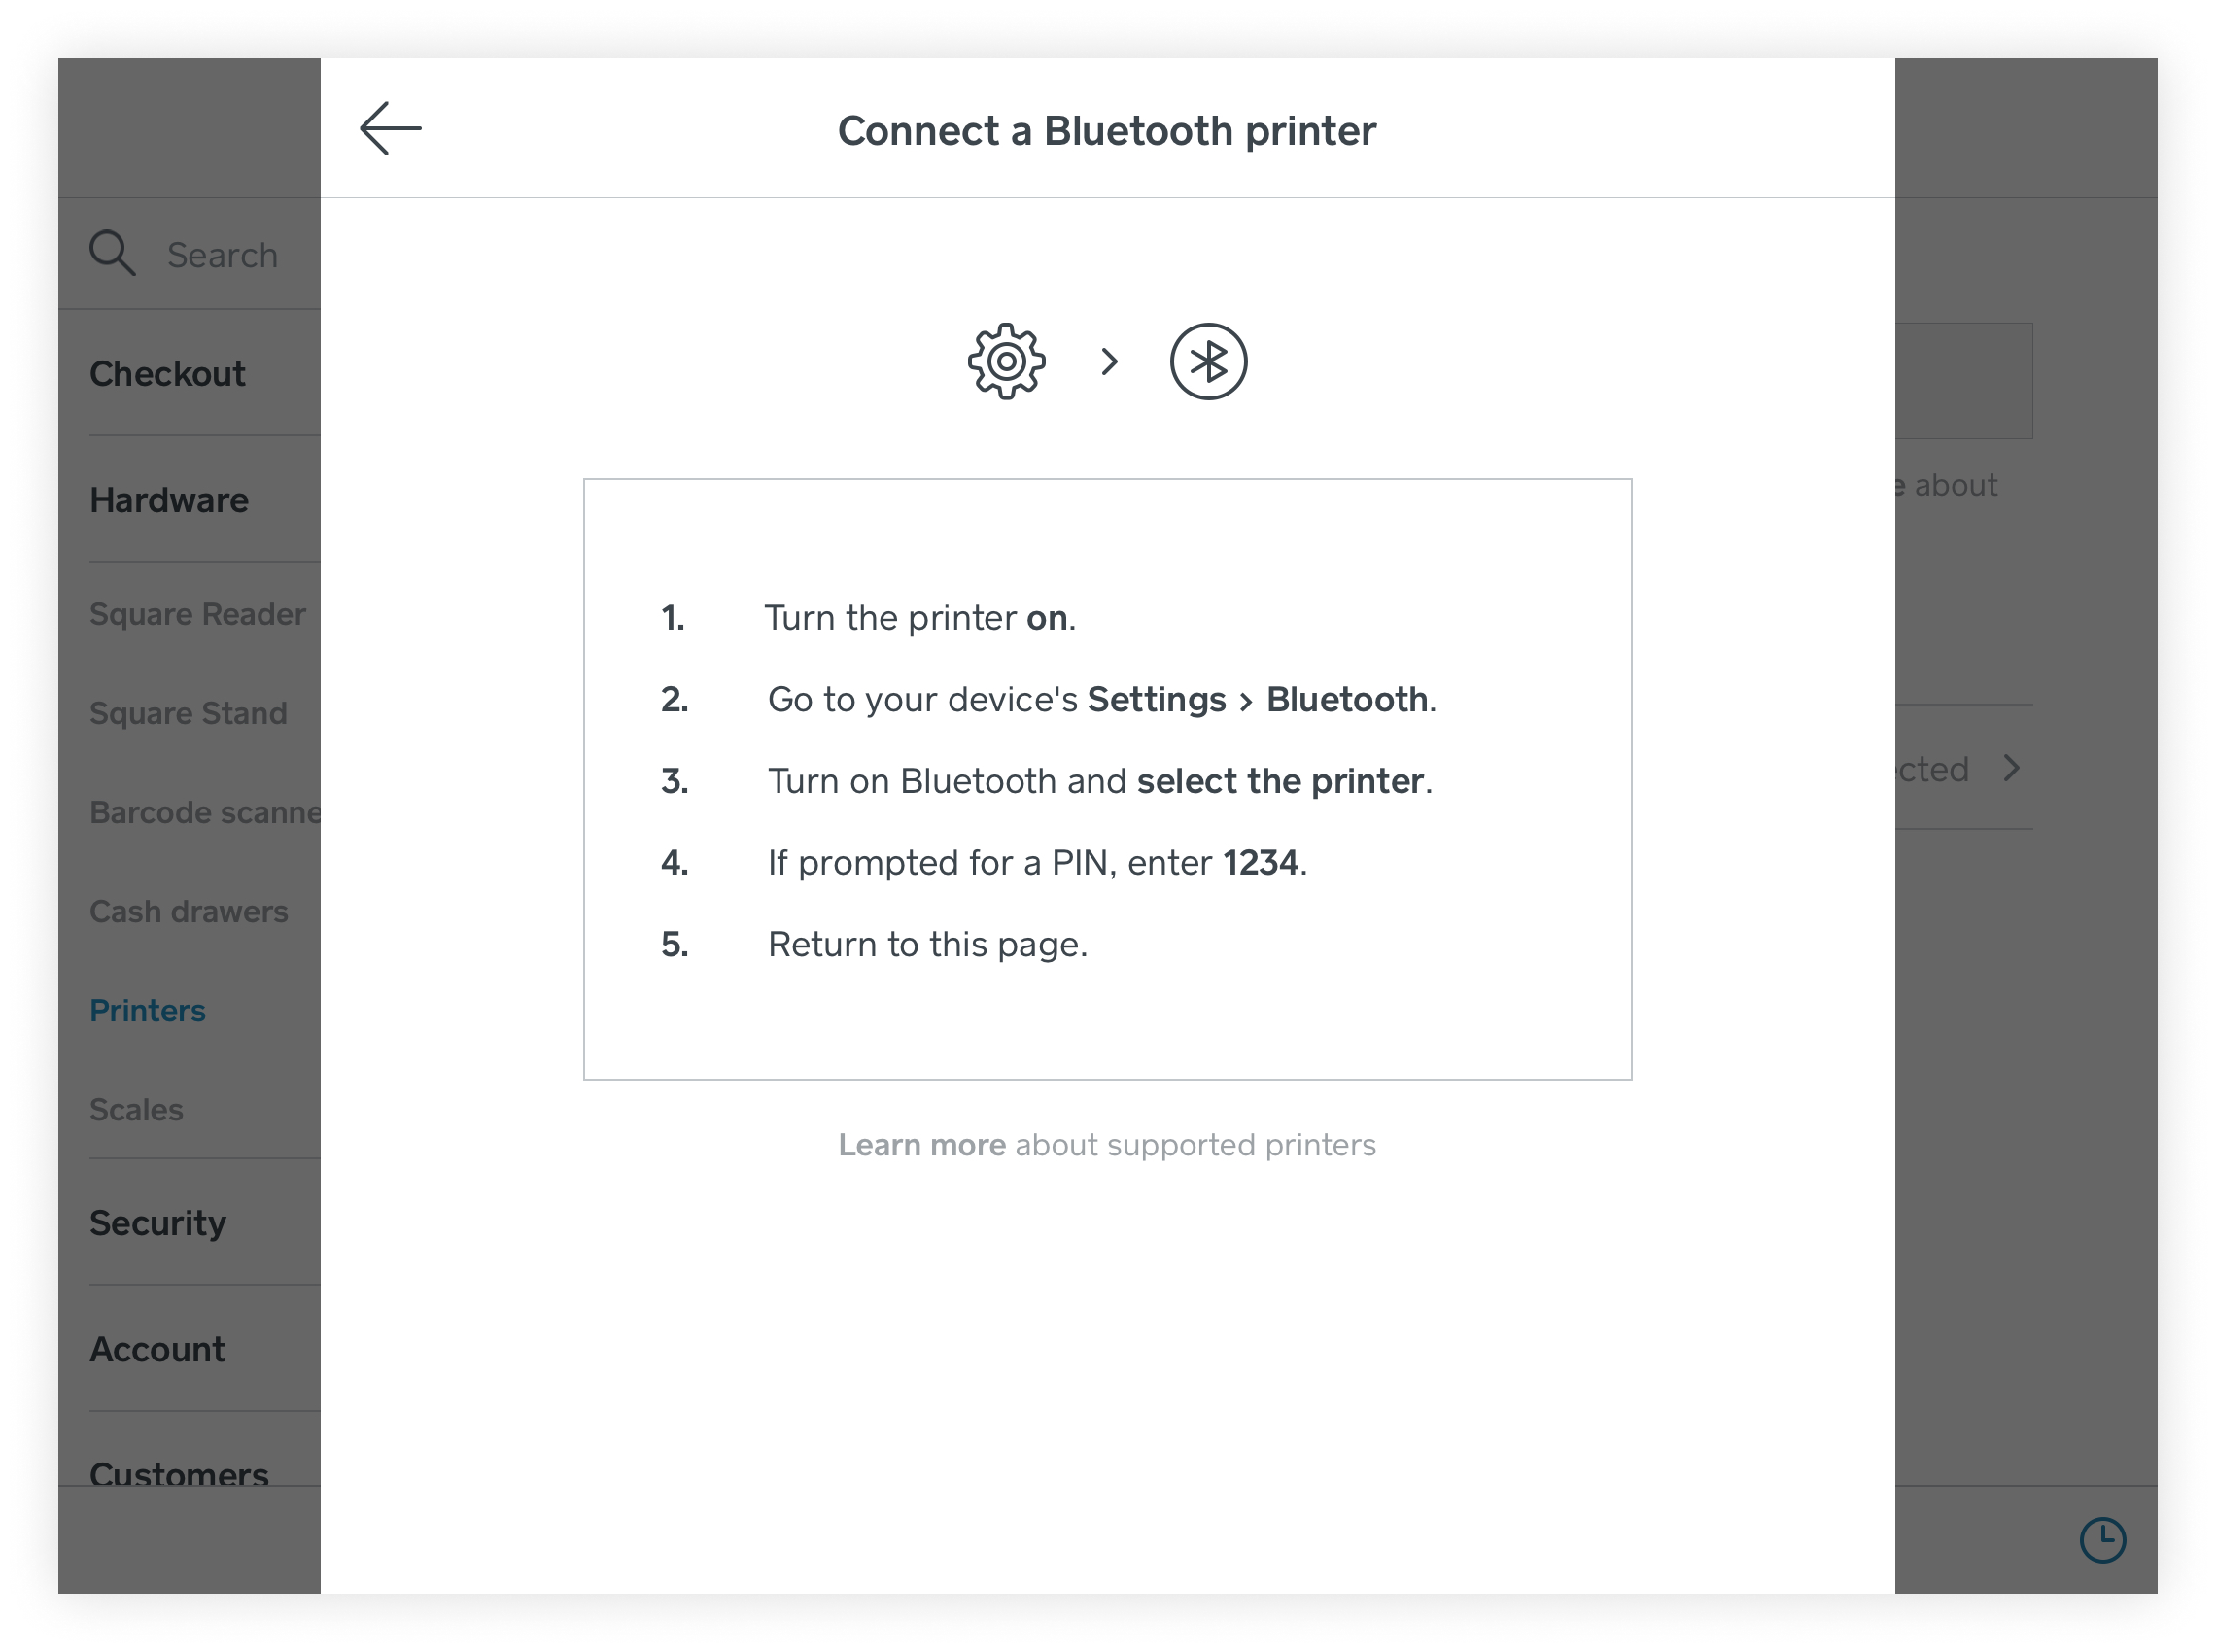
Bluetooth Printer
To get started:
Plug the power cable into the power supply port and into an outlet.
Plug the round adaptor end into the hole labelled DC24 in the back of the receipt printer.
You may need to pull back the casing on the plug in the direction of the arrow, in order to insert it into the receipt printer.
Turn the receipt printer on by pressing the switch on the side of the unit.
From the iPad’s home screen, tap Settings > Bluetooth > toggle Bluetooth on.
If you have the Star Micronics TSP-654II, hold down the larger of the two red buttons at the back of the printer labelled “PAIR” for approximately 10 seconds until the light next to the button starts to flash. If you have the Star Micronics TSP-143II, it should automatically turn on in pairing mode.
Select ‘Star Micronics’ from the list of Bluetooth devices available on your iPad.
Press the iPad’s home button > tap and open the Square app.
To connect your Bluetooth Interface printer:
From the Square app, tap More > Settings > Hardware > Printers > Create Printer Profile.
Enter a printer profile name.
Tap Printer and select your printer.
To test your Bluetooth connection, tap Test Print.
Toggle on Receipts, In-person order tickets, Online order tickets to print orders for prep stations, Order ticket stubs to give an order reference to a customer, and/or void tickets. If you turn on Order Tickets, you’ll also need to select which categories from your item library you’d like to print on the Order Ticket.
Tap Save.
Connect USB Printer to Square Stand
Plug your supported USB receipt printer into a power source.
Plug your USB cable from your printer into the USB accessory hub.
From the Square app, tap More > Settings > Hardware > Printers > Create Printer Profile.
Enter a printer profile name.
Tap Printer and select your USB printer. To test your printer connection, tap Test Print.
Toggle on Receipts, In-person order tickets, Online order tickets, Order ticket stubs, and/or void tickets. If you turn on Order Tickets, you’ll also need to select which categories from your item library you’d like to print on the Order Ticket.
Tap Save.
Note: If your Epson TM-T82ii USB printer isn’t able to be selected, your printer might be in Ethernet mode. To change it to USB mode, follow these steps:
Turn off the printer.
Hold down the Feed button and turn the printer back on. Release your finger from the Feed button, then press and hold it down for more than one second. A printout should then print containing the current printer settings and some menu options.
Go to Mode Selection by holding down the Feed button for more than one second.
To select Customise Value Settings, press the feed button 3 times, then press and hold it for more than one second on the 4th time. This will prompt for the next menu.
A menu containing 18 items will print. To select Interface Selection, press the feed button 17 times, then press and hold it for more than one second on the 18th time. This will prompt for the next menu.
To select the interface to USB, press the feed button 2 times, then press and hold it for more than one second on the 3rd time. This option is now saved.
Turn the printer off then on.
Open the Square Point of Sale app, then follow the steps above to finalise set up.
Connect Cash Drawer to iPads
A cash drawer must be connected via a receipt printer to open automatically. Otherwise, you’ll need to manually open the drawer using the cash drawer key. To link your cash drawer to the Square app on your iPad, connect it to a supported receipt printer via the RJ11 port labelled DK on the back/underside of the printer.
Ensure you have toggled on Receipts, In-person order tickets, Online order tickets, Order ticket stubs, and/or void tickets in your printer profile settings in the Square app for the cash drawer to open automatically.
Once the cash drawer is set up, it’ll automatically open in the following scenarios:
Cash payments
Cash refunds
Payments entered as other tender
Each time Paid In or Paid Out during a cash drawer session is selected
Note: Mobile Bluetooth receipt printers aren’t compatible with cash drawers at this time.
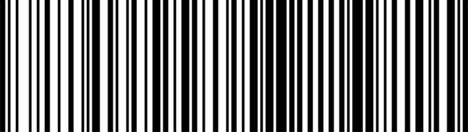
Connect Bluetooth Scanner to iPads
-
Scan the bar code below to put your Bluetooth Socket Mobile SocketScan S700 into iOS pairing mode.
Visit your iPad’s Settings.
Make sure Bluetooth is toggled on.
Tap Socket S700 from the Devices menu to pair it.

Note: Bluetooth can pair with only one mobile device at a time. To pair your Bluetooth hardware with a different iPad, you’ll first need to unpair it.
Unpair your scanner
Hold the Trigger button (large button) and the Power button (small button) down together until you hear 3 beeps.
Release both buttons.
Follow the same steps above to pair your barcode scanner to a different iPad.
Connect USB Scale to Square Stand
To connect your supported CAS PD-2 USB scale to Square Stand:
Plug the 9-pin male end of the serial-to-HID adapter into the null modem adapter/null modem cable. Then plug the male end of the null modem adapter/null modem cable into the port on your scale. To keep the adapter firmly connected, twist the security screws into place.
Plug the micro-USB end of the cable into the adapter, and plug the USB-A side of the cable into the USB accessory hub on Square Stand.
To check the connection, open the Square Point of Sale app and tap More > Settings.
Tap Hardware > Scales.
The connected scale should appear in the app menu as USB Scale.
Learn how to connect scales to Square Point of Sale.