Accept payments with Square Stand
The Square Stand family includes the classic first generation and the reimagined second generation. Learn how to accept payments using both models below.
Not sure which Square Stand you have? Learn how to Identify Your Square Stand.
Square Stand (2nd generation)
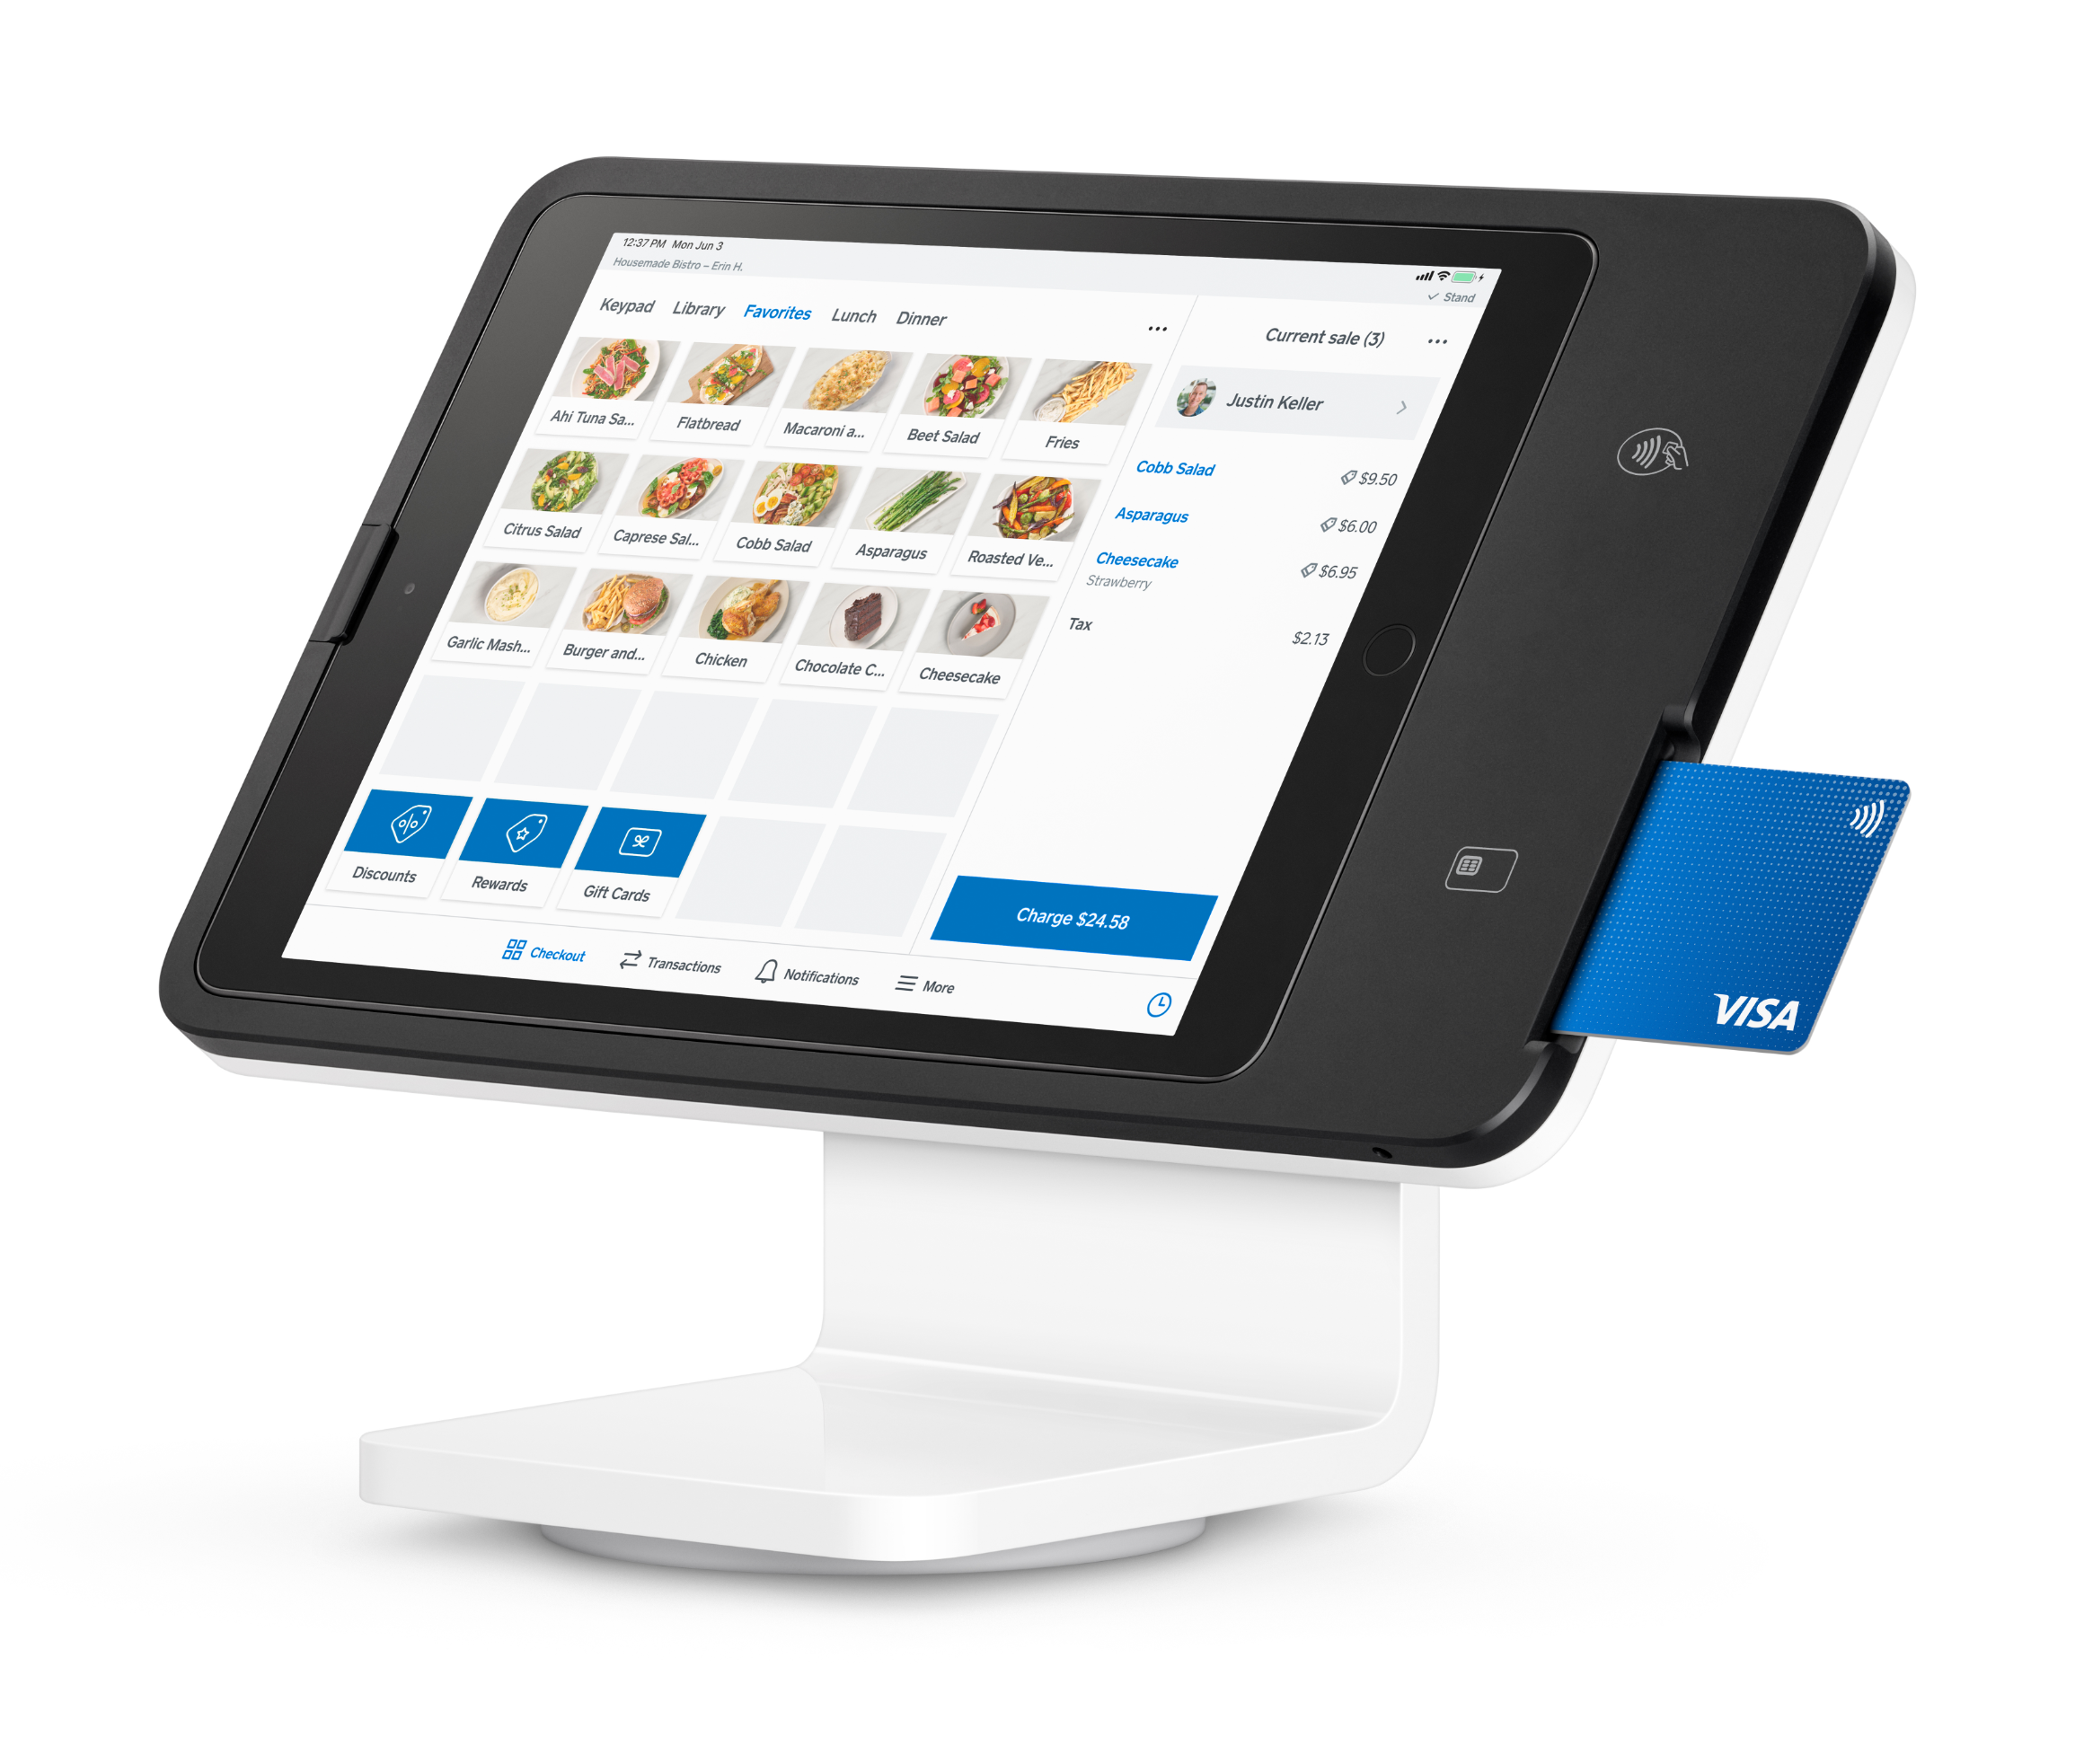
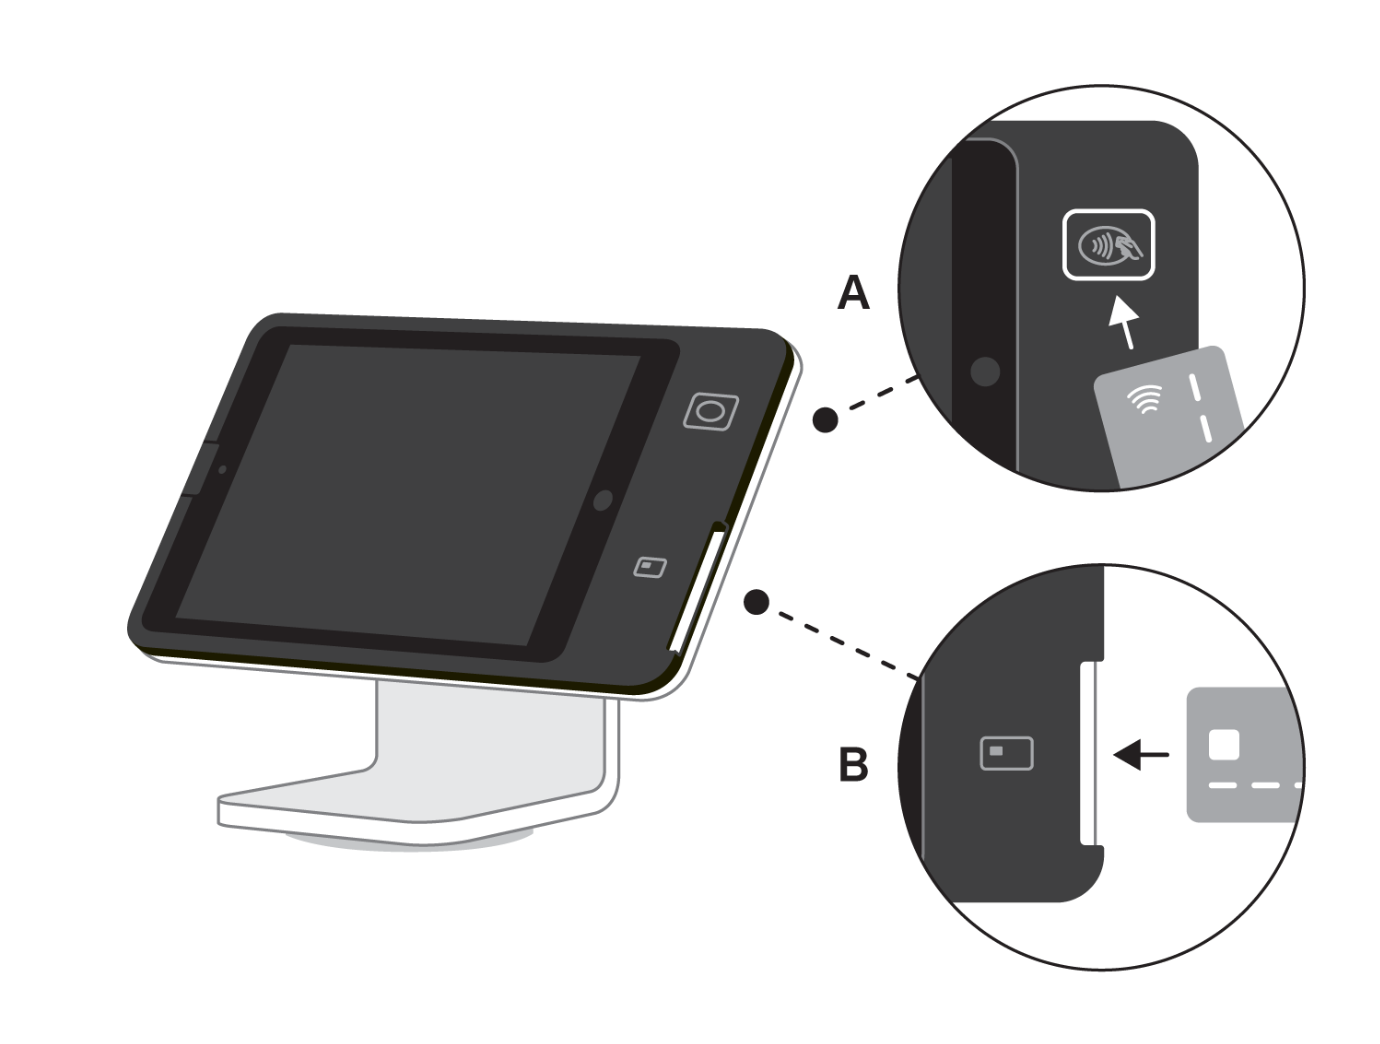
Once you’ve set up your Square Stand with your compatible iPad, you can accept payments directly with the built-in card readers via:
Contactless cards, including Apple Pay, Google Pay or Samsung Pay.
Chip and PIN cards.
Note: Swiping a payment card or gift card is not available on Square Stand (2nd generation).
Using your Square Stand (2nd generation)
- Sign in with the email address and password associated with your Square account.
- If you’ve created items, tap the item(s) you’d like to sell from your Item Library or Favourites Page, or scan the barcode of an item with a SKU saved to your Item Library. Your item will be added to the current sale on the right.
- To enter a custom sale amount, tap Keypad. You can also select a variable price item saved to your Item Library.
- Tap on the item in the the right-hand panel to add a description, create modifications, change the quantity and apply tax. When you’re done, tap the “X” icon or Save.
1.Tap Charge to checkout, and swivel Stand 180 degrees to face the customer.
- The customer-facing checkout screen will prompt the customer to pay on the right side of Stand by either inserting their card into the chip reader or tapping their contactless card or mobile device near the flashing contactless icon.
- To view other payment options, including cash or manual card entry, tap All payment options in the upper left corner prior to swiveling Stand toward the customer. If you don’t regularly swivel your Square Stand to your customers, you can set this to be the default payment screen in Checkout settings.
For additional security, you may require a passcode to change payment types on the customer-facing checkout screen. To learn more, view the Enable Checkout Passcode section below.
Note: Square Stand (2nd generation) must be plugged into a power source all times to take payment.
- With tipping enabled, your customer will see the option to leave a tip on the screen.
- Once the payment has completed, select your customer’s preferred receipt delivery method (if applicable). If your Square Stand is connected to a receipt or kitchen printer, you also can print a receipt and kitchen ticket.
Square Stand (2nd generation) can accept offline payments if your internet connection becomes temporarily unavailable. There are duration limitations associated with how long you can accept offline payments once you go offline and how long you have to upload offline payments once you regain internet connectivity.
You’ll have up to one hour from when your Square Stand (2nd gen) goes offline to accept offline payments and up to 24 hours from when your device goes offline to reconnect to the internet and upload those offline payments. Any offline payment that is not processed within 24 hours will expire and the funds will not be received from your customer.
Note: Afterpay transactions, physical and eGift Cards, and eftpos/swipe-only cards will not work with offline payments.
Offline payments must be enabled while connected to the internet, prior to going offline.
To enable offline payments:
- From the navigation bar at the bottom of your screen, tap ≡ More.
- Tap Settings > Checkout > Offline payments.
- Toggle Allow Offline payments to on.
- Review the information and then tap Allow.
- To set a limit for card transactions taken offline, enter an amount next to Per Transaction Limit.
Disable offline payments by tapping ≡ More > Settings > Checkout > Offline payments > turn off.
Once offline payments are enabled, an offline session will automatically activate whenever your internet connectivity is unavailable. A notification banner at the top of your device will indicate it has automatically entered into an offline session accompanied by a countdown clock showing how much time you have left to accept offline payments. You will receive an in-app notification when your offline session has expired or if it was interrupted. After you have regained internet connectivity and uploaded your offline payments, another offline session will activate if you lose connectivity again.
Offline payments will appear as pending from your in-app payment history while your device is offline. When you reconnect your device to the internet, payments will show as completed and will be visible from your online Square Dashboard. Customers’ digital receipts and your payment notification emails will also be sent when the device is back online.
If you have pending offline payments:
- Do not delete the Square app.
- Do not sign out of the Square app or your Square account.
- Do not factory reset the device that has taken offline payments.
Pending offline payments will be permanently lost and the funds won’t be captured if you log out of your Square account, delete the Square app, or factory reset the device that has taken offline payments. Make sure you process these payments by reconnecting your device to the internet within the 24 hours time limit.
There is additional risk with any offline payments you accept. Square is not responsible for any loss due to declined cards or expired payments taken while offline. In addition, Square can not contact any customers on your behalf should an offline payment be declined or expire.
Refer to the Offline Payments section of the
Payment Terms for terms and conditions that apply to this feature. Learn more about offline payment specifics for offline session duration, Square hardware, connected hardware, and acceptable payment types.
Square Stand (1st generation)
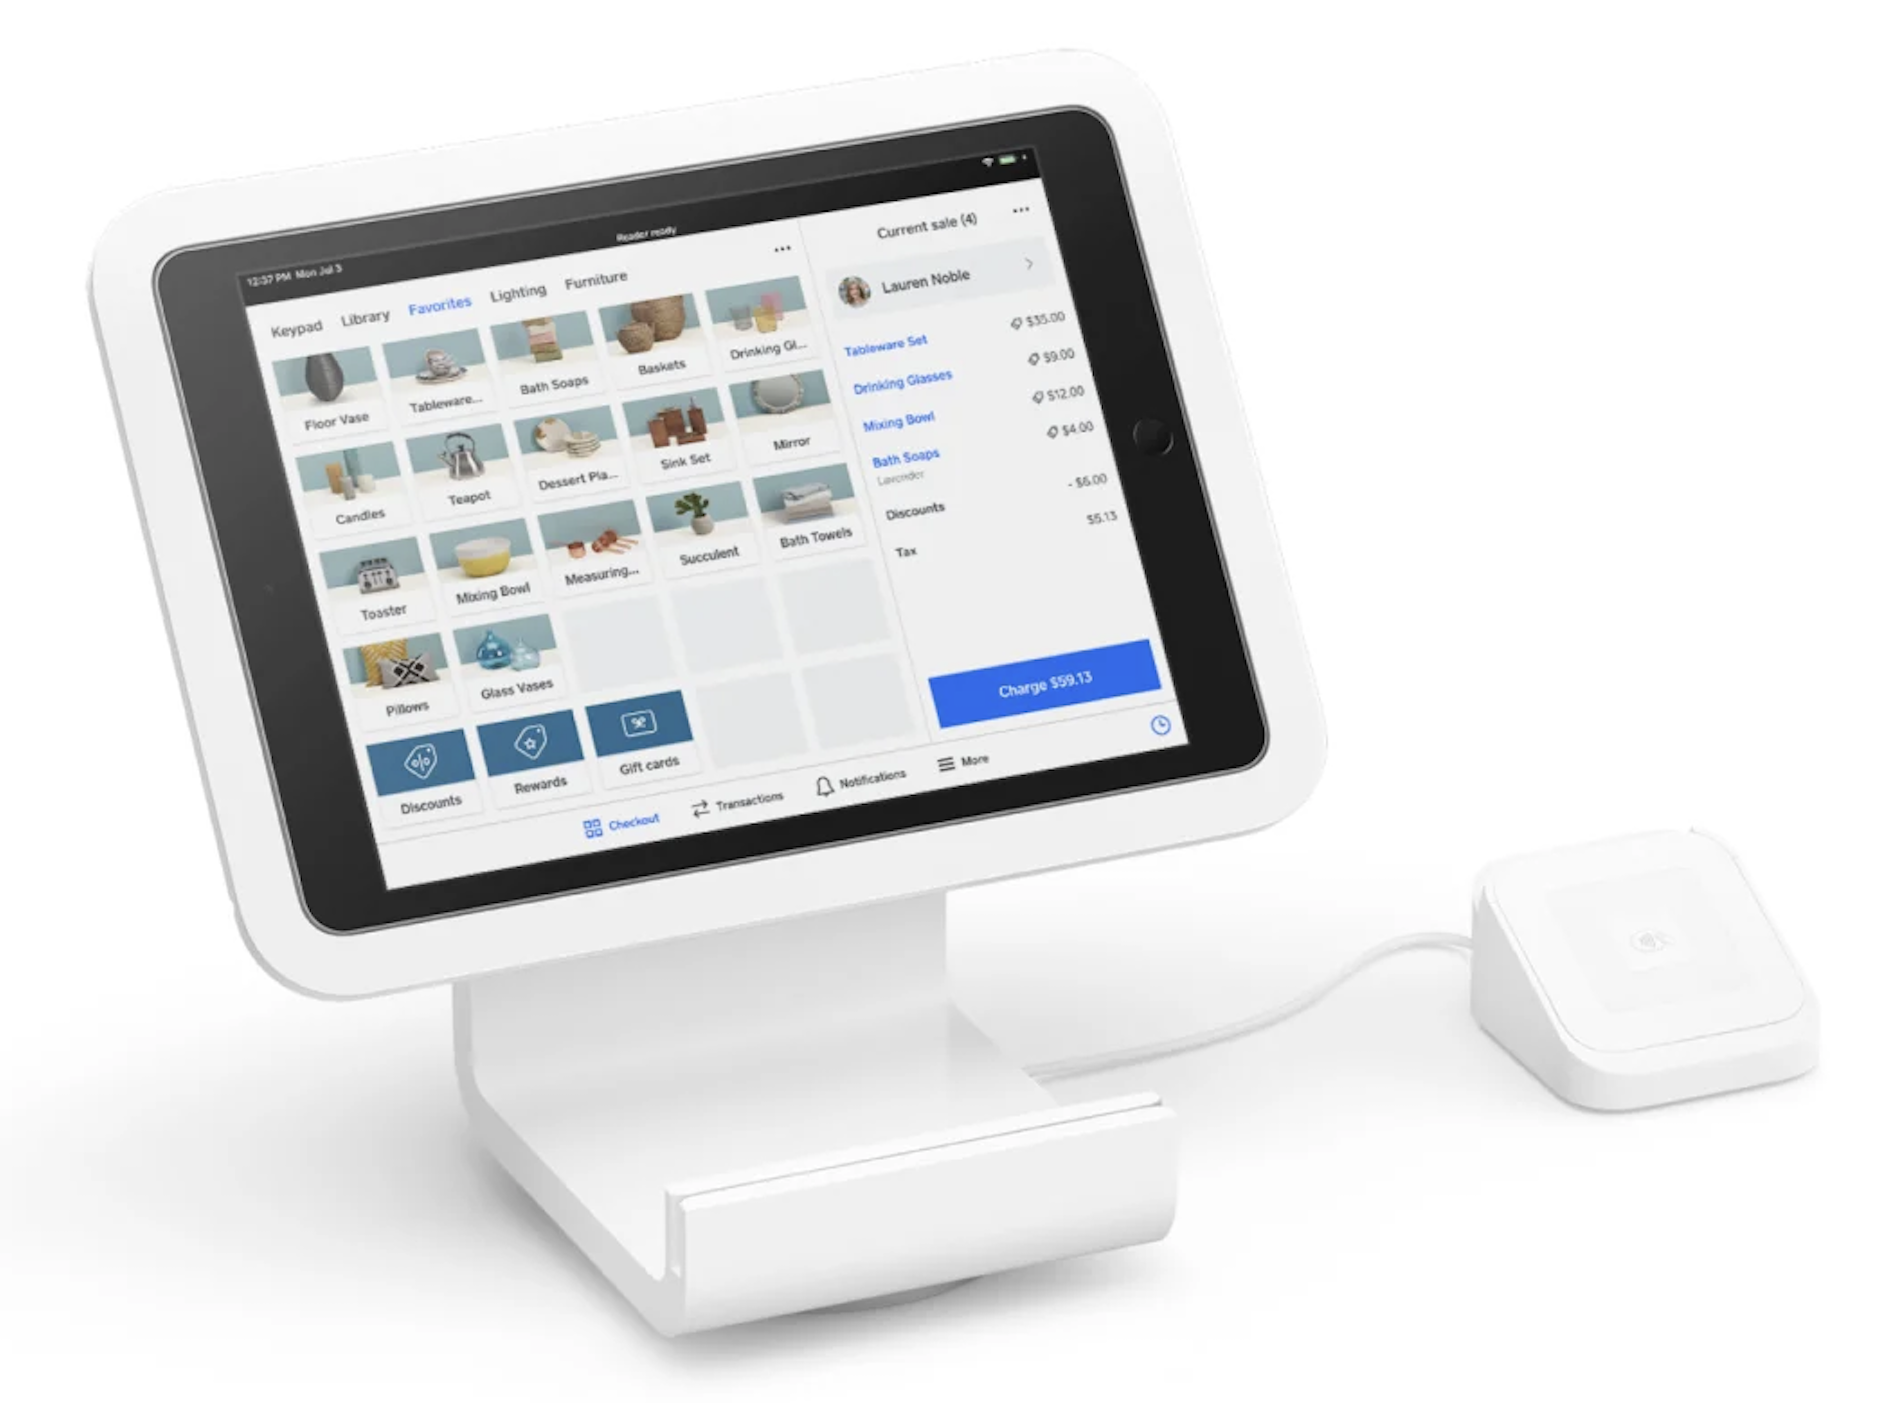
Once you’ve set up your Square Stand with your iPad, you can accept contactless and chip and PIN payments on the Square Reader. You can also accept contactless payments from Apple Pay or Google Pay-enabled devices.
Note: The newly improved Square Reader (2nd generation) is available with compatible Bosstab Dock and can be connected to Square Stand (1st generation) via USB-A to USB-C cable.
Using your Square Stand (1st generation)
- Sign in with the email address and password associated with your Square account.
- If you’ve created items, tap the item(s) you’d like to sell from your Item Library or Favourites Page, or scan the barcode of an item with a SKU saved to your Item Library. Your item will be added to the current sale on the right.
- To enter a custom sale amount, tap Keypad. You can also select a variable price item saved to your Item Library.
- Tap on the item in the the right-hand panel to add a description, create modifications, change the quantity and apply tax. When you’re done, tap the “X” icon or Save.
- Tap Charge to check out.
- Tap or insert your customer’s card using the Square Reader, or manually enter payment card information while your iPad is secured in the Square Stand.
When Square Stand (1st generation) is not plugged into a power outlet, it utilises the iPad’s battery as a power source.
In this mode, the Square Stand (1st generation) will allow you to swipe magstripe cards and connect to the Square Reader via Bluetooth to accept tapped and inserted chip card payments if your device has an internet connection, such as 4G or 5G.
Square Stand (2nd generation) must be plugged into a power source all times to accept payments.
Note: USB accessories are not supported if Square Stand is not connected to a power outlet.
- With tipping enabled, your customer will see the option to leave a tip on the screen.
- Once the payment has completed, select your customer’s preferred receipt delivery method (if applicable). If your Square Stand is connected to a receipt or kitchen printer, you also can print a receipt and kitchen ticket.
Accept Square Gift Cards
There are multiple ways to accept Square Gift Cards with Square Stand.
During the checkout process:
- Navigate to all payment options.
- Select Gift Card.
- Either manually enter the gift card details or press the camera icon to scan the physical gift card using your iPad’s front-facing camera (only available for newer gift cards).
Note: Swiping a payment card or gift card is not available on Square Stand (2nd generation).
- Swipe the gift card through your Square Stand’s in-built magstripe reader track.
- During the checkout process:
- Navigate to all payment options.
- Select Gift Card.
- Either manually enter the gift card details or press the camera icon to scan the physical gift card using your iPad’s front-facing camera (only available for newer gift cards).
Enable checkout passcode
If you are interested in using additional security features on your Square Stand (2nd generation), you can enable free Team Permissions. Team Permissions requires a passcode to take certain actions, such as cancelling a sale or changing the payment method displayed on the customer-facing screen.
This feature can be enabled directly on the Square Point of Sale app and Square Appointments app. Square for Retail will automatically apply the permissions that are set in your Square Point of Sale app. To apply this feature for Square for Retail, download the Square Point of Sale app and follow these steps:
Sign in to your Square Dashboard and enable Team Permissions.
On Square Point of Sale or Square Appointments app: Tap More > Settings > Security > Passcodes.
Toggle on Passcodes.
Under Require passcode, toggle on any that apply: After each sale, To back out of a sale, To back out of customer-facing payment screen.
To enable for Square for Restaurants:
Sign in to your Square Dashboard and enable Team Permissions.
Click Settings > Device Management > Points of sale > POS devices.
Select Square Stand.
Scroll to Team Management and enable Lock POS backing out of customer-facing payment screen under Passcode Options.
Click Save.
Once enabled, a passcode will be required to change the payment method after you’ve begun a credit card transaction and are ready to swivel your Square Stand.