@Rest Stand for iPad mini Wi-Fi Kit Set Up Guide
Included in the Kit
| Heckler @Rest Stand |
| Square Reader for contactless and chip |
| Square Reader for magstripe |
| Ethernet receipt printer |
| Receipt printer paper |
| Printer-driven cash drawer |
Add-Ons
| iPad mini |
| Dock for Square Reader |
| Bluetooth barcode scanner |
| Ethernet kitchen printer (for food and beverage) |
| Kitchen printer paper (for food and beverage) |
| Security lock, wire, and anchor point |
| USB wall charger |
Let’s get set up
What You Need to Get Started
Internet access
If you purchased the optional Ethernet kitchen printer, you also need an Ethernet Internet connection (e.g., cable modem, router, and Ethernet cable).
Follow these steps to assemble your kit:
Step 1. Download our free point-of-sale app
If you haven’t already, download Square Point of Sale from the App Store to your iPad.
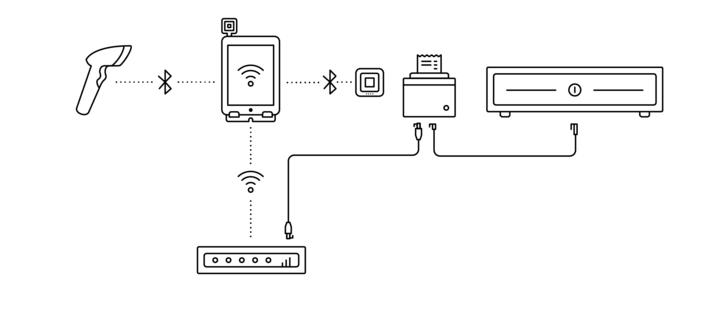
Step 2. Check your router
Make sure there are two free output ports on your router to plug things in. Keep your receipt printer close to the router for easy setup.
Step 3. Connect to Wi-Fi

Head into the Wi-Fi settings on your iPad, choose your router’s network and wait a few seconds for the signals to communicate. If you’re having trouble connecting, unplug the router’s power cord and Ethernet cable, then plug everything back in.
Step 4. Secure your iPad

Set your iPad mini on the Heckler @Rest stand. Use the included plugs to position the bottom of the iPad on the stand. If you purchased a security lock, wire, and anchor point, go ahead and get things locked down. Superglue the anchor point to your device, slip in the lock, and then loop the wire around a fixed point and attach it to the lock.
Step 5. Charge and set up the Square Reader for contactless and chip
Use the included micro USB cable to charge your Square Reader for contactless and chip. Connect the micro USB end to your reader, and the other end to a computer or outlet using a USB power adapter (sold separately).
Once it’s charged, press and release the button on your reader to turn it on. Go to Settings on your iPad and make sure Bluetooth is turned on. Open your Square app and tap the three horizontal lines on the bottom left to access the Settings sidebar menu.
Tap Settings > Hardware > Card Readers > Contactless + Chip Reader.
Put your reader into pairing mode by pressing the reader’s button for 3 to 10 seconds. Remove your finger as soon as you see orange flashing lights.
Note: If you see red flashing lights, you’ve held the button for too long, and you need to try again. When connected, the reader will be listed as Ready.
Step 6. Plug in the Square Reader for magstripe

To connect your Square Reader for magstripe, simply plug it into your iPad’s headset jack.
Step 7. Connect your receipt printer

Connect one end of your printer’s Ethernet cable to your printer and the other end to one of your router’s output ports. Plug your printer into a power source, then switch on the power button. Place your receipt printer on the counter next to your @Rest Stand.
Step 8. Connect your kitchen printer (optional)

Just as you did with the receipt printer, connect one end of the Ethernet cable to your kitchen printer and the other end to another of your router’s output ports. Plug your printer into a power source, then switch on the power.
Step 9. Add paper to your printer(s)
Lift the lever on the top-right side of your printer, open it up, and rest the printer paper inside. The trick is to keep the roll underhand, leave a little slack, and then shut the top with some paper sticking out. Once you get a solid green light, it’s good to go.
Step 10. Set up your cash drawer

Take the interface cable (labeled CD-014A) from the cash drawer packaging. The larger end plugs into the bottom of your cash drawer, and the smaller end plugs into the DK port on the back of your receipt printer.
Your Square app is designed to automatically open the cash drawer after every cash sale. Or you can use the included manager keys to manually open the cash drawer.
Step 11. Connect your barcode scanner (optional)

Use a coin to remove the back panel on the barcode scanner, load the batteries inside, and snap everything back in place. Hold down the button on the scanner to turn on Bluetooth. Go to your iPad settings, make sure Bluetooth is turned on, and then select the scanner to pair.
Step 12. Test it out
Open your Square Point of Sale app. Tap the three lines on the bottom left to access the Settings sidebar menu.
Tap Settings > Hardware > Printers. From here, you’ll see all available printers. Select your printer from the list and make sure to turn on Receipts, Order Tickets, and/or Order Ticket Stubs.
Then tap Cash Drawers, select your cash drawer, and tap Test Cash Drawer to make sure it pops open automatically.
Then tap Barcode Scanners and make sure your scanner appears in the list of connected devices. Test it by scanning a barcode.